Company Manual
Login as a Company
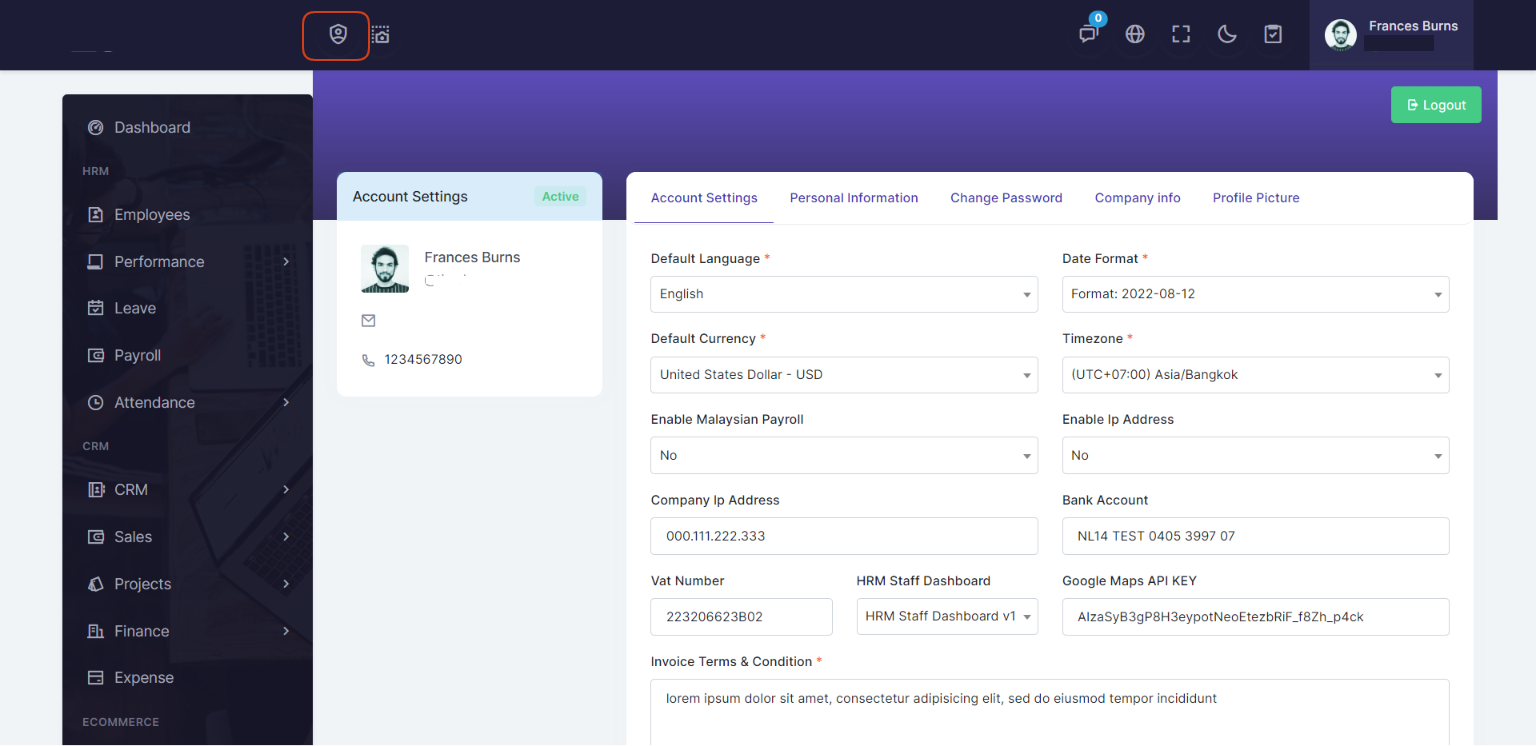
After login to company panel, Go to company profile page and update information like set default language, date format, default currency, timezone, Personal information, company profile picture, company information, change password and Google Maps API KEY
Google Maps API KEY: This will use for to show employee clockin and out location in map.
Upgrade Subscription
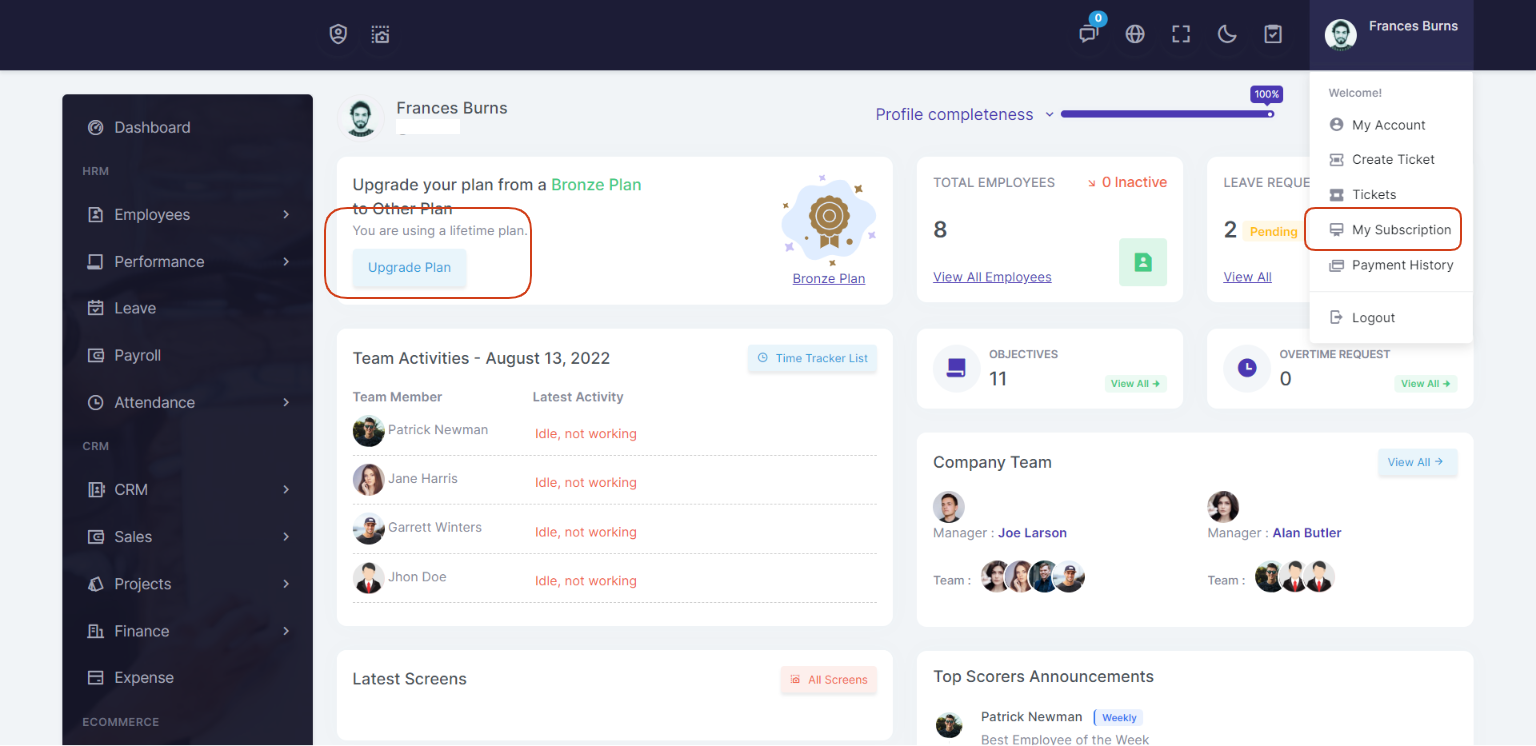
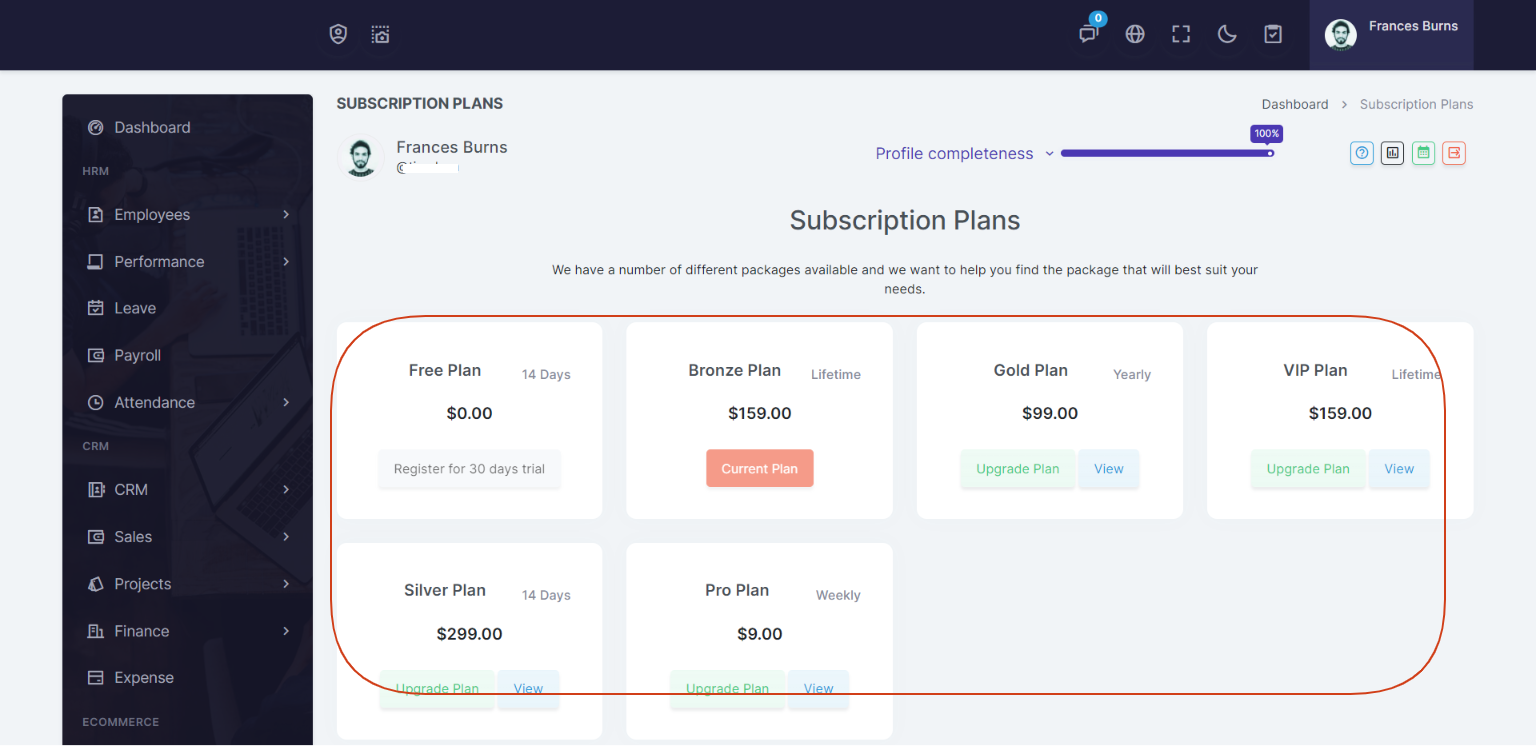
To upgrade your Subscription, click on Upgrade Plan on dashboard or click on My Subscription link from top right menu, you will redirected to subscription list page
Necessary Modules
After profile setup, you can setup the necessary company modules first to use the system smoothly:
- Department
- Designation
- Office Shifts
- Setup Roles
- Competencies
When you add above modules data in the system, then you easily add more data in the system according to your requirements.
1: Department
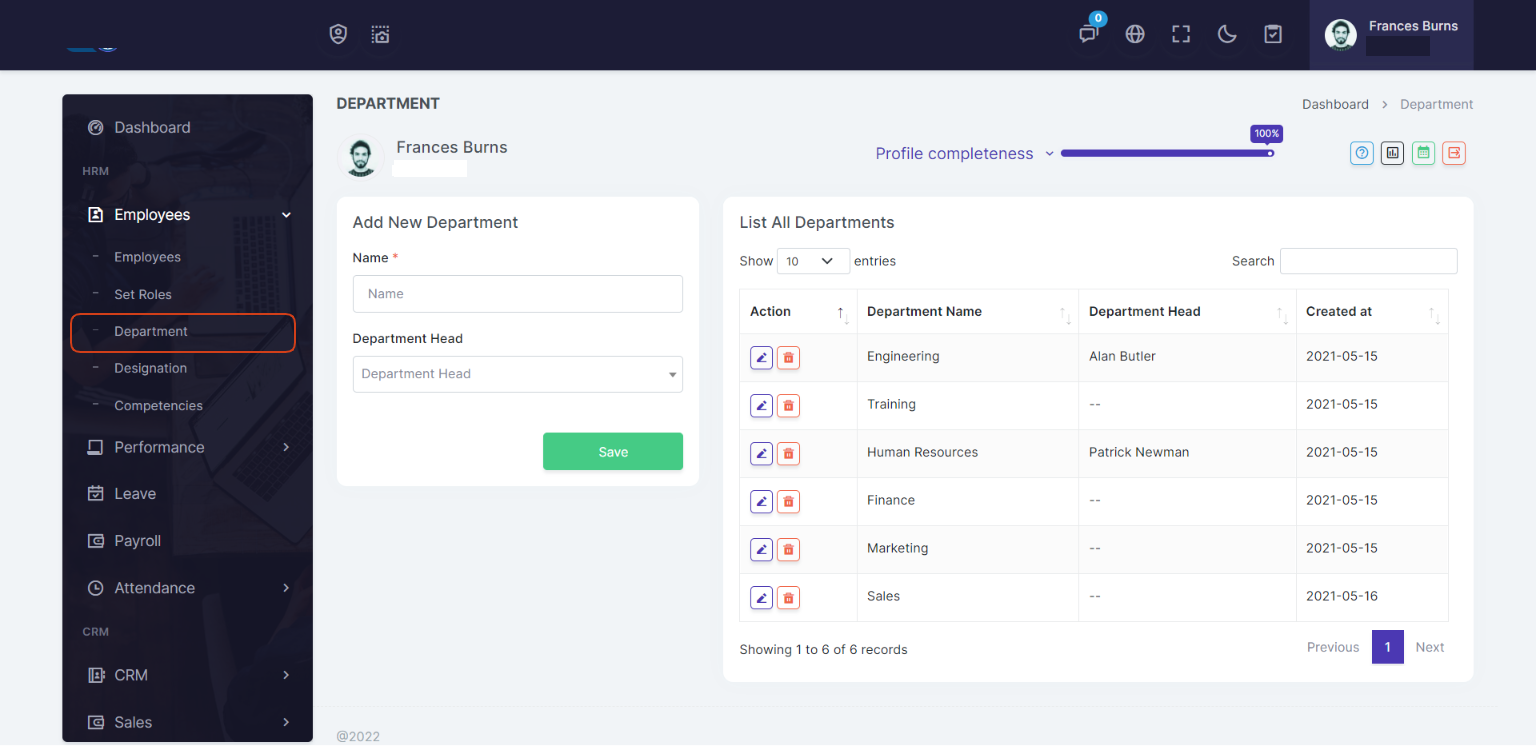
Go to Employees > Department page and enter department details
You can add multiple departments, and under one department administrator can add multiple designations. Administrator can edit / update any department information anytime.
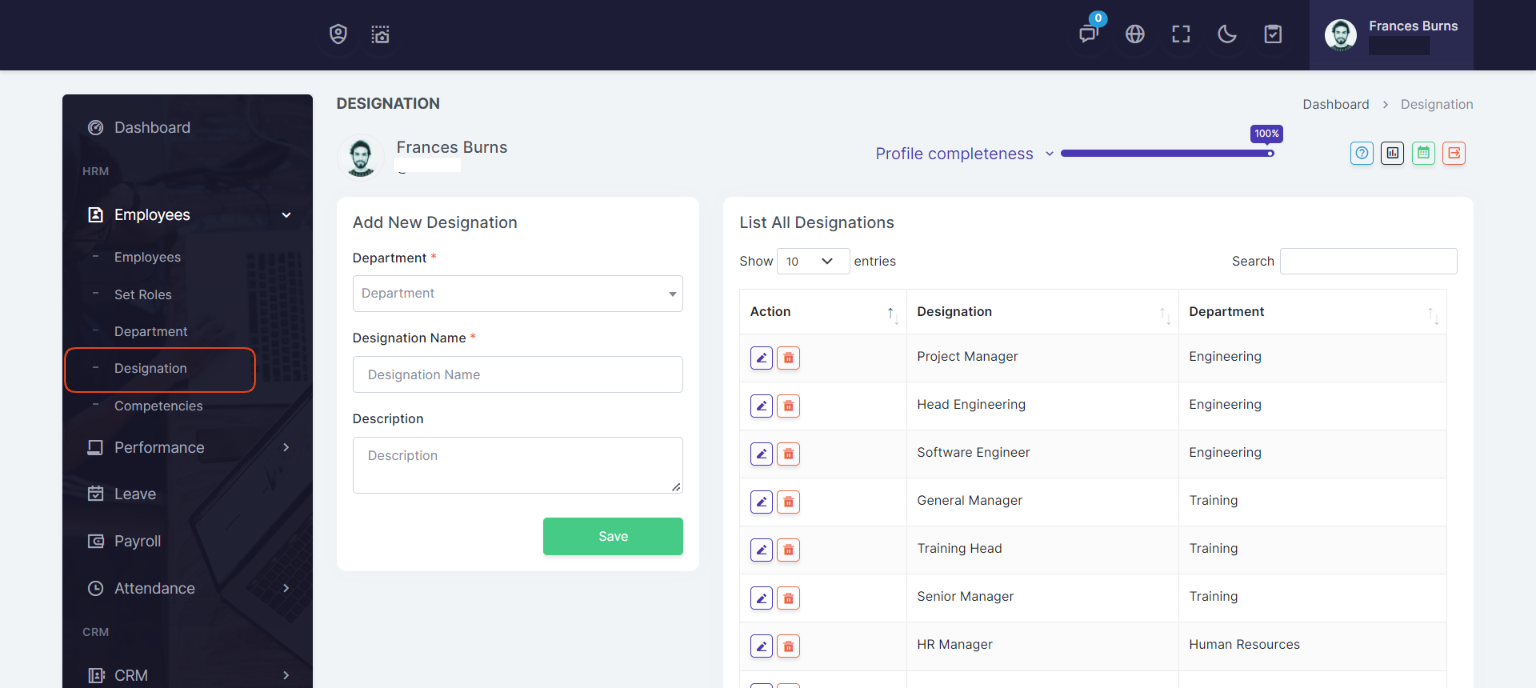
2: Designation
Go to Employees > Designation page and enter designation details
You can add multiple designations, and under one designation administrator can add multiple employees. Administrator can edit / update any designation information anytime.
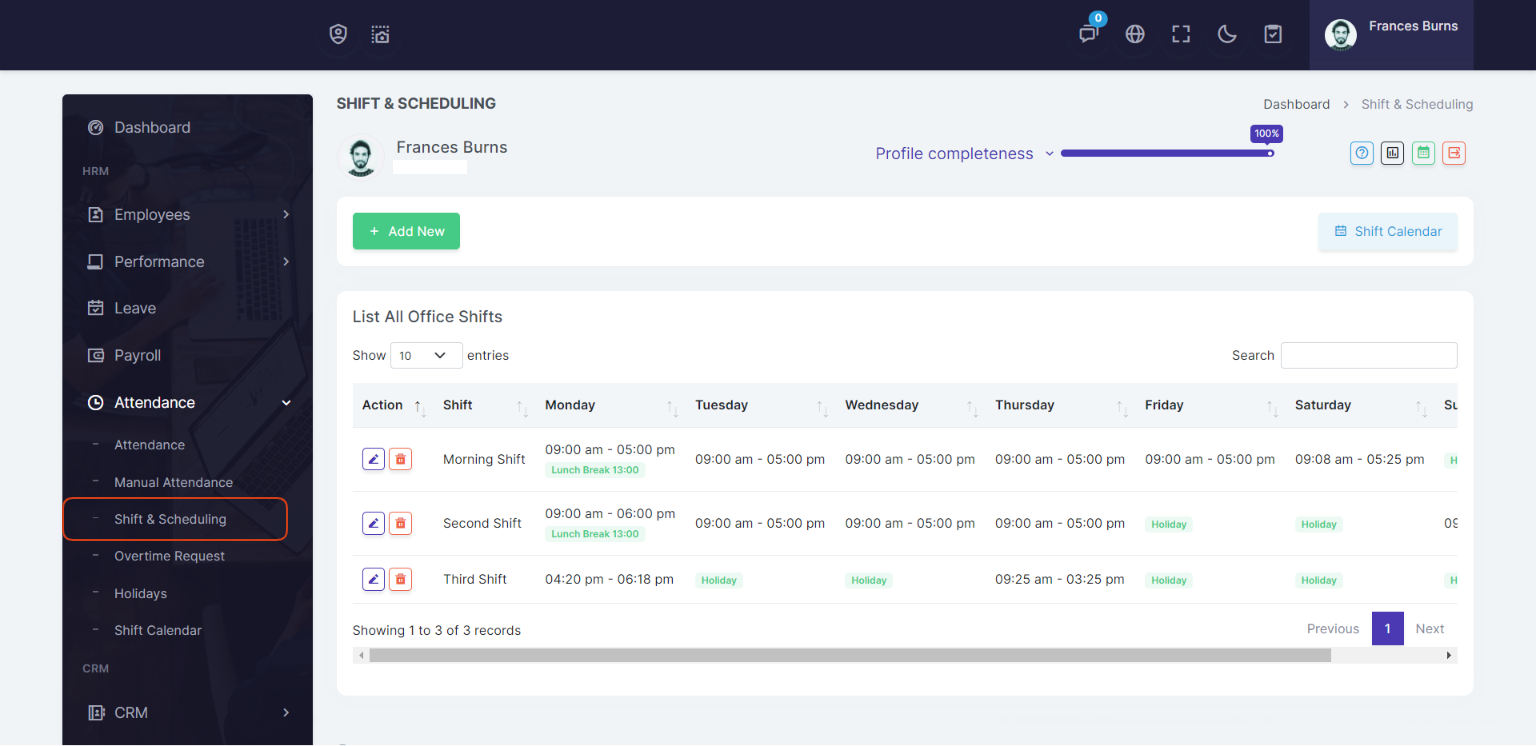
3: Office Shifts
Go to Attendance > Shift & Scheduling page and enter Shift details
Office shift is a good feature in Human Resource Management System, in office shifts you can create many shift, like first shift, second shift, third shift etc etc, and also you can set timing for each shift, and can assign the shift to employees.
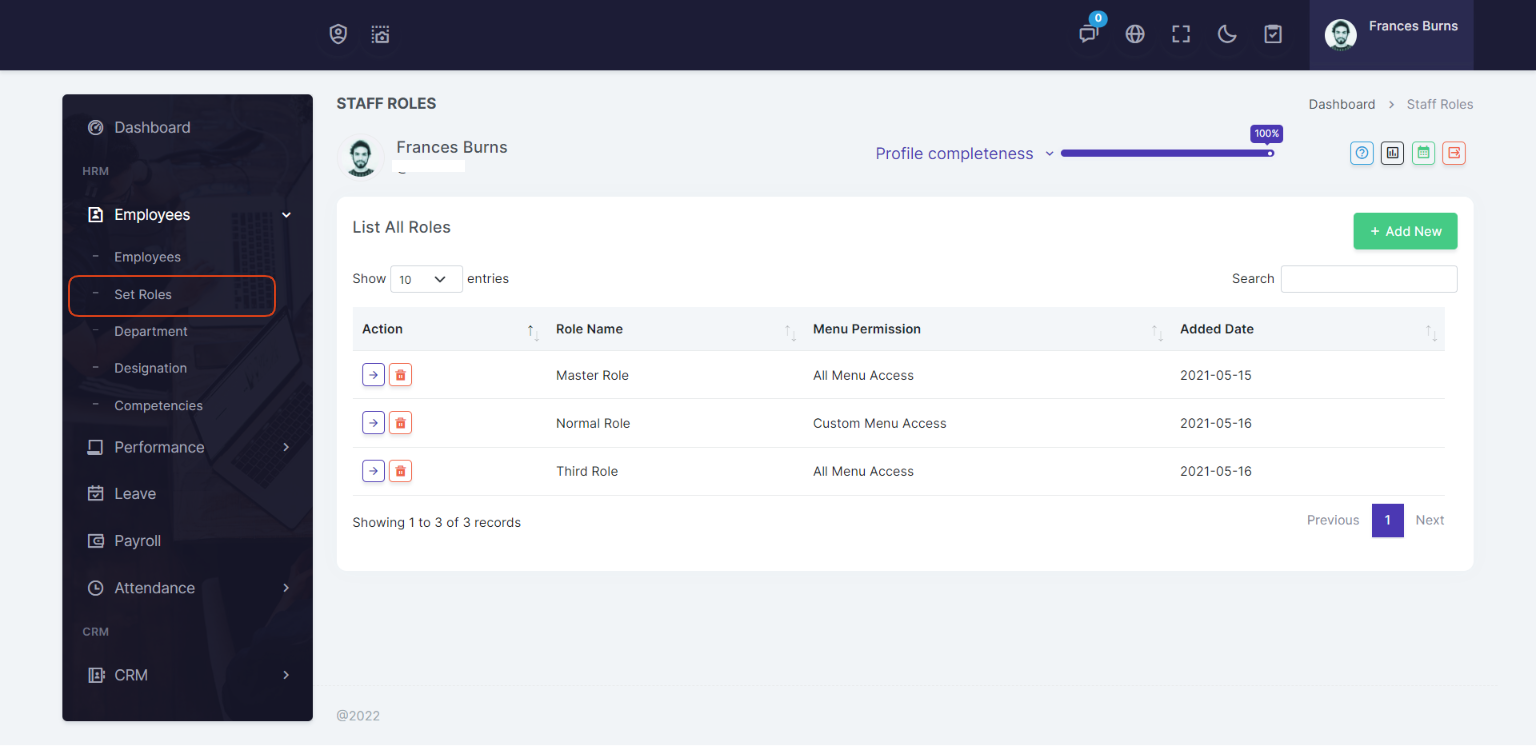
4: Setup Roles
Go to Employees > Roles & Privileges page and enter Roles details
Roles Level is a very powerful module which should be used carefully. If you want to give permission to any employee - you have to create a new employee - and then set access rules by simply select any role from options you want to give an employee permission.
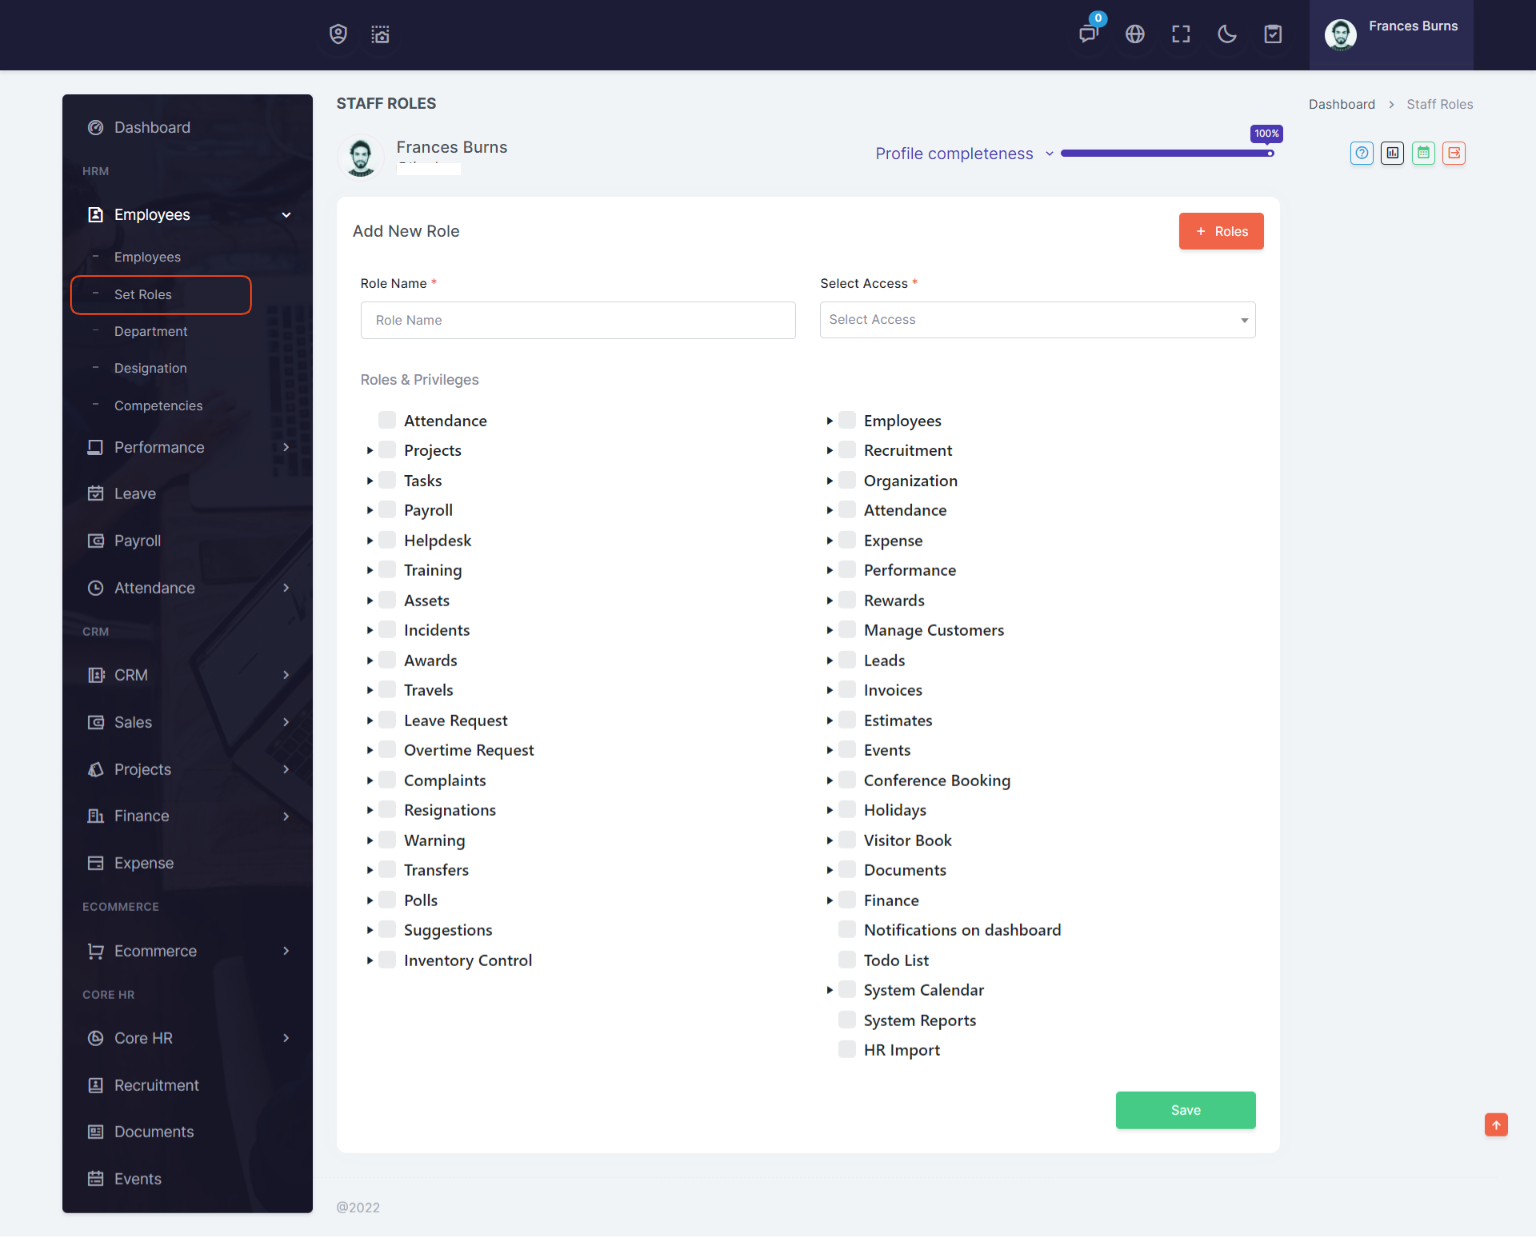
There are many modules in the role, you can easily set new roles with any module, and can assign any role to any employee in the company.
This will build a level of trust with your employees and gives them the ability to self serve.
Role Modules Menu
5: Competencies
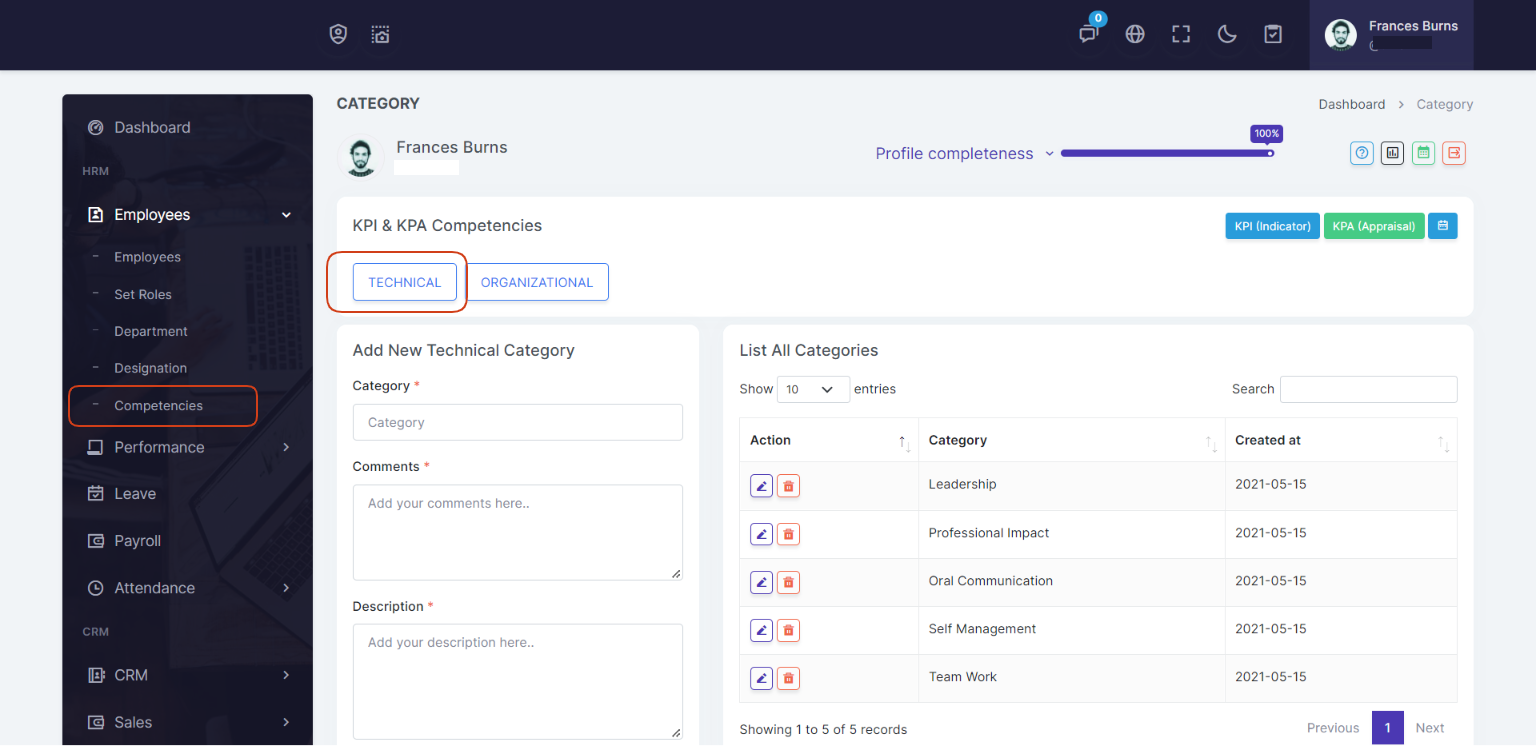
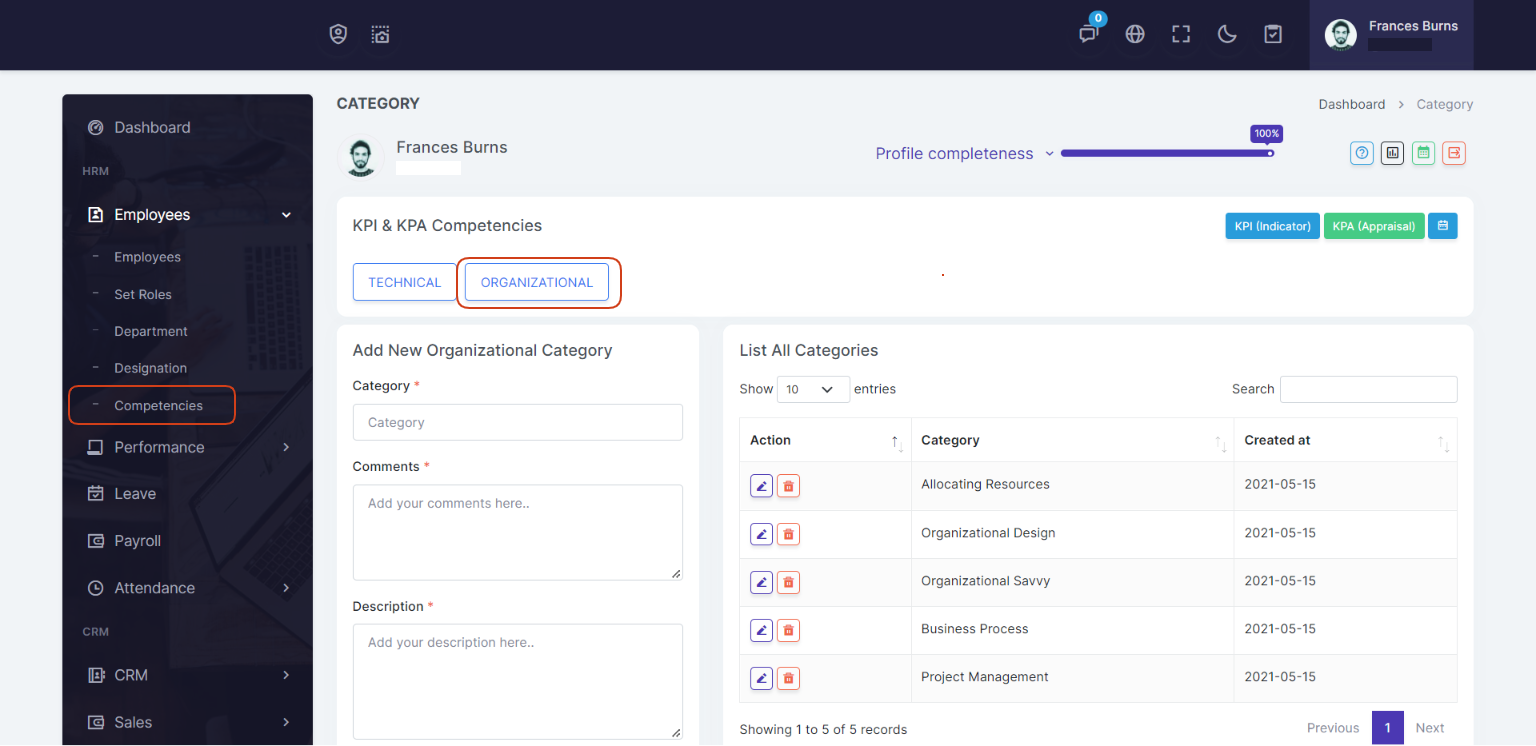
Go to Employees > Competencies
Competencies is a part of Performance Appraisal and Performance Indicator. where you can add Technical and Organizational Types with comments and description data for performance appraisal and performance indicator.
Note: Competencies will use for both KPI (Indicator) and KPA (Appraisal)
Technical
Organizational
Employees
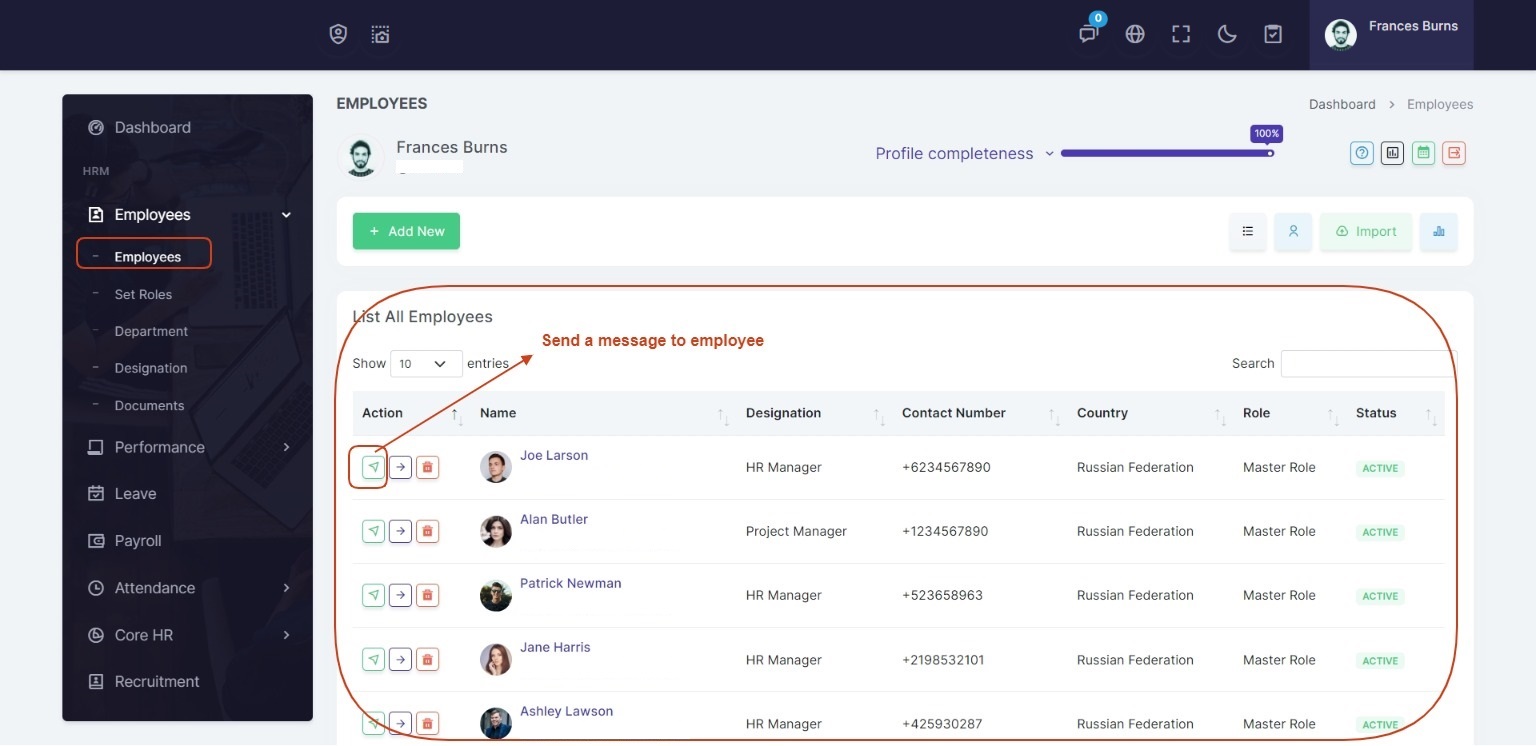
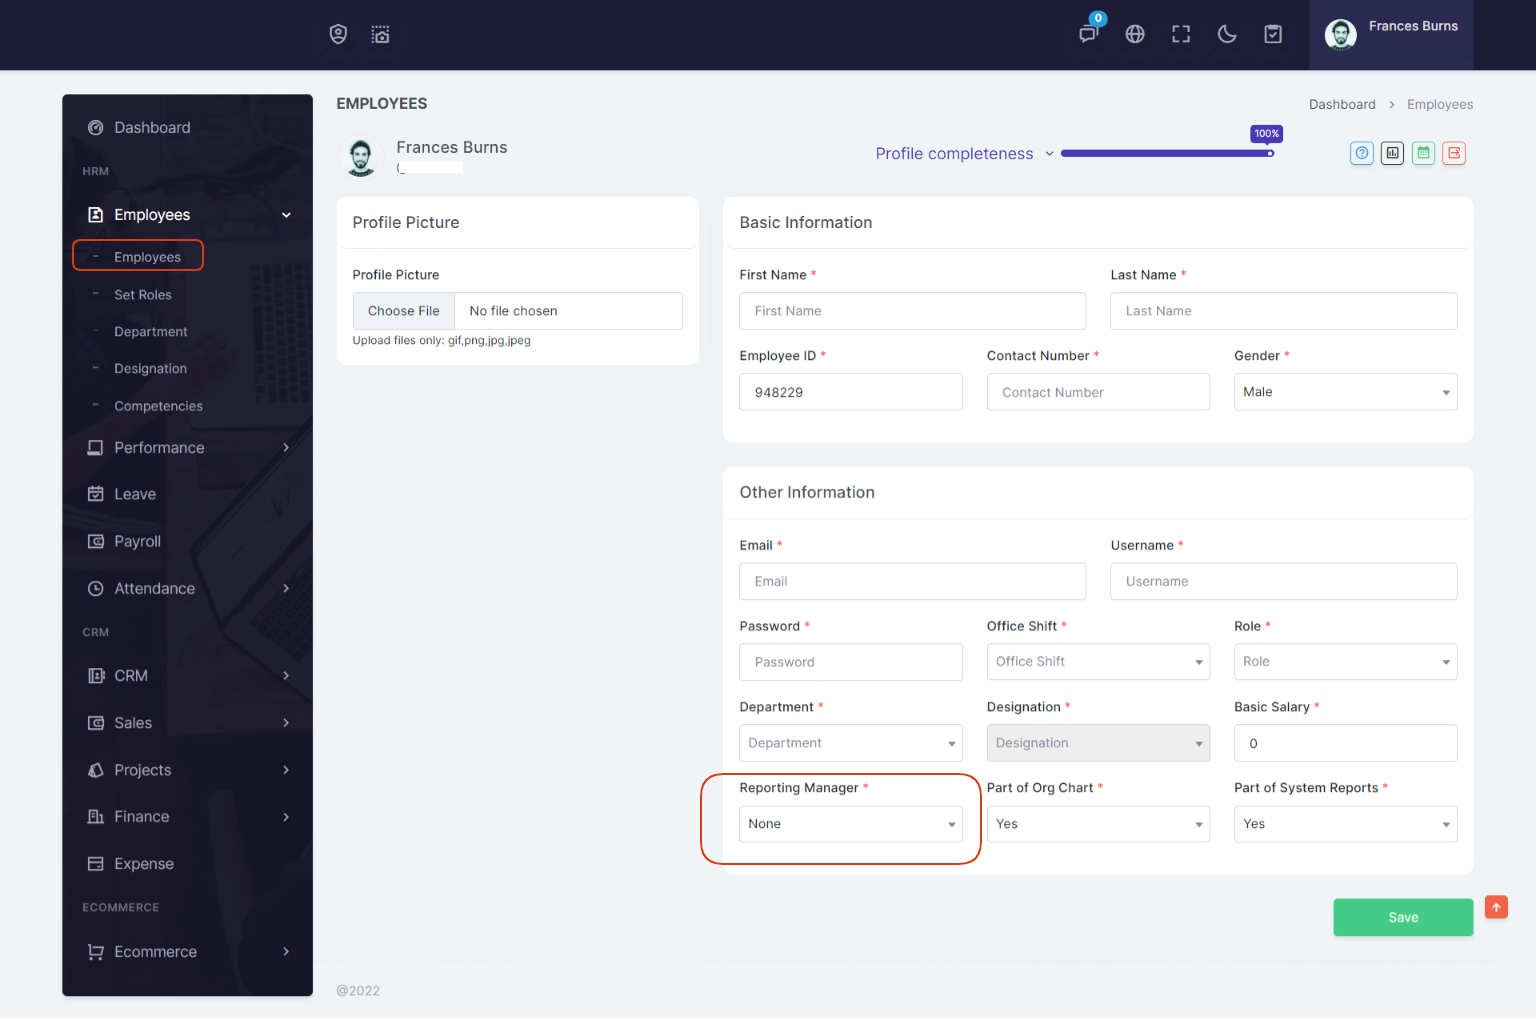
Adding a new employee in the system is very easy. You can at a go - add all related information of an employee. You can easily add new employee in the system. The form is elaborate with all possible information you might need to add for a new employee. During addition of new employee you just have to provide the Employee ID - the employee id you provided will be the employees user name for his / her employee panel access. The default password for all employee will be "employee" - once any employee log in successfully to his / her employee panel - they should update their password from their panel.
Note: When you add an employee select Reporting manager as None for first employee.
Note: In the whole system there should be only one employee who has no reporting manager, Don't select reporting manager as none for more than 1 employee otherwise organization chart will not work.
After add an employee, then go to employee details.
Note: You can update employee basic information, personal information, profile picture, account information. Also you can see Requests of an employee.
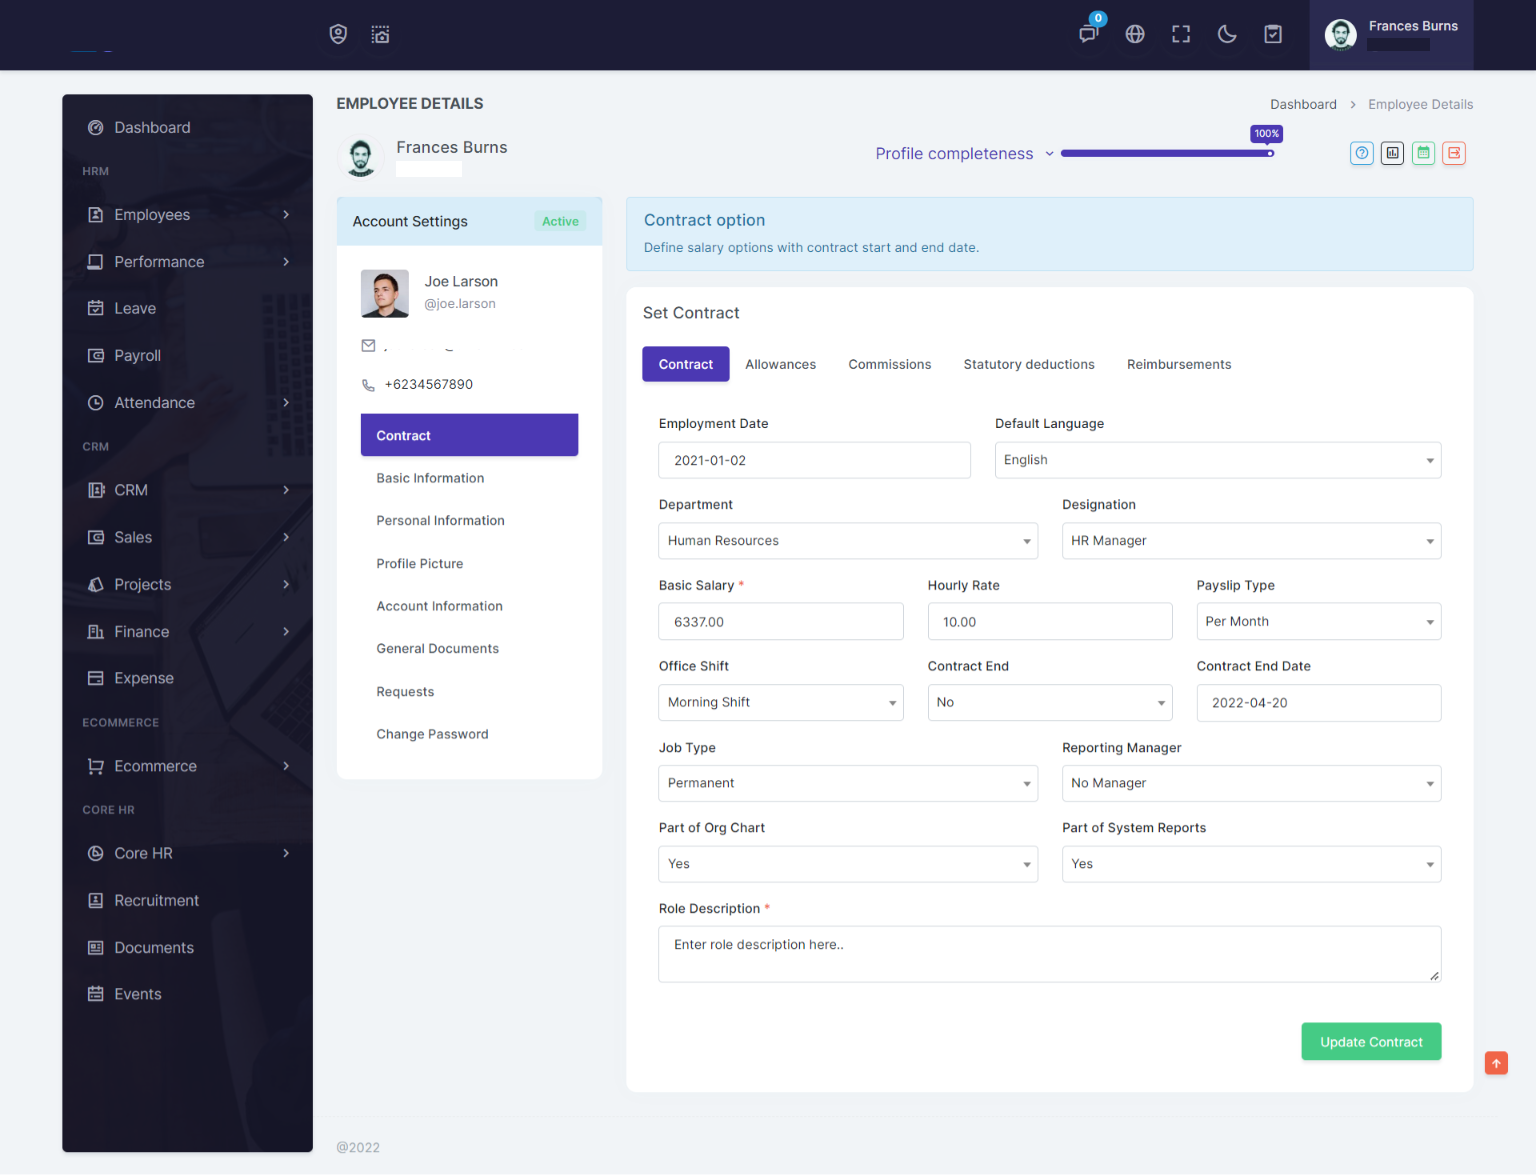
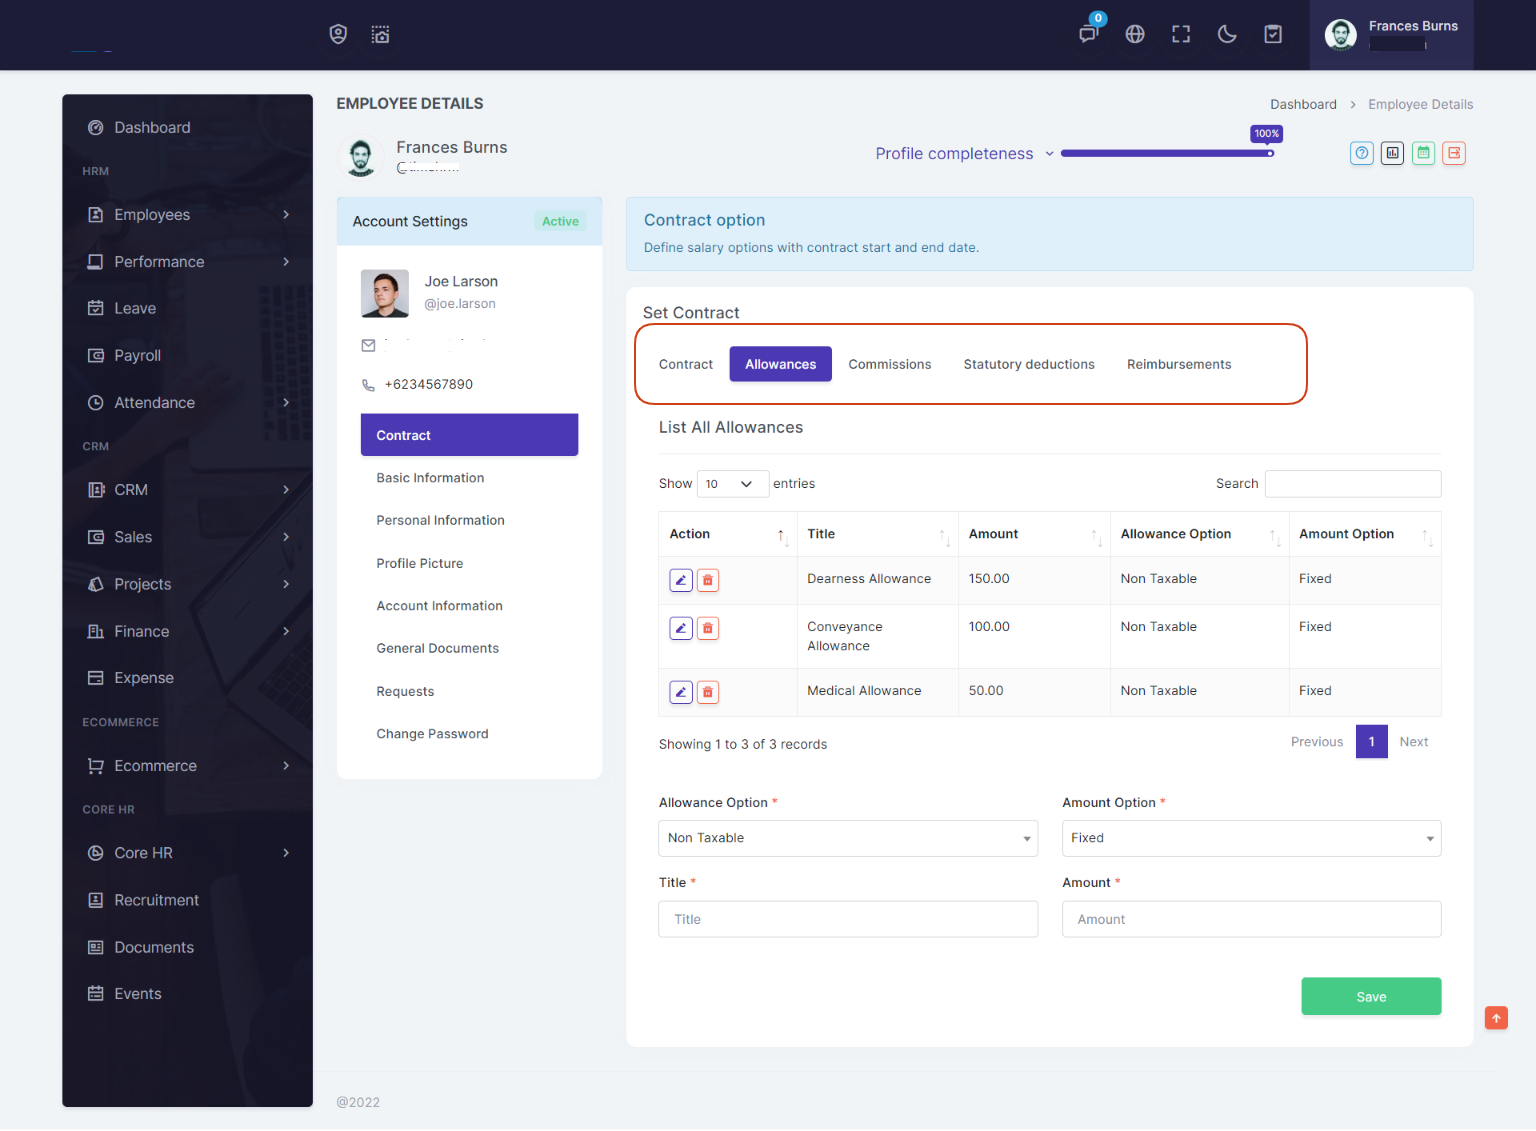
Contract: You can setup contract for an employee. You can setup Allowances, Commissions, Statutory deductions and Reimbursements
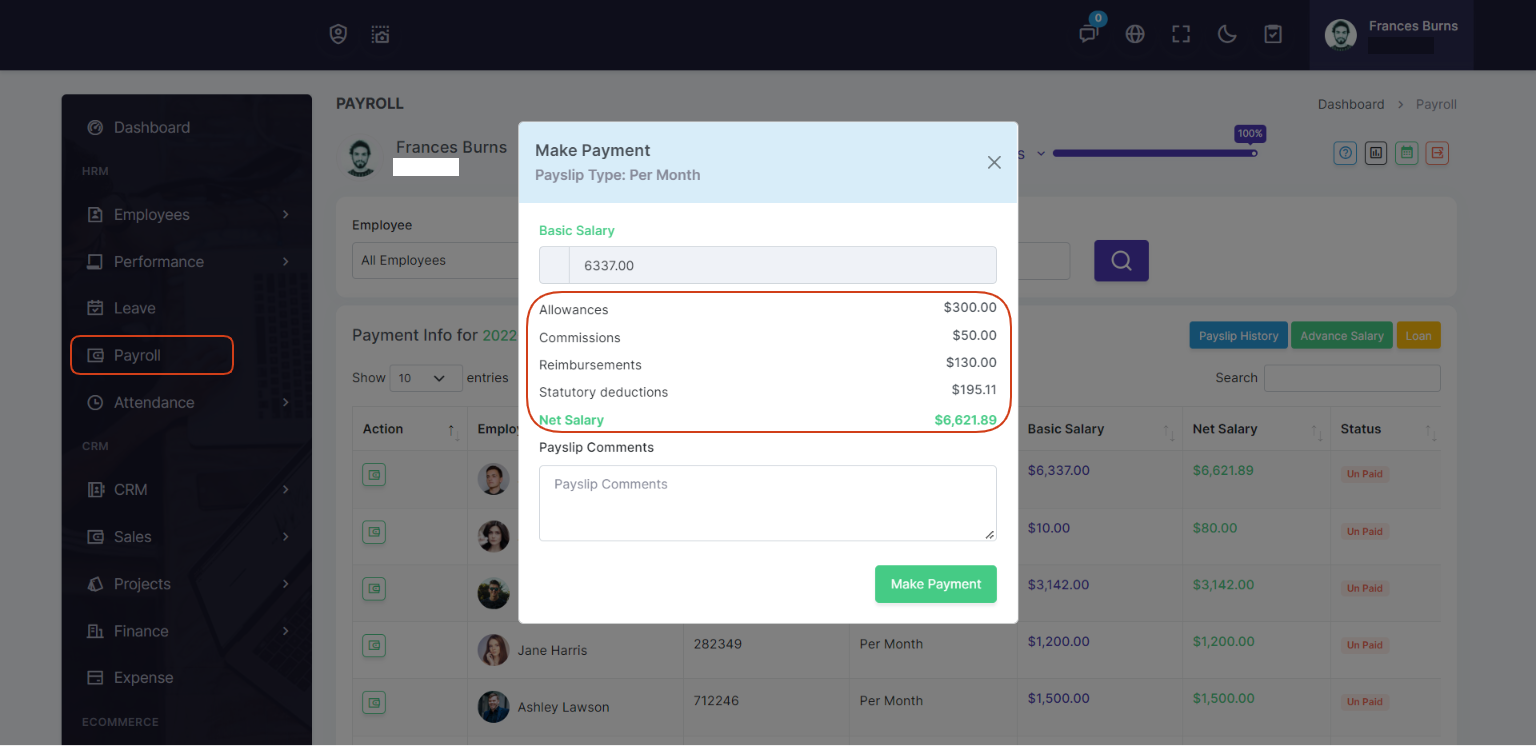
Note: When you setup allowances, commisions, statutory deductions and reimbursements it will be easily calculated in payslip.
Allowances, Commissions, Statutory deductions and Reimbursements calcultion example:
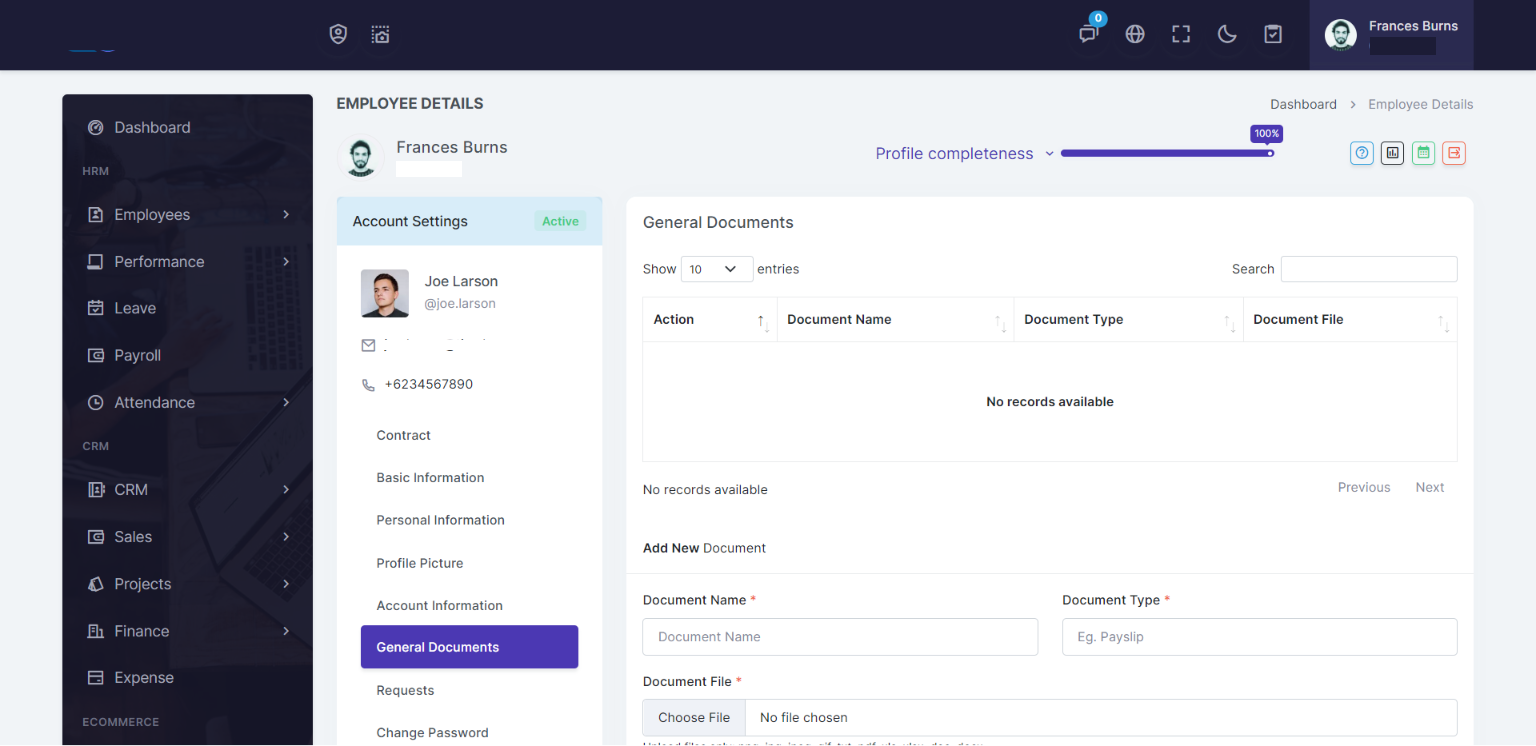
General Documents: You can general documents for an employee.
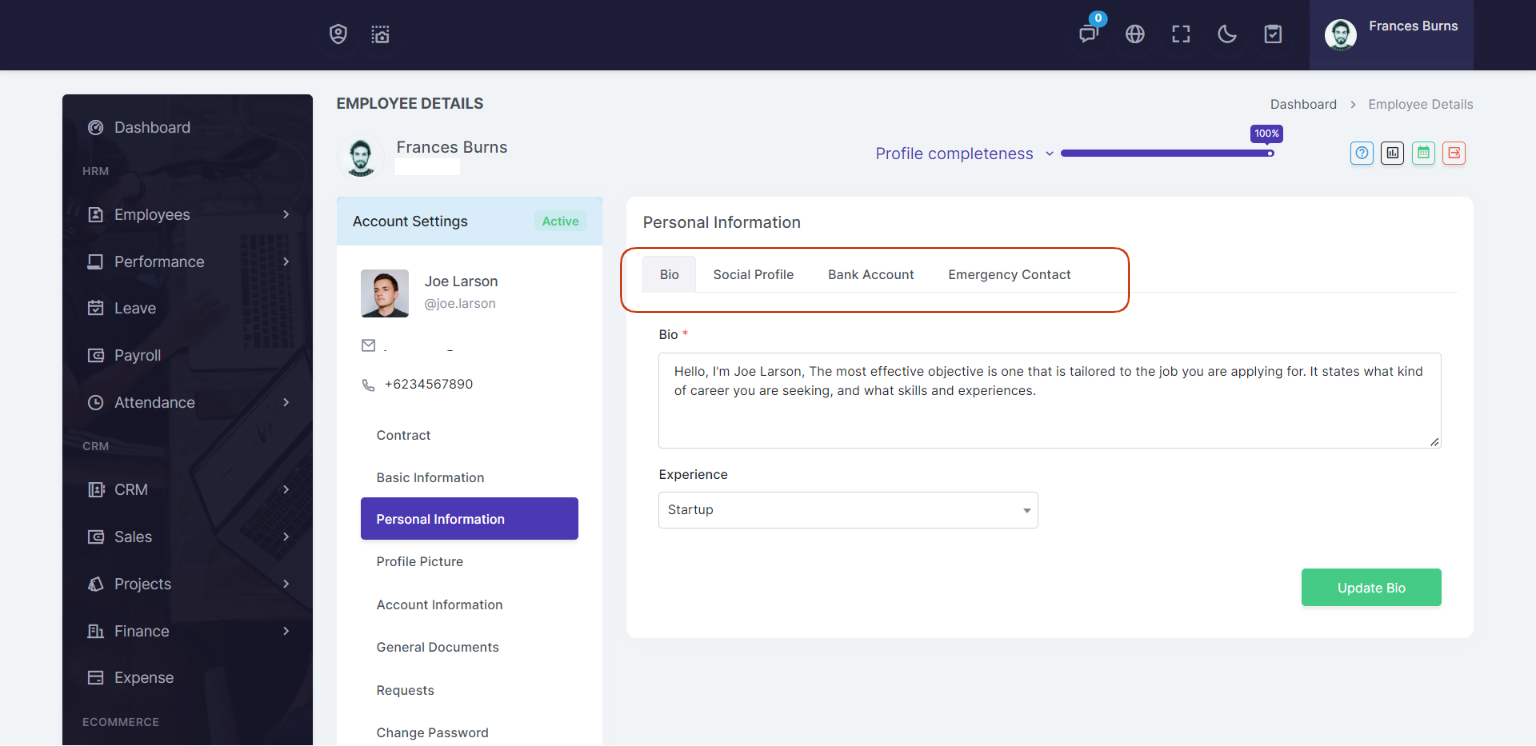
Personal Information: You can setup bio, social profile, bank account and emergency contact for an employee.
Performance
An ongoing, continuous process of communicating and clarifying job responsibilities, priorities, performance expectations, and development planning that optimize an individual's performance and aligns with organizational strategic goals.
KPI & KPA Competencies
Go to Performance > Competencies and add Competencies details.
Competencies is a part of Performance Appraisal and Performance Indicator. where you can add Technical and Organizational Types with comments and description data for performance appraisal and performance indicator.
Note: Before creating KPI (Indicator) or KPA (Appraisal), you need to add first Technical and Organizational Competencies values.
Technical
Organizational
KPI (Indicator)
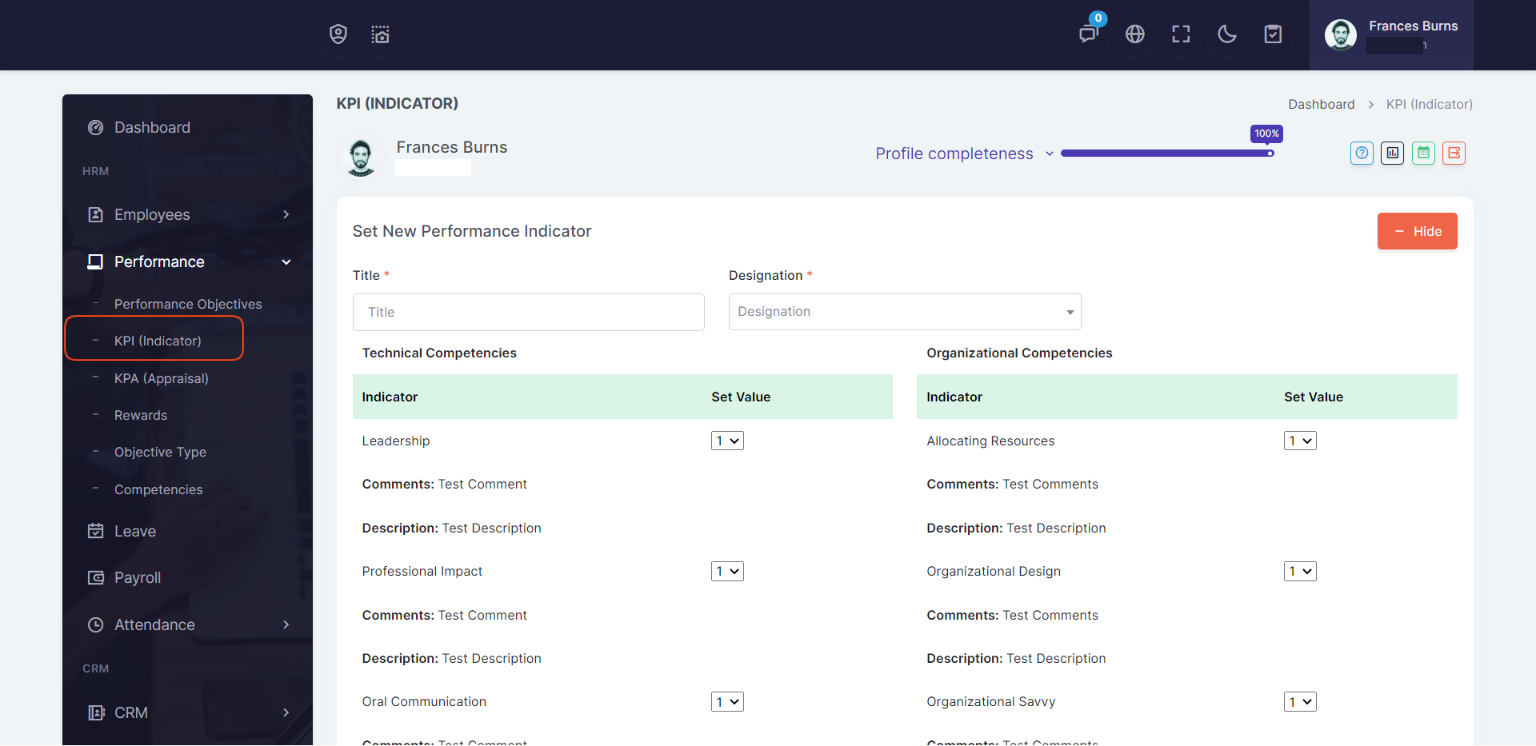
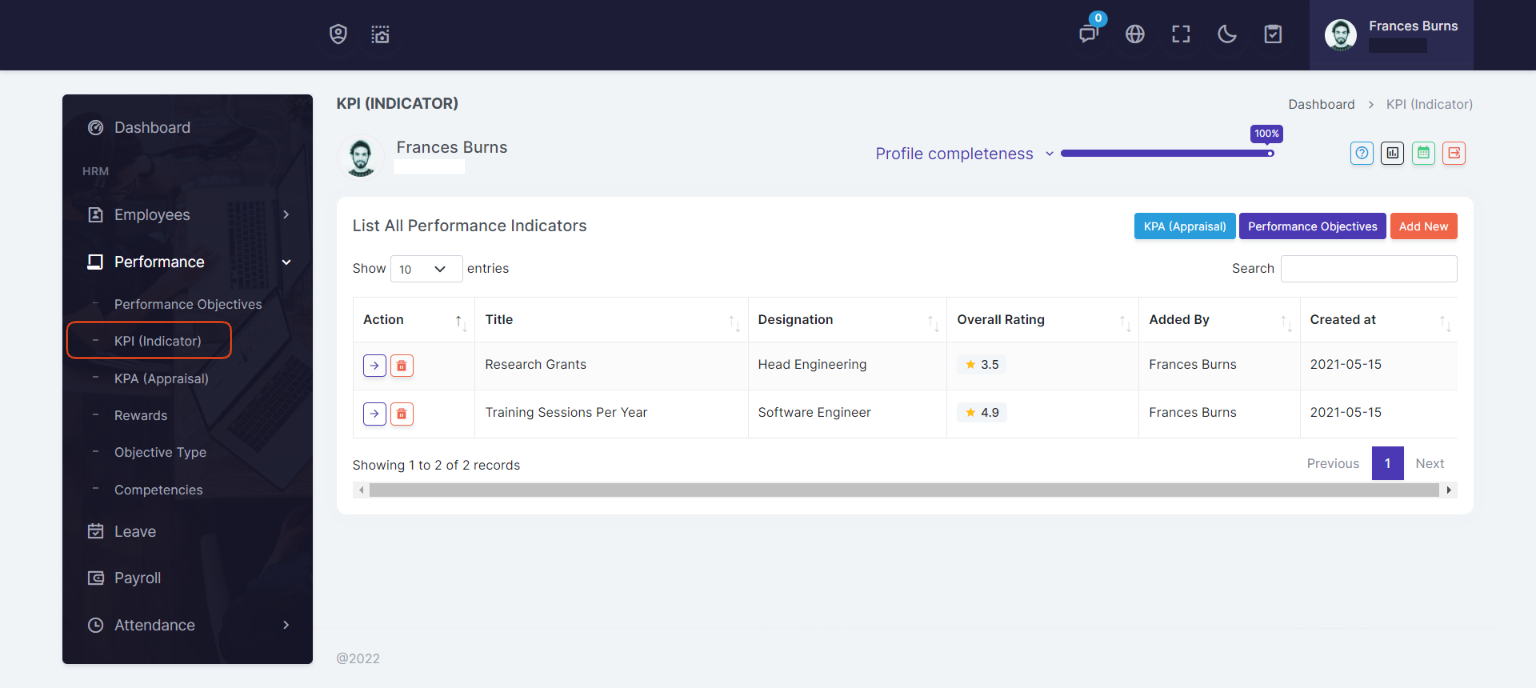
Go to Performance > KPI (Indicator) page and add KPI (Indicator) details.
In performance indicator you can set new performance for designations in the company. You can set Technical Competencies and Organizational Competencies values in performance indicator for any designation.
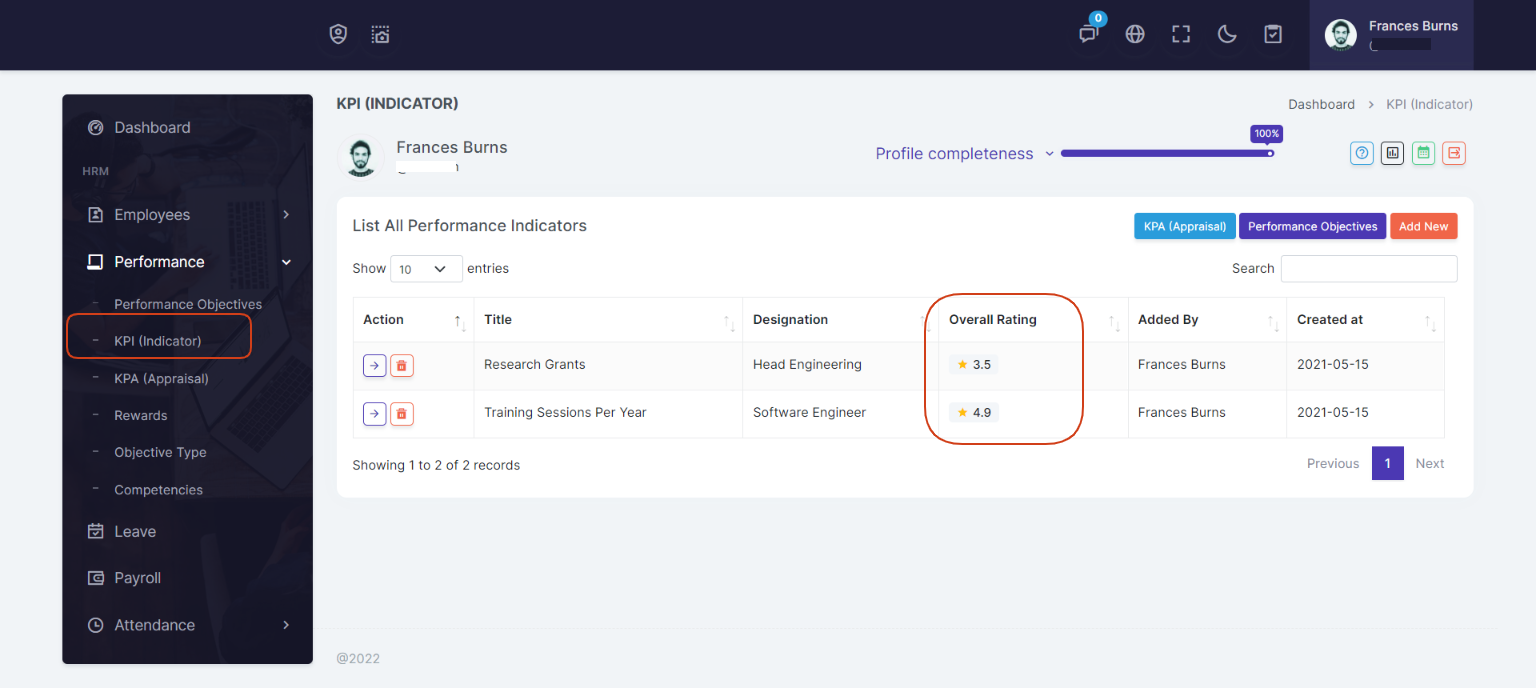
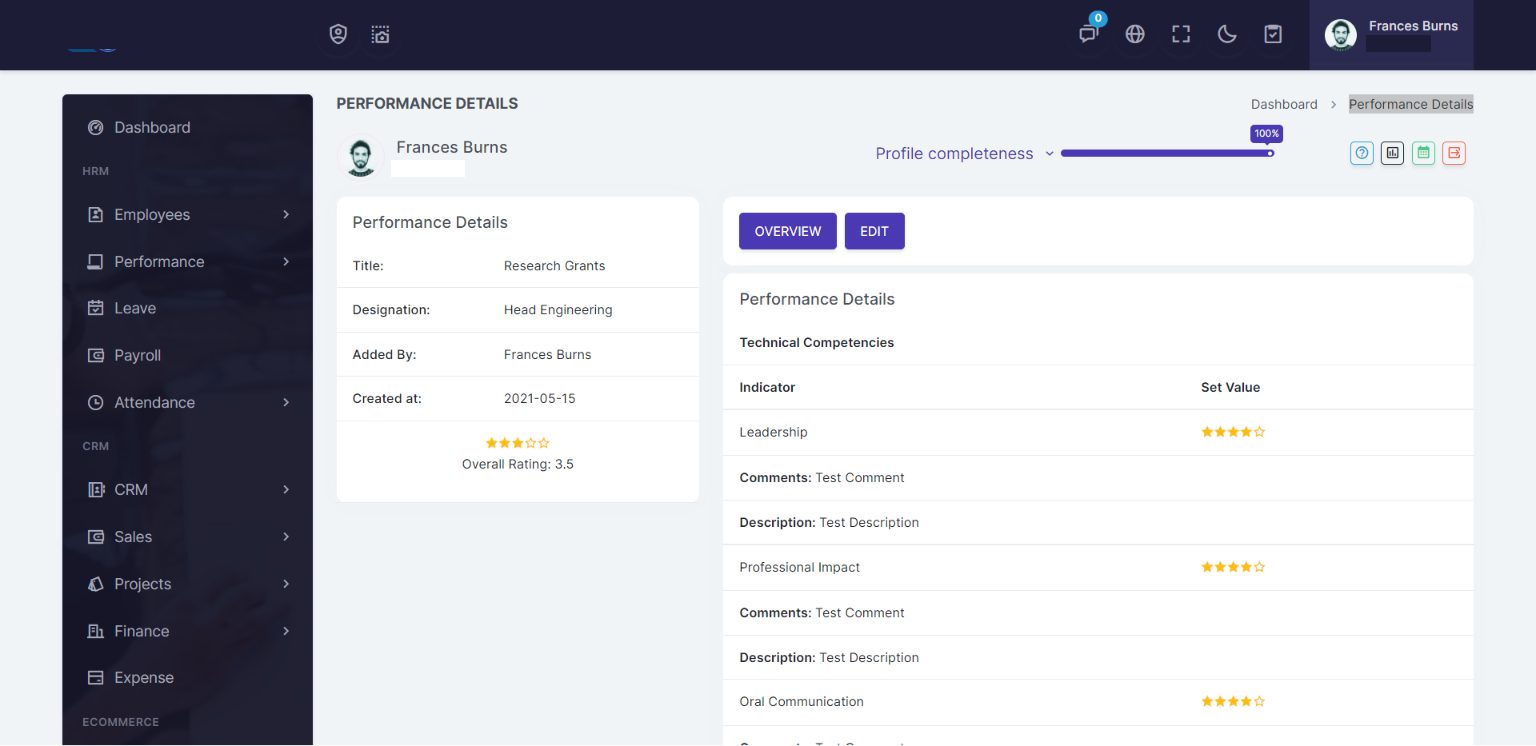
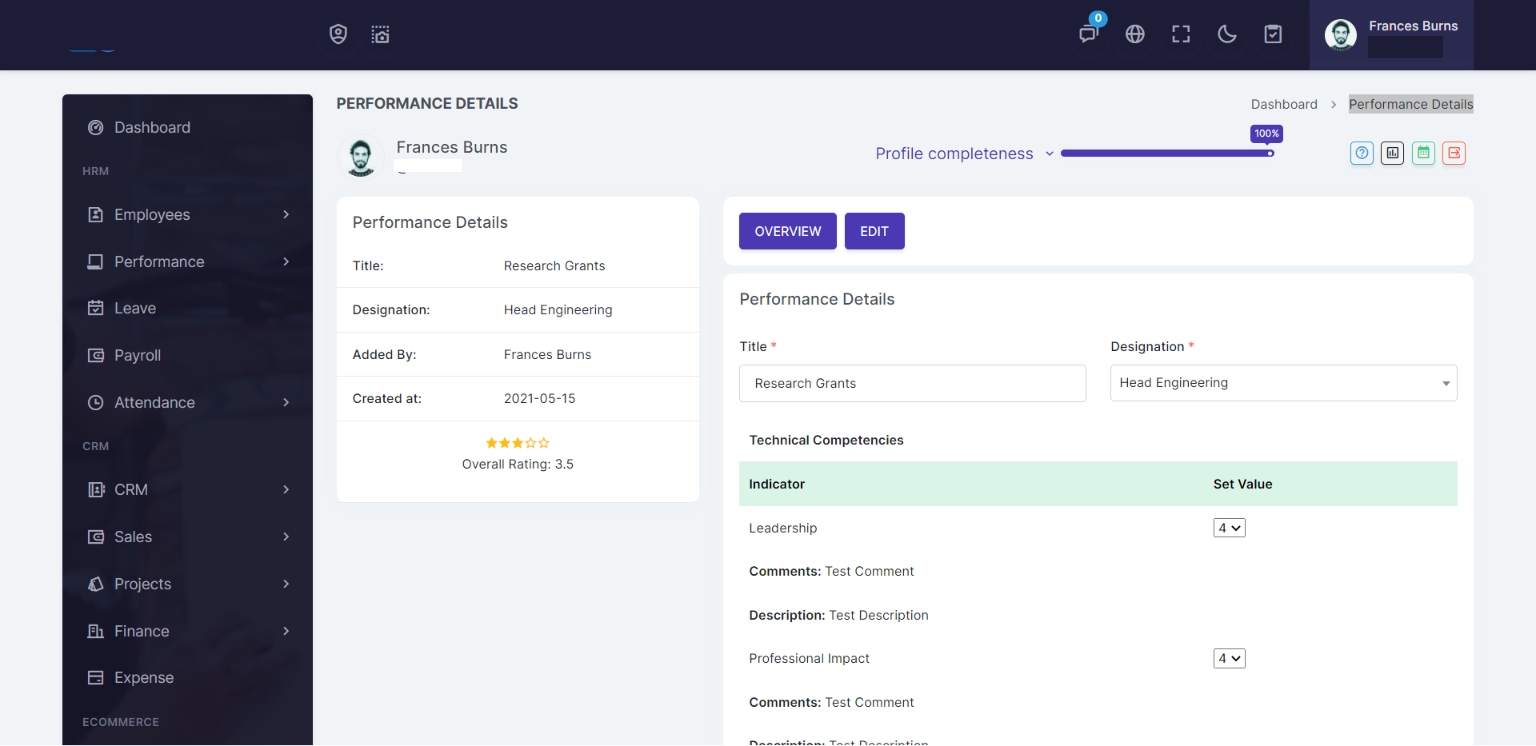
When you click on view details link, you can easily view the KPI (Indicator) details and can edit the KPI (Indicator) fields.
KPI (Appraisal)
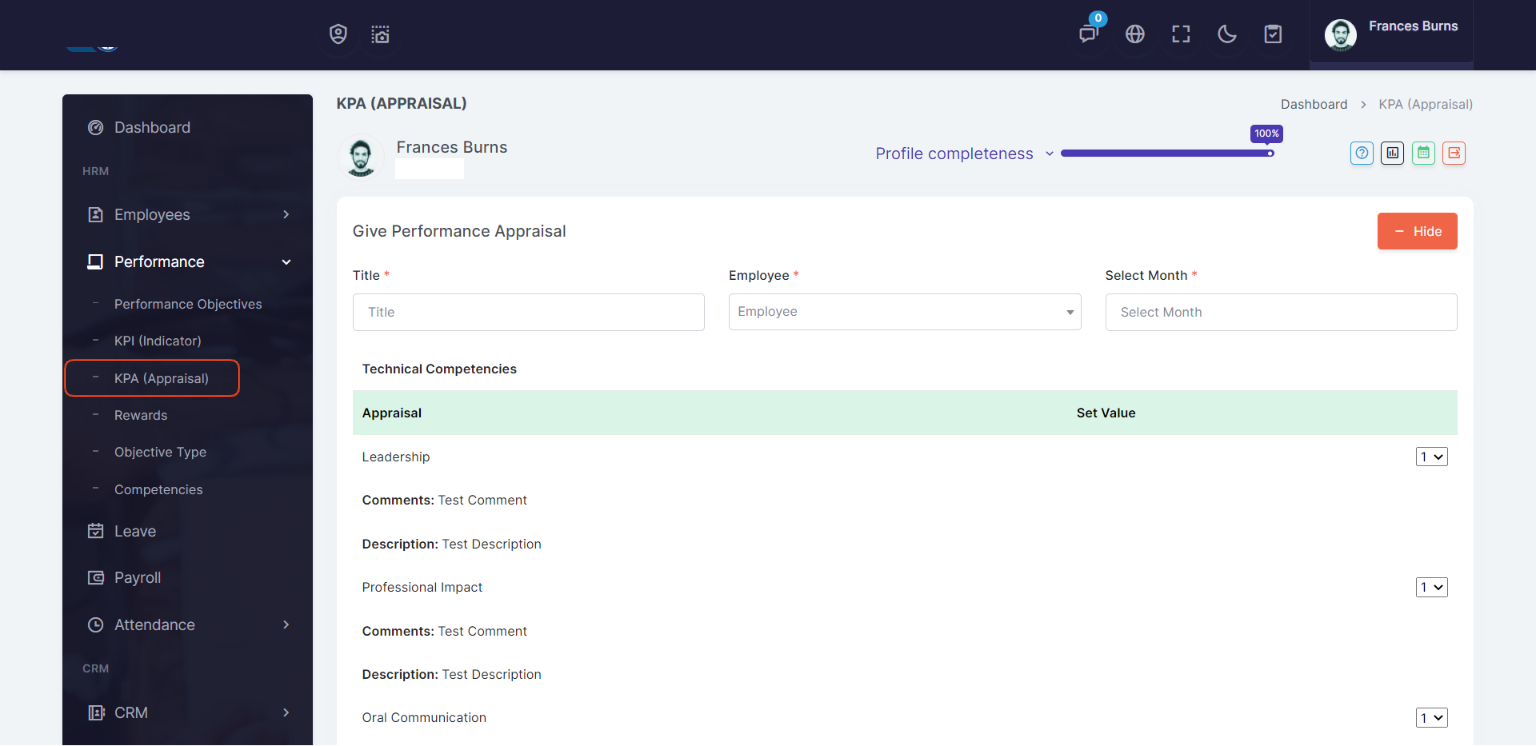
Go to Performance > KPI (Appraisal) page and add KPI (Appraisal) details.
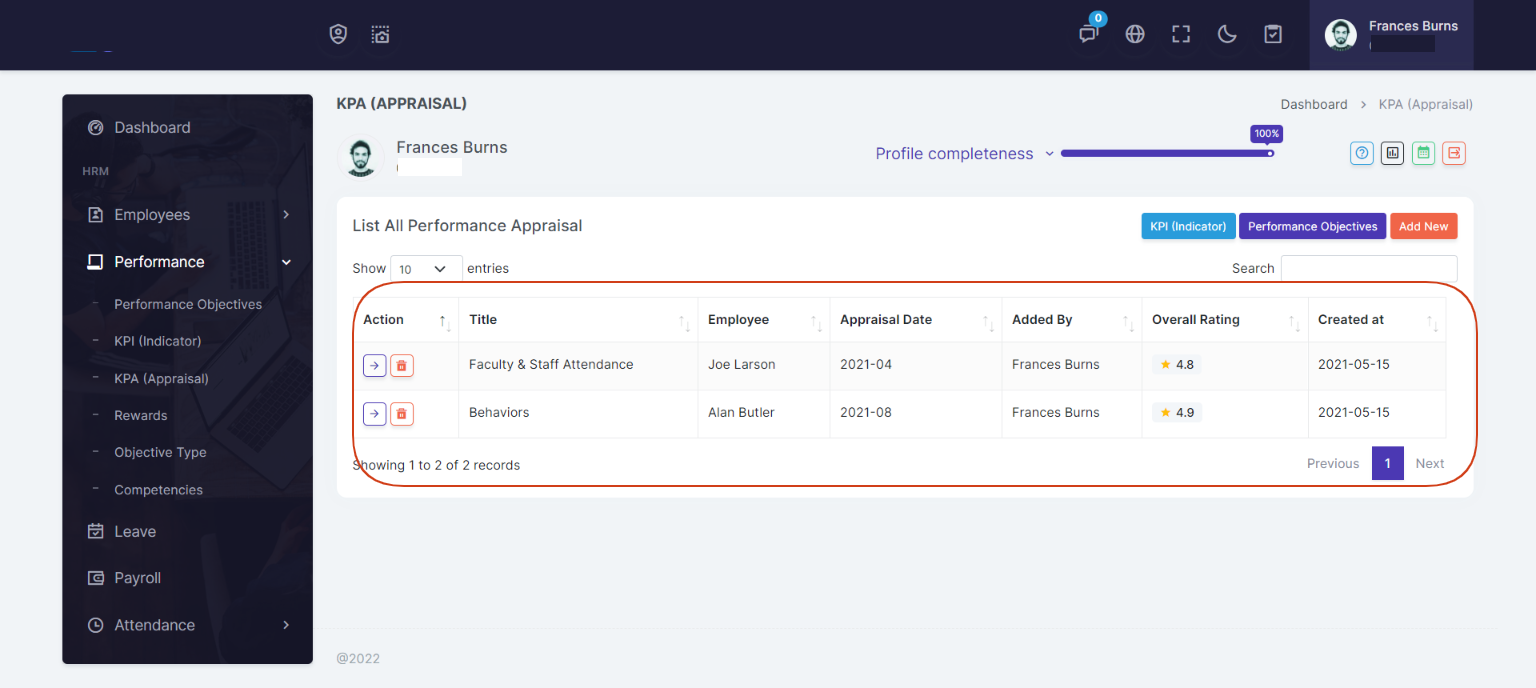
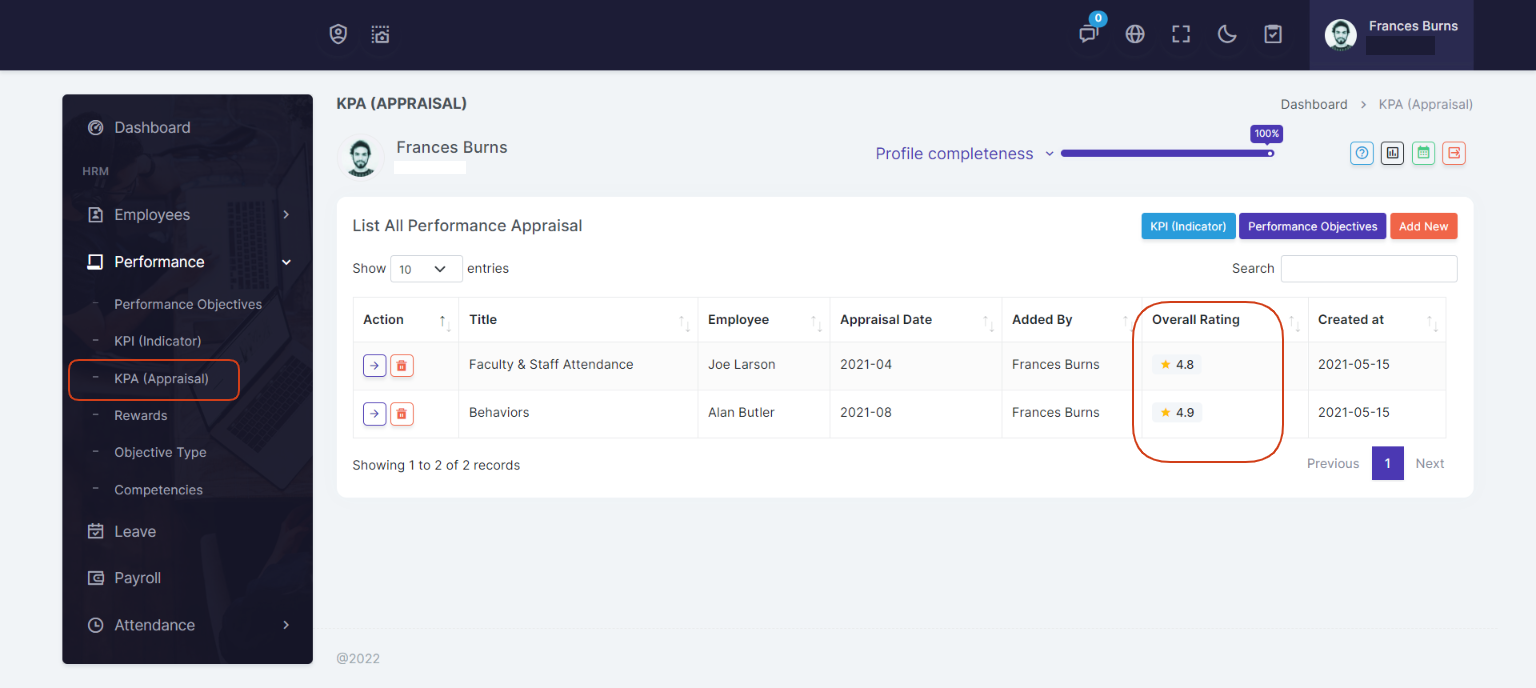
In performance appraisal You can set performance appraisals for any employee of any month. Also you can view / edit and delete appraisals from Performance Appraisal List.
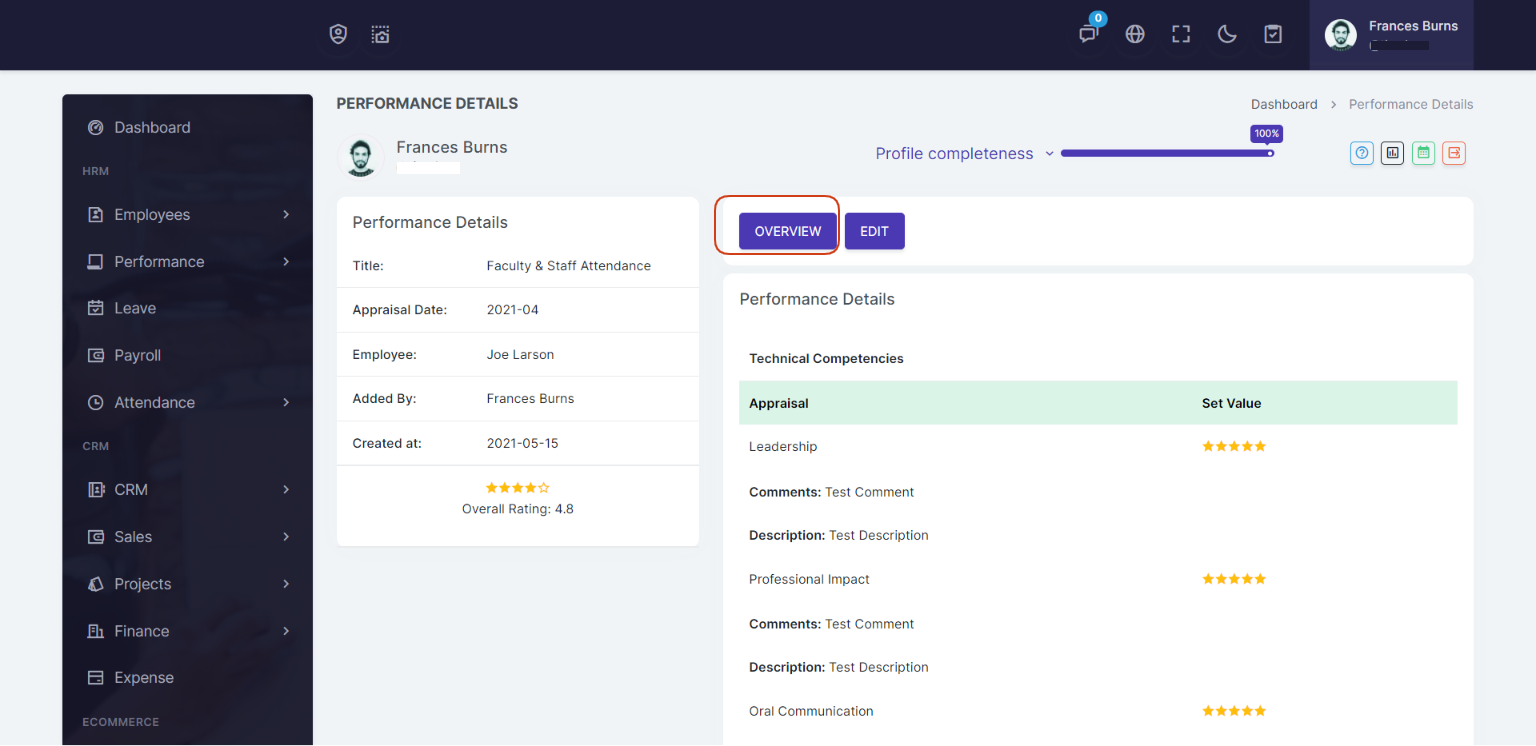
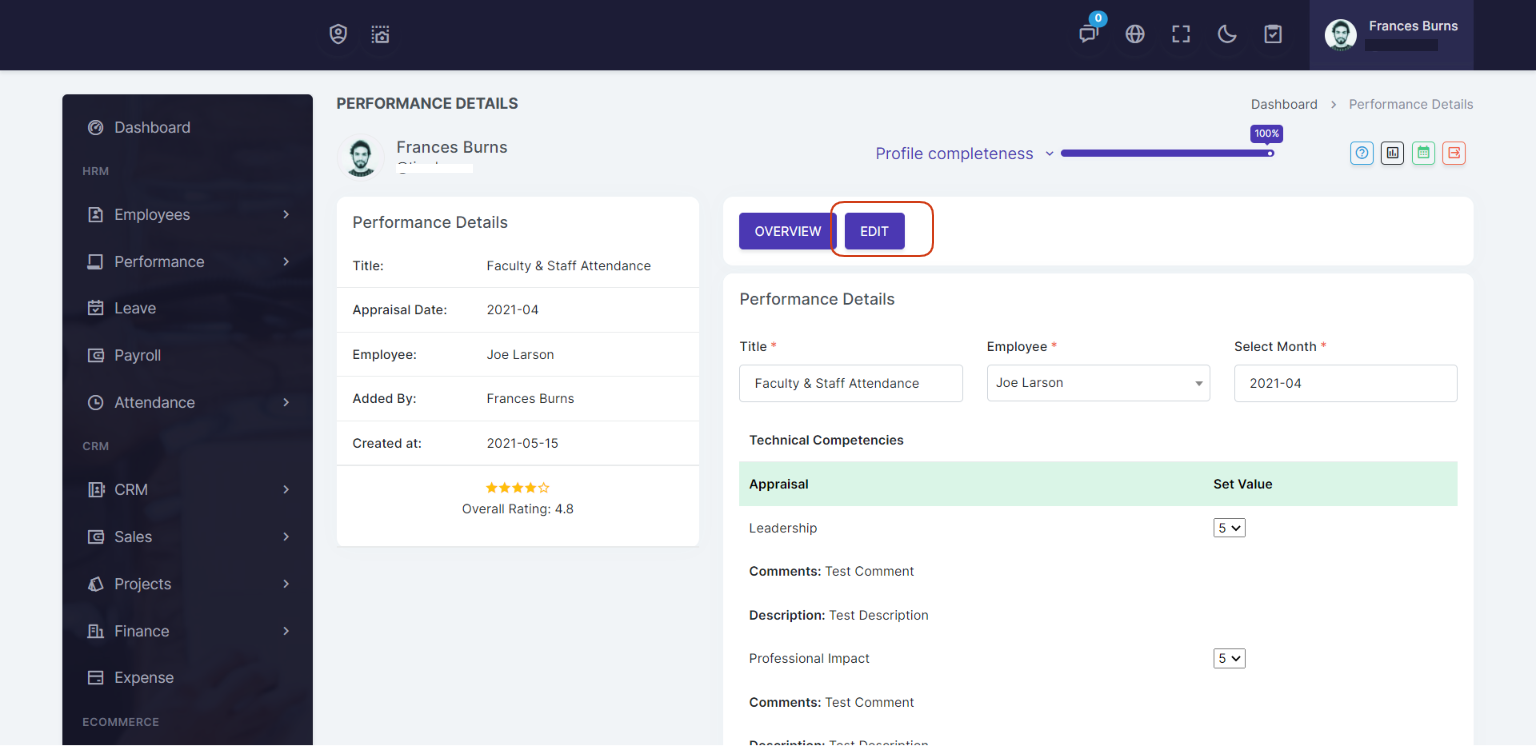
When you click on view details link, you can easily view the KPI (Appraisal) details and can edit the KPI (Appraisal) fields.
Objective Type
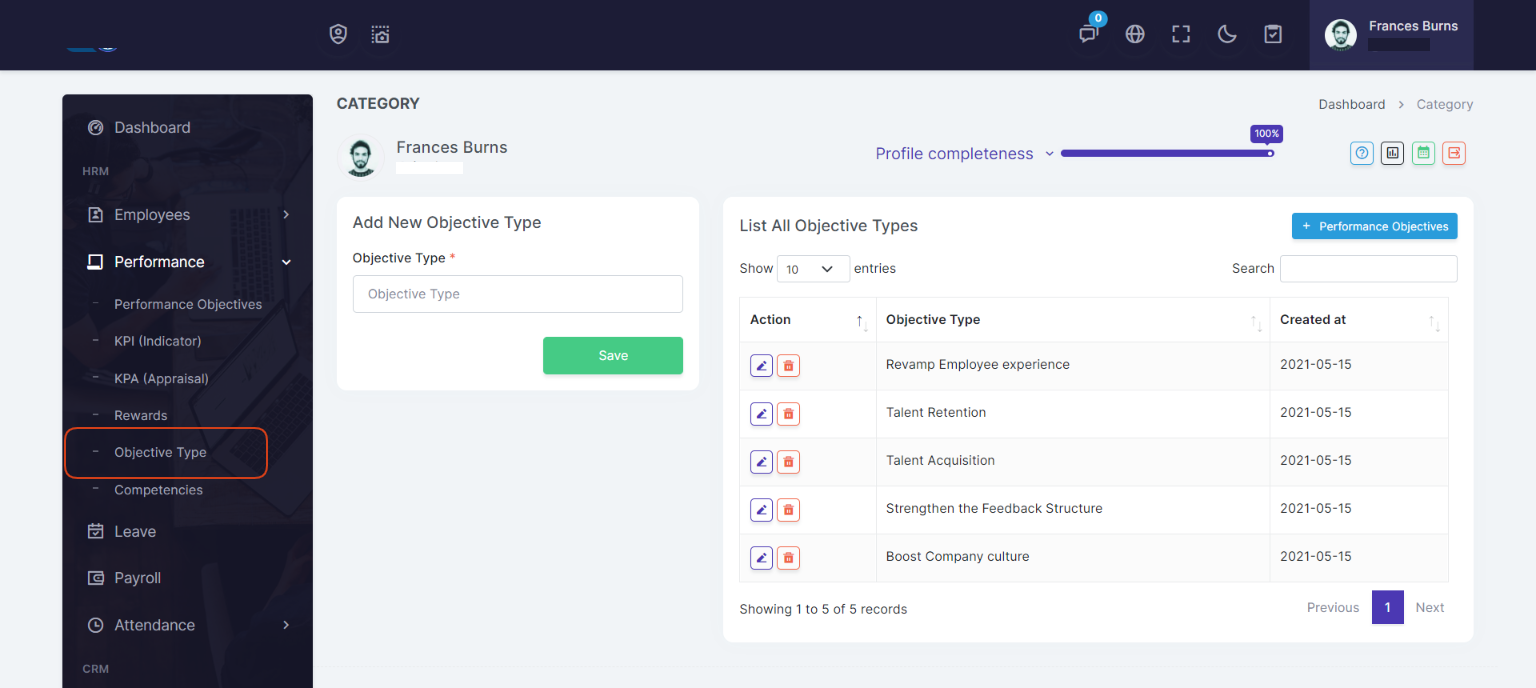
Go to Performance > Objective Type page and add Objective Type details.
You can create, edit and delete objective types
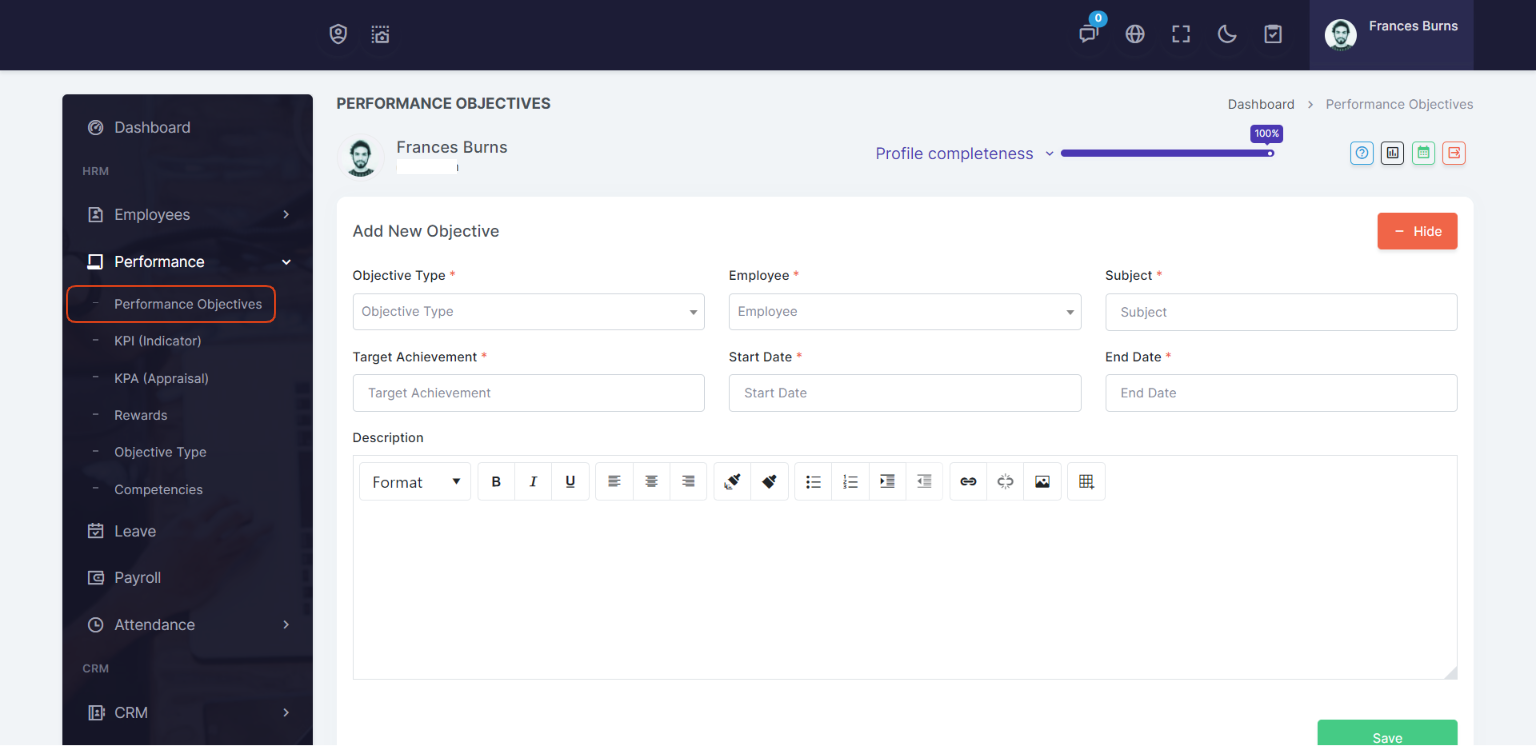
Note: Before creating a Objective first you need to add objective types.
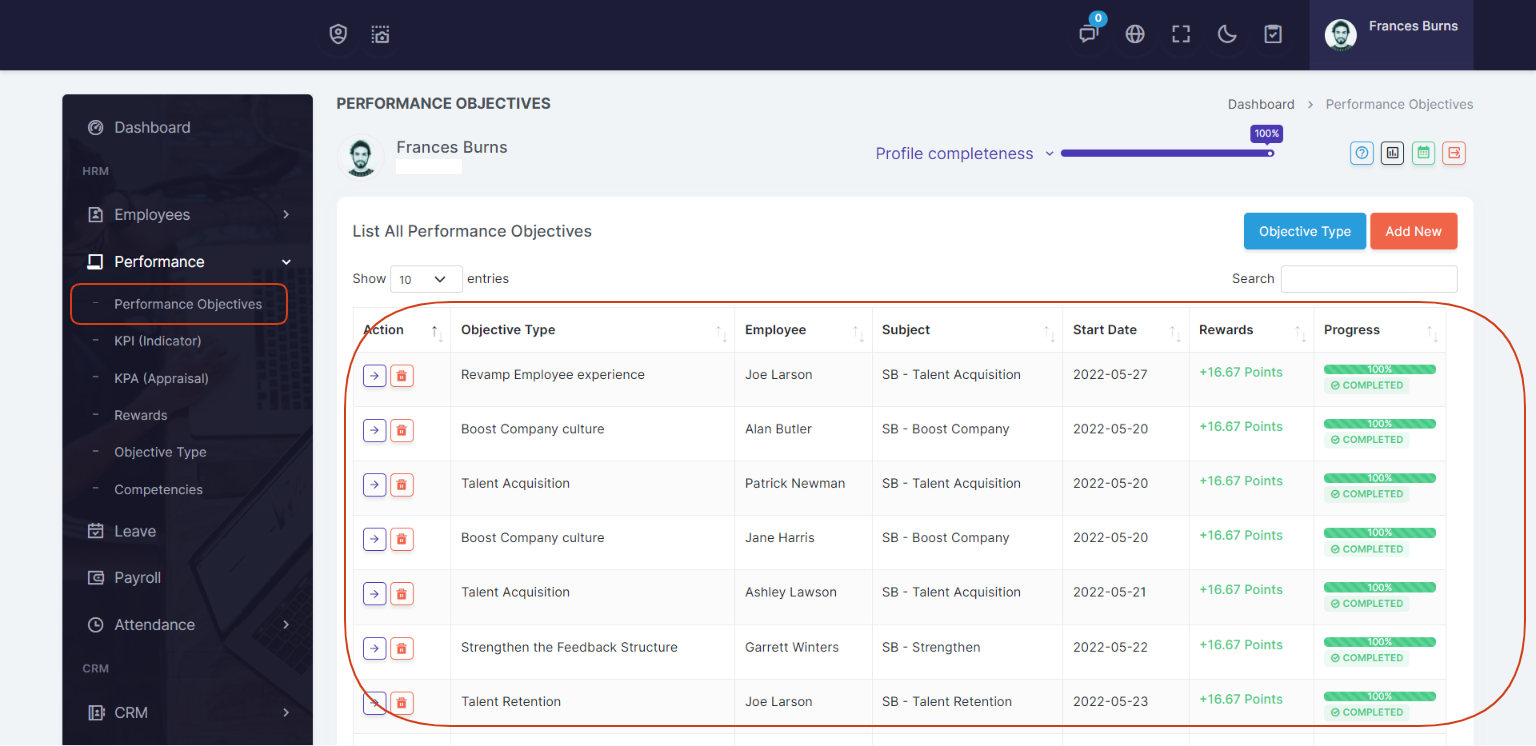
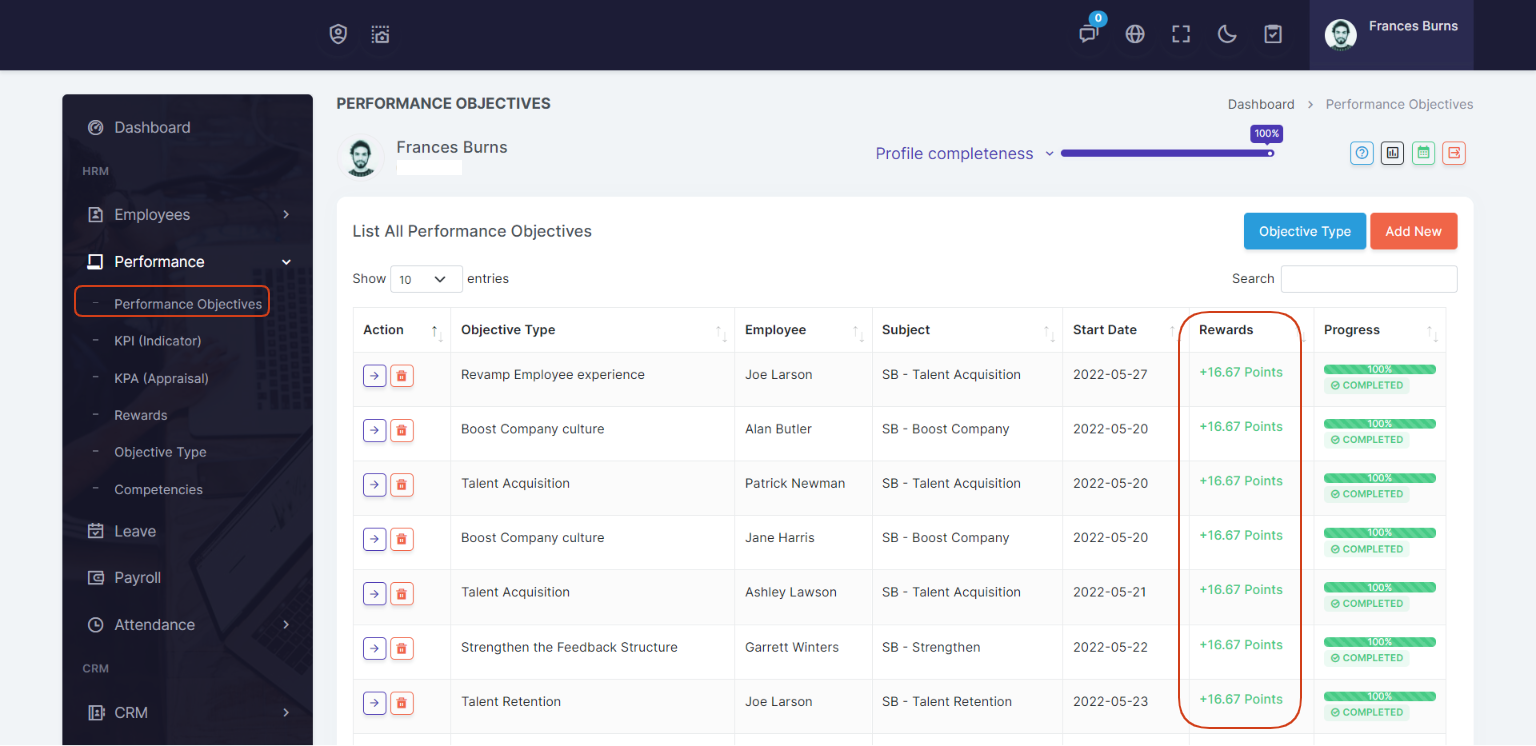
Performance Objectives List
Go to Performance > Performance Objectives
You can see list of all Performance Objectives at a glance.
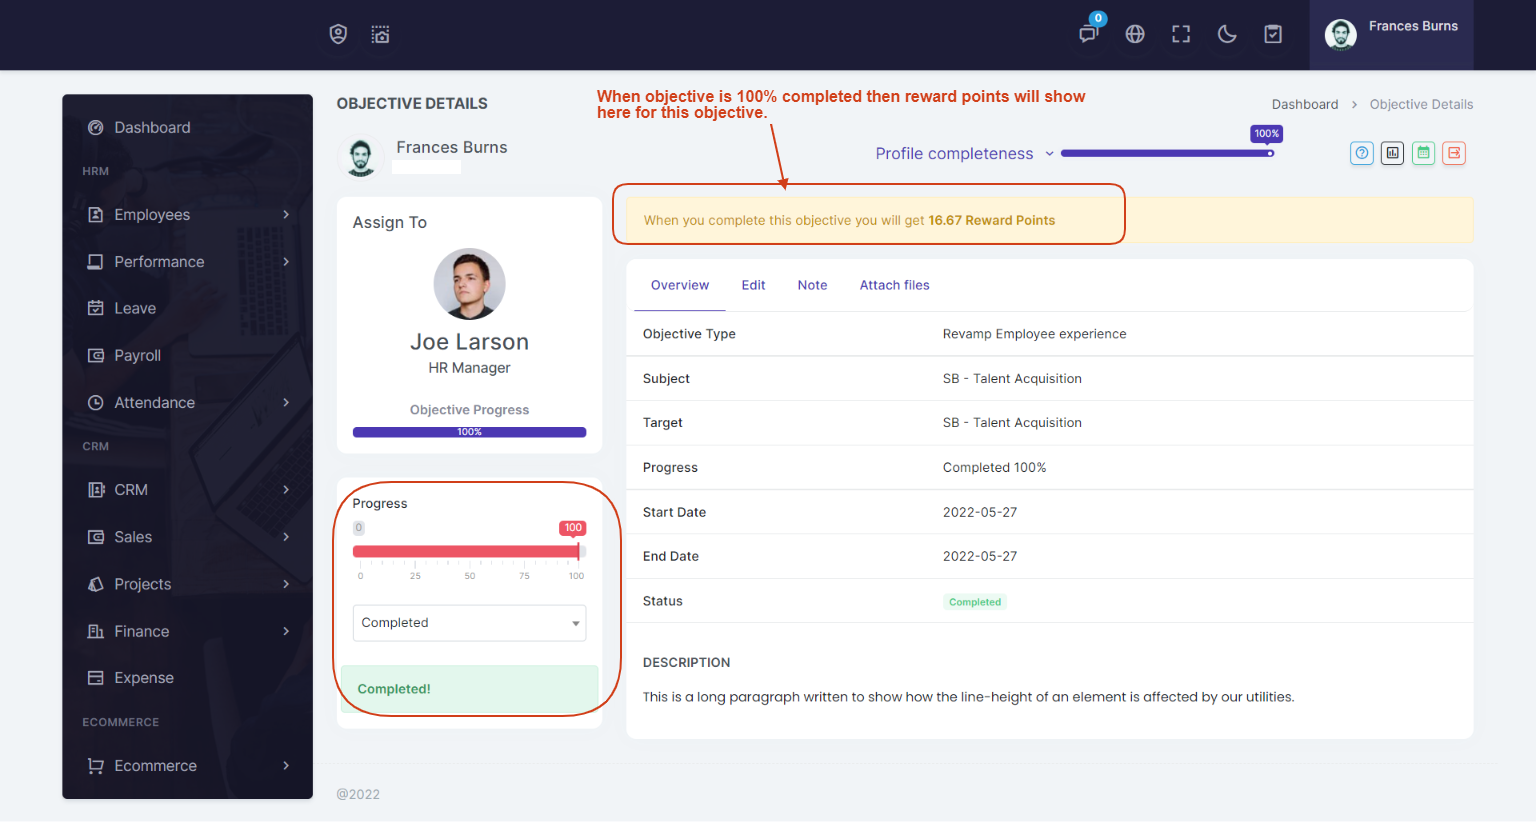
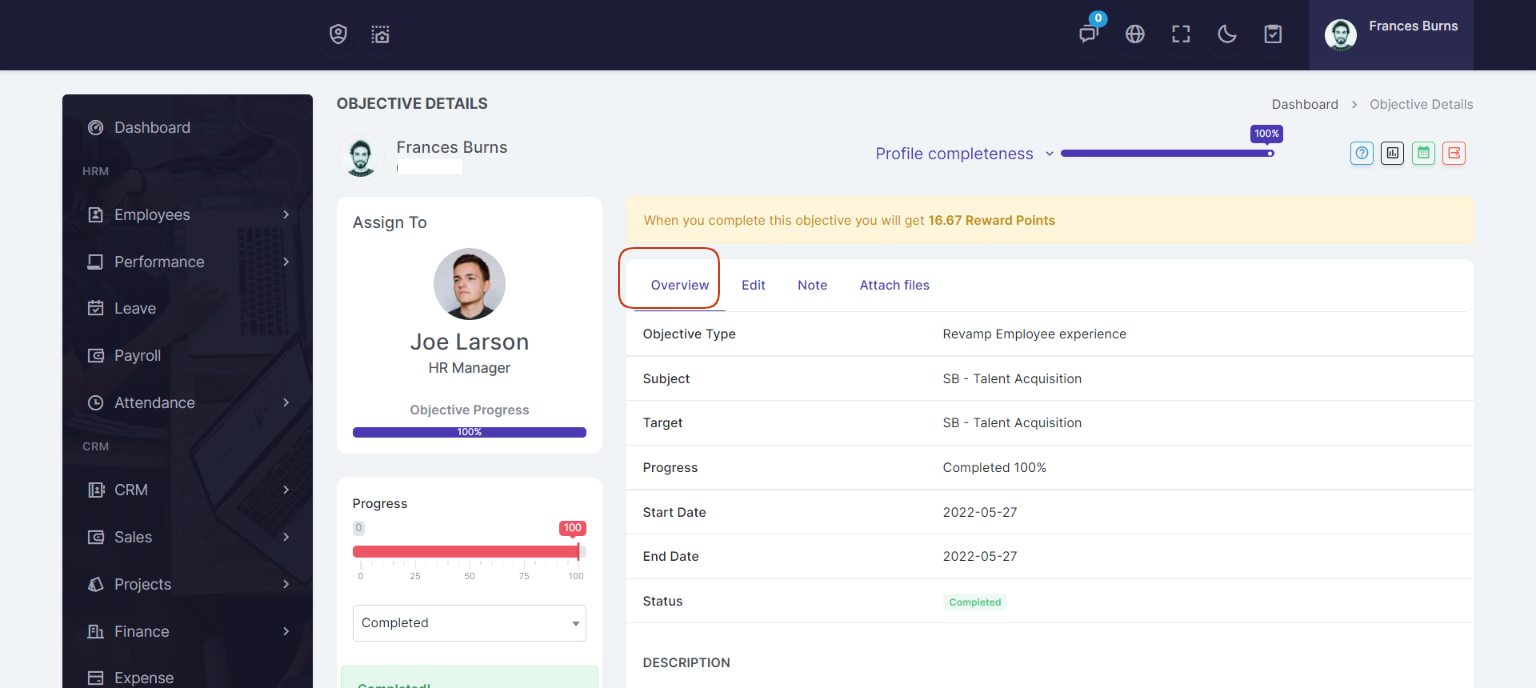
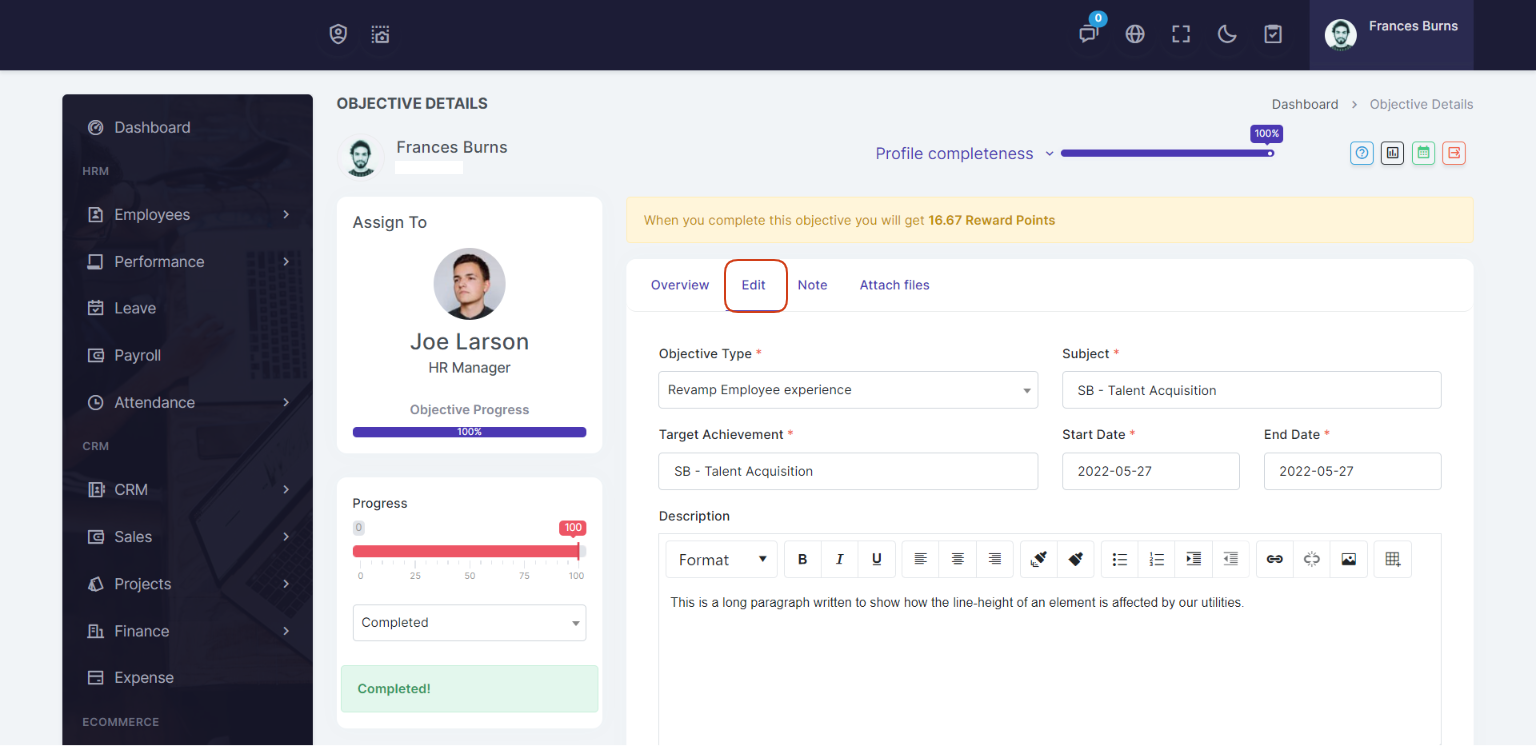
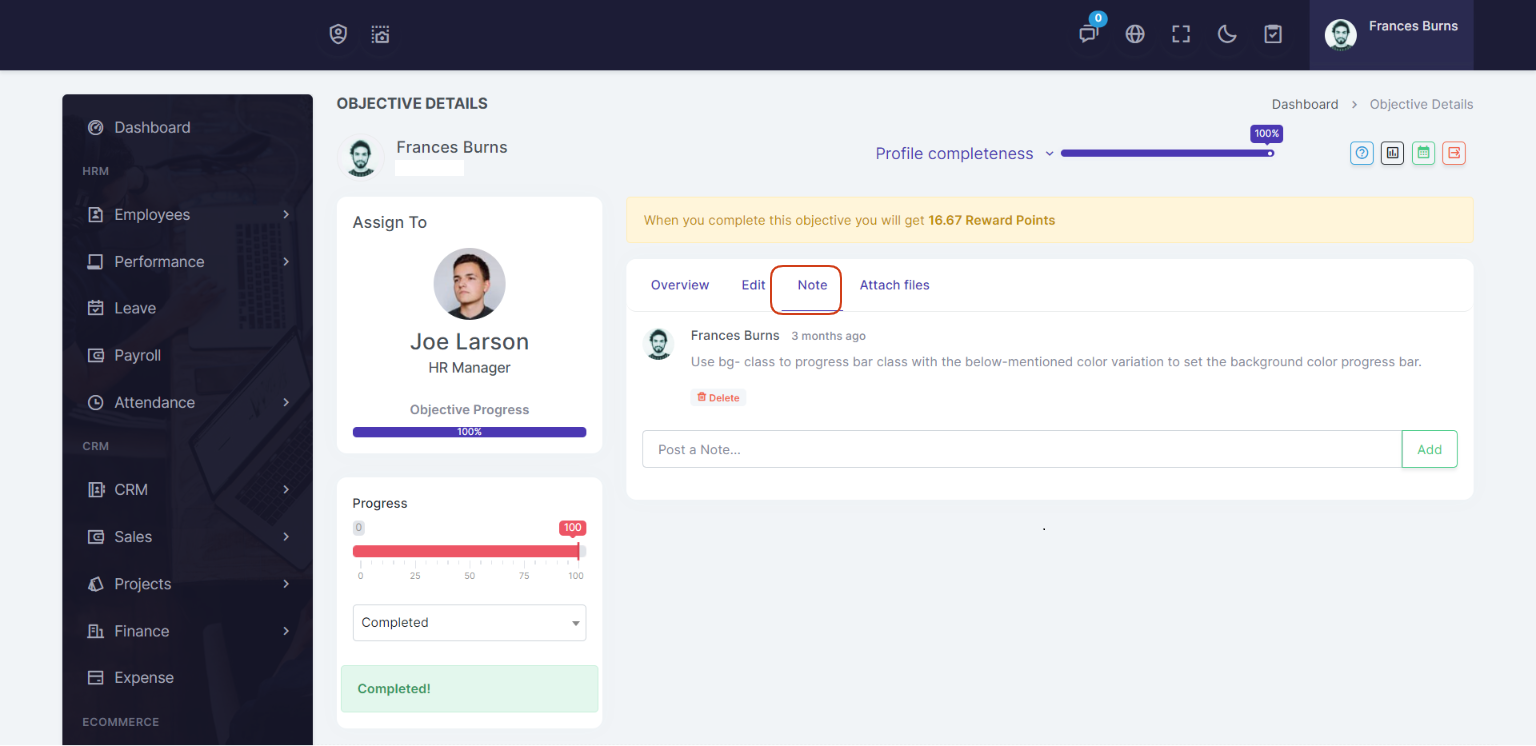
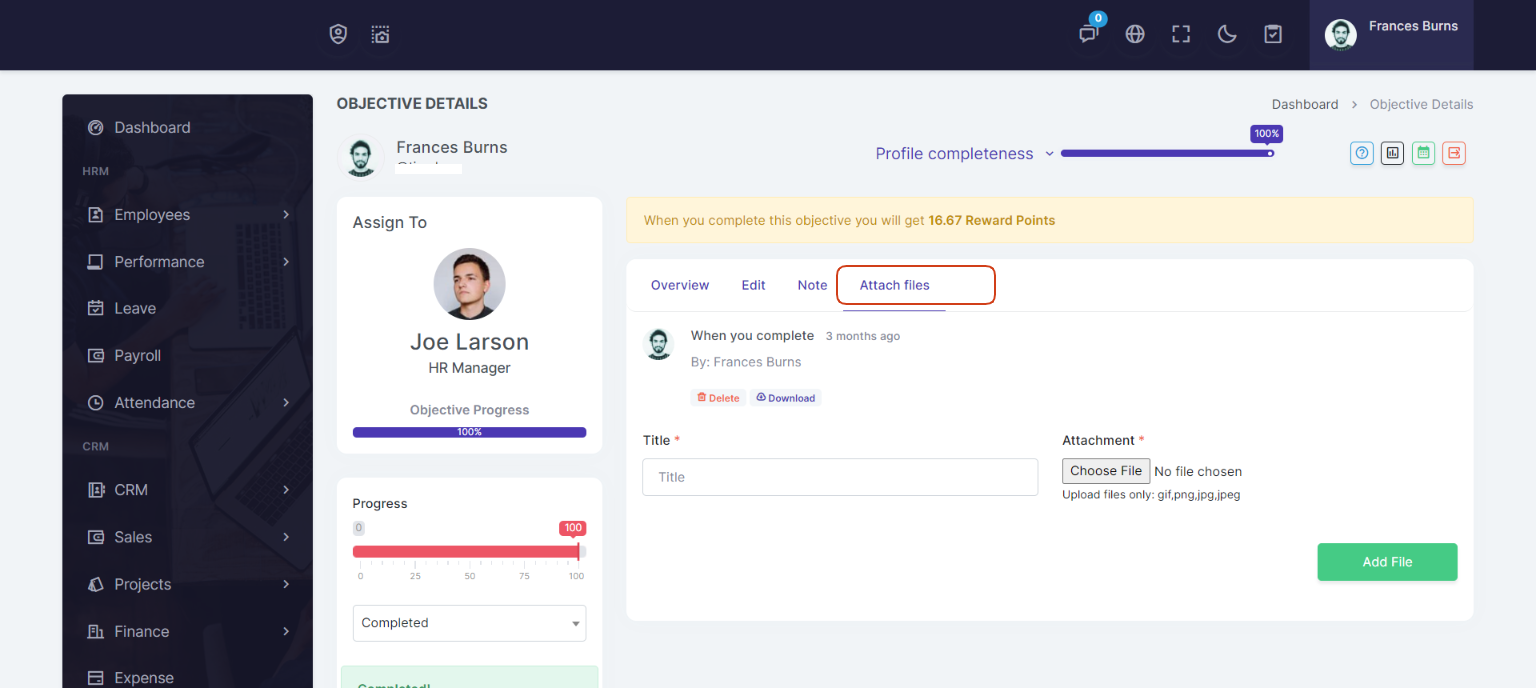
When you click on view details link, you can easily view the Performance Objective details, update Performance Objective progress, add notes, files and can edit the Performance Objective fields.
Payroll
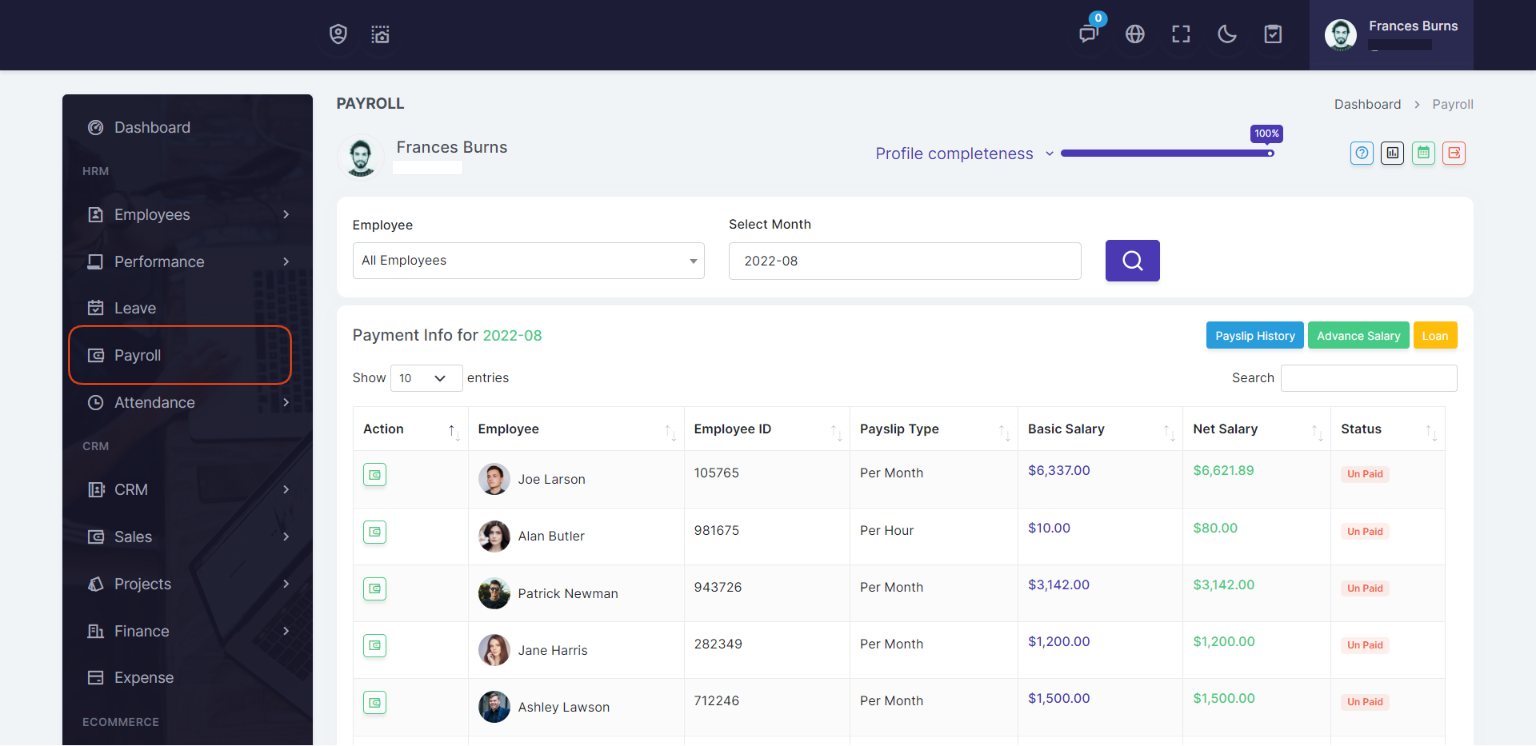
Payroll is the most vital part of this system. A very intelligent and robust payroll management is provided so that you do not have to worry about any aspect of your payroll management. The system will trigger and do almost everything for you.
You can setup payroll options on employee details page, as we already explained it in employee section Setup Payroll Options
Payroll List
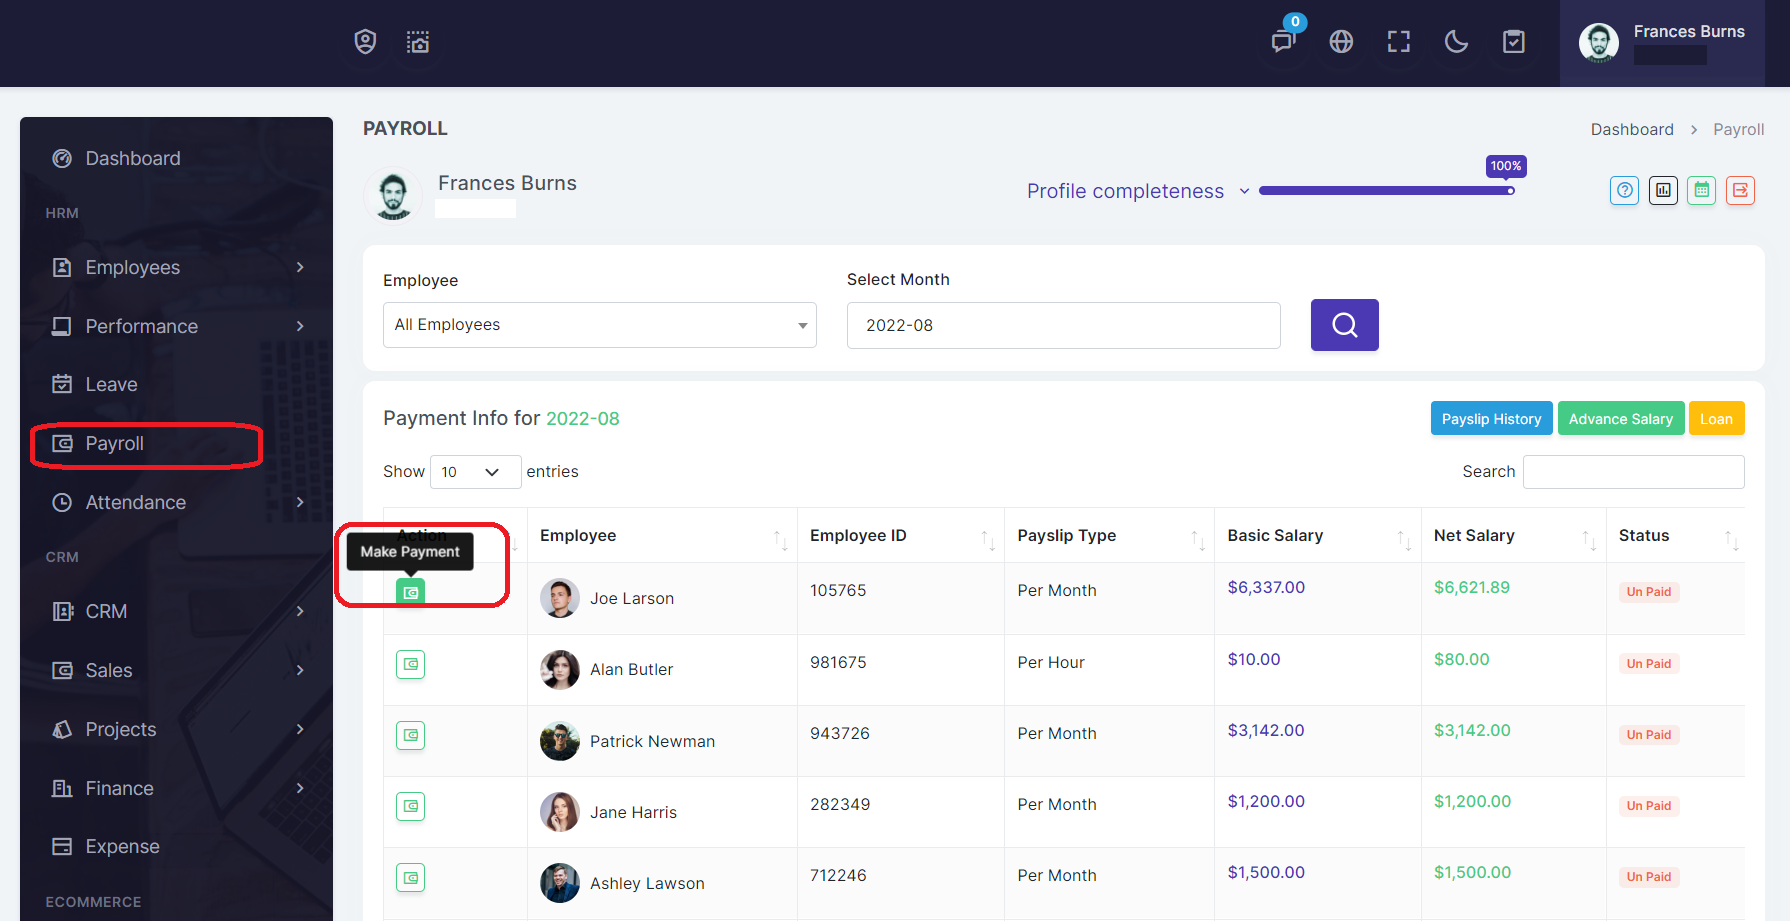
Make Payment
When you generate a payslip for an employee then mouse over on any employee and then click on make payment button, the modal box will option. Put a comment in the comment field and click on Make Payment Button
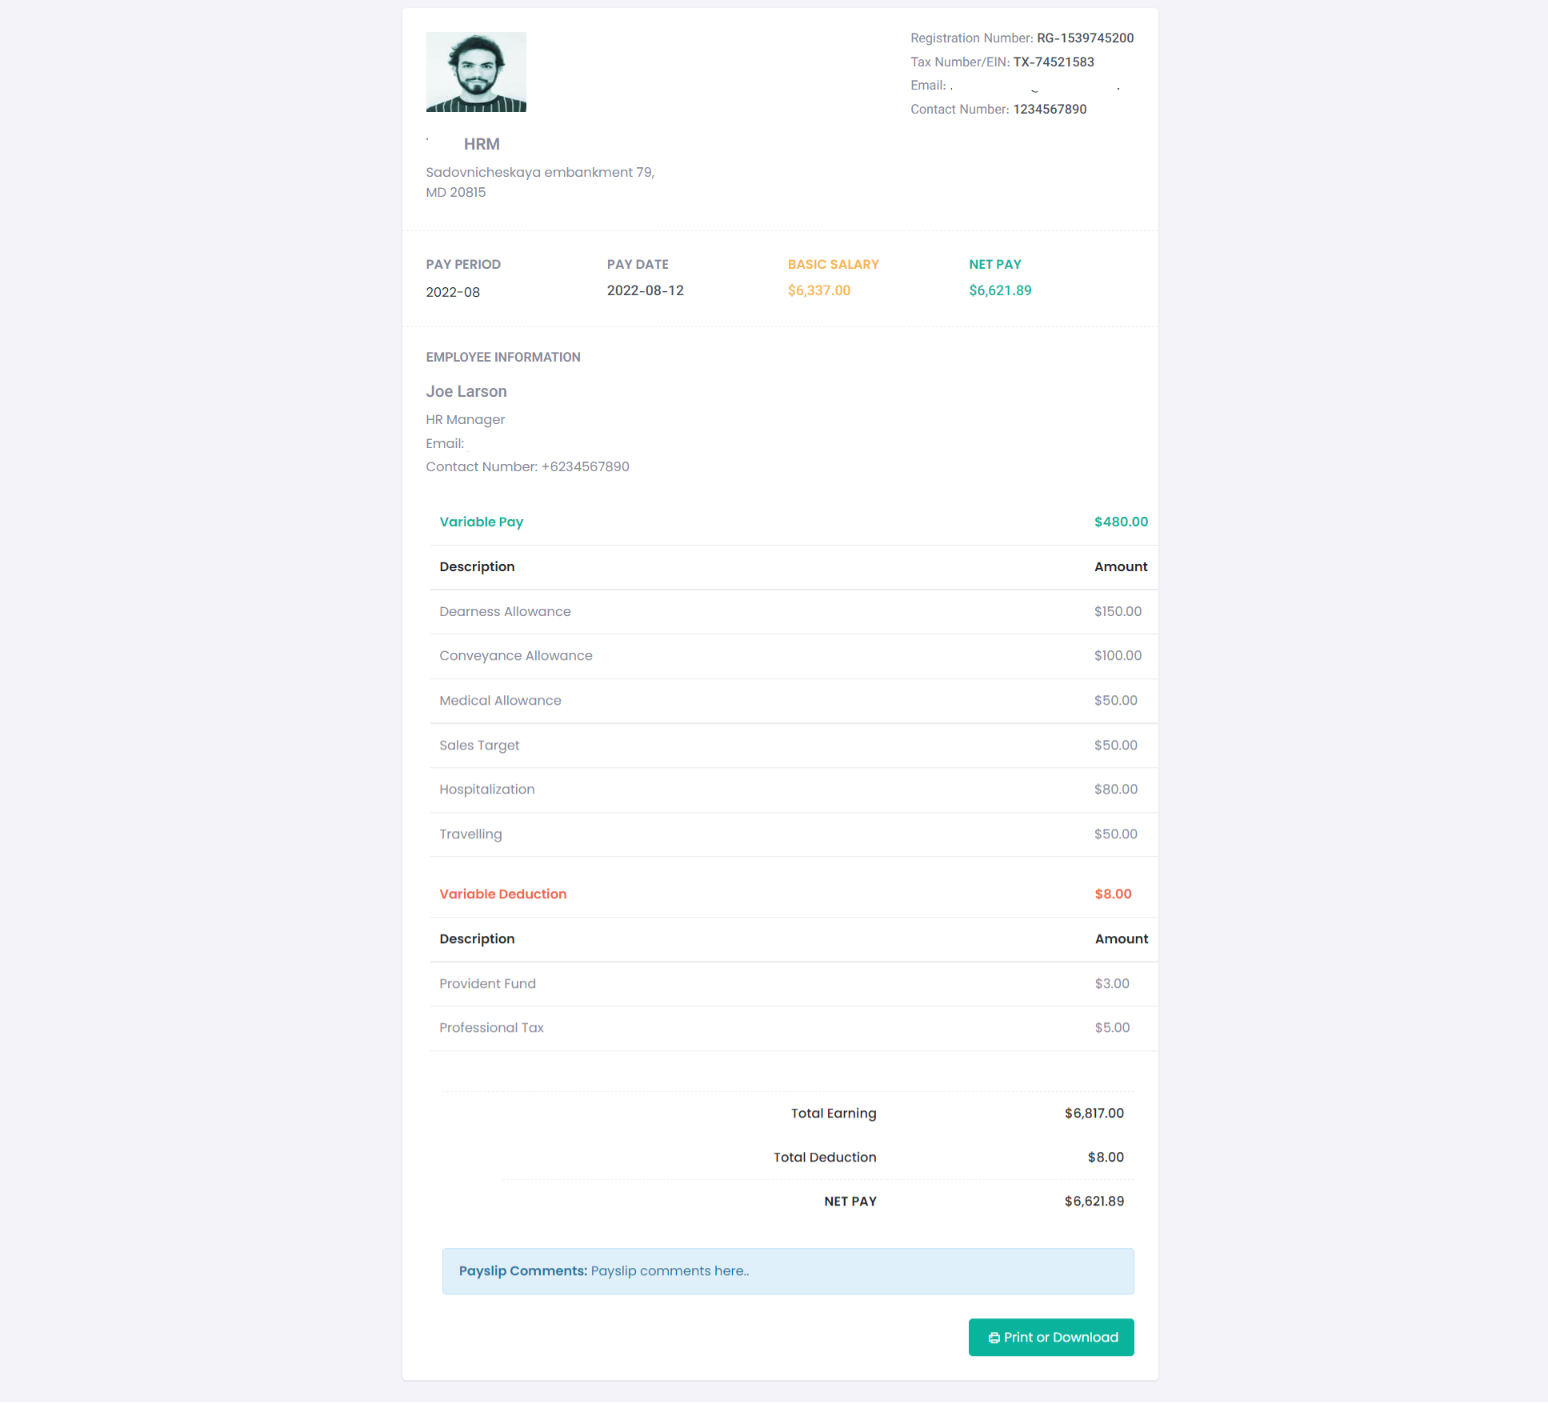
Payslip View
After generate a payslip, you can view the payslip of an employee. You can print the payslip or download the payslip in pdf in print section.
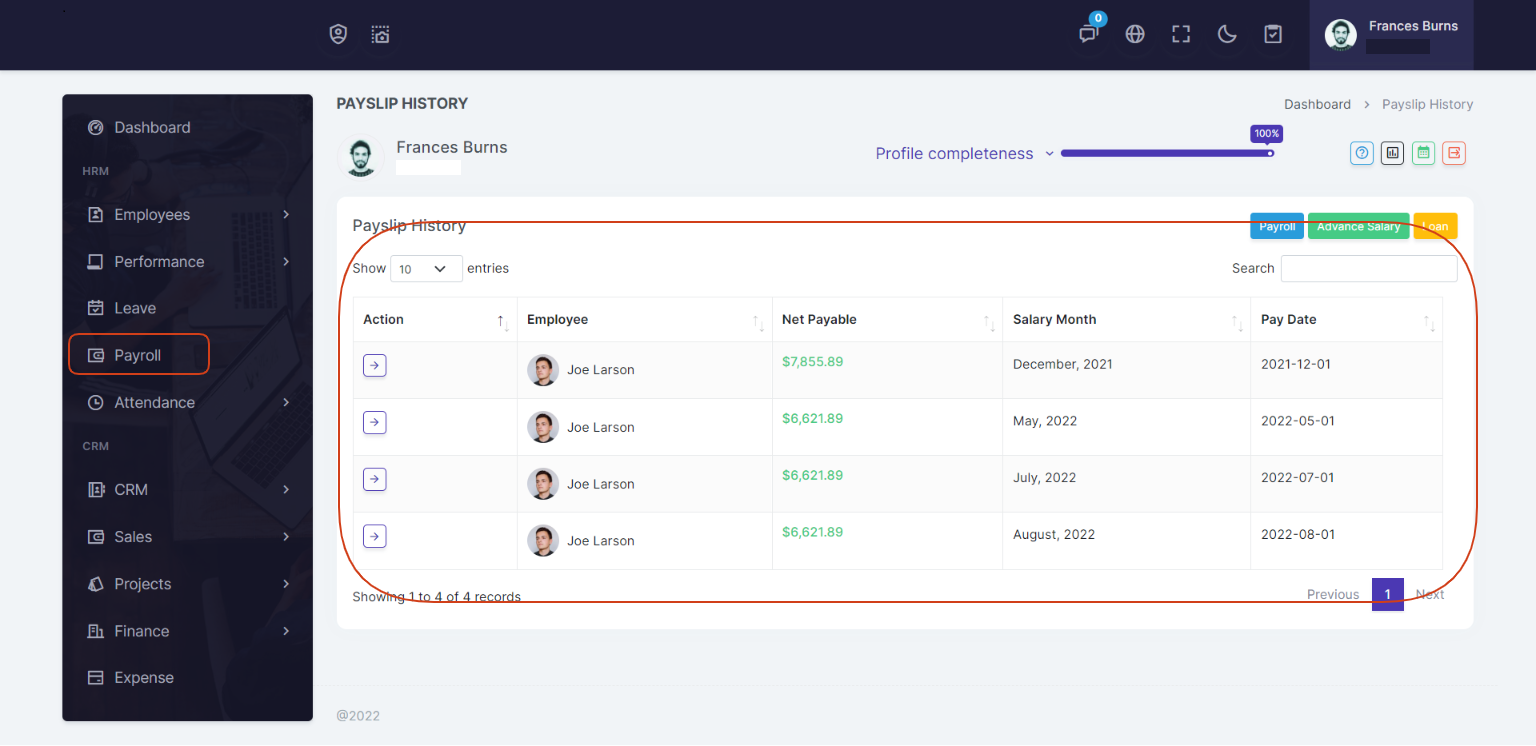
Payslip History
Go to Payroll > Payslip History page and see Payslip History
Advance Salary
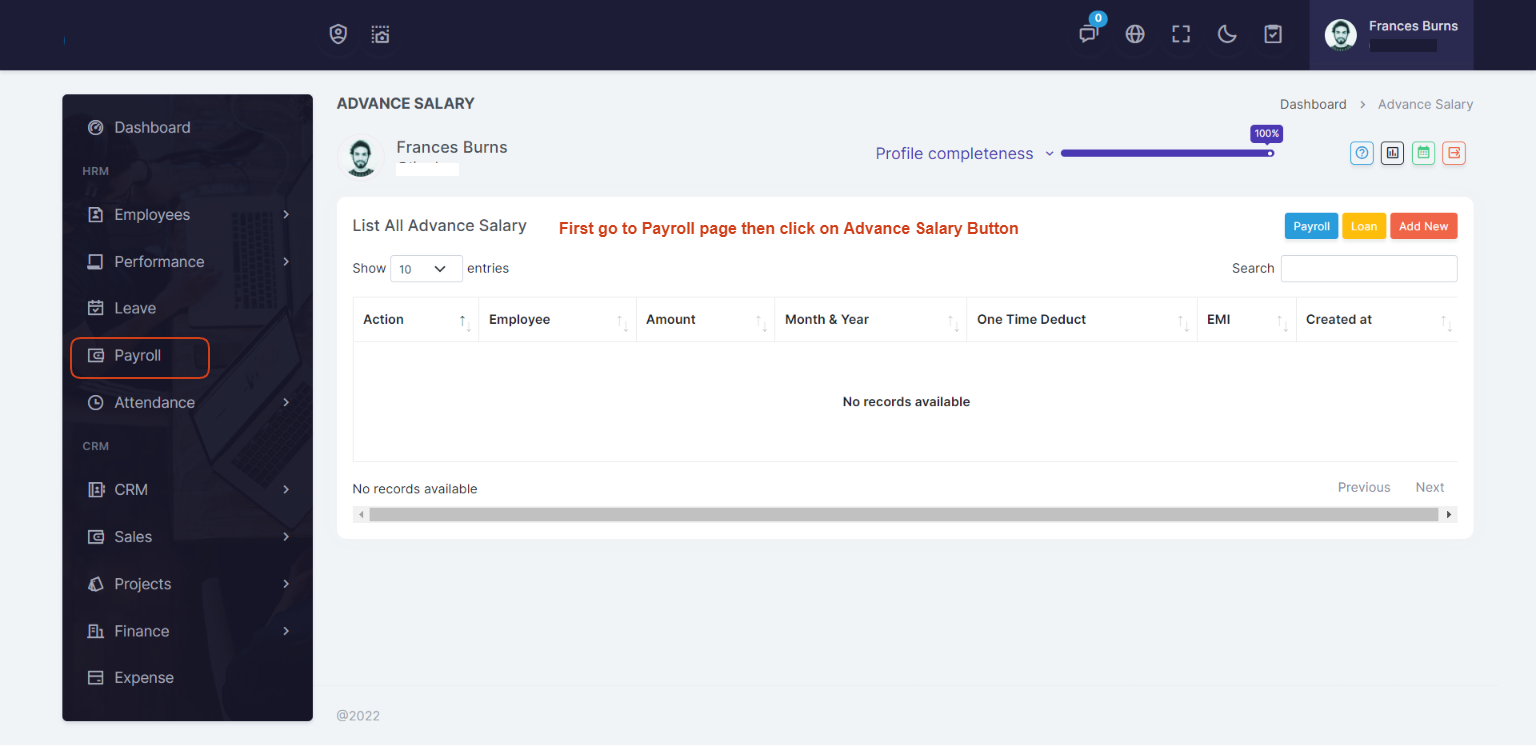
Go to Payroll > Advance Salary page and enter Advance Salary details. The advance salary amount will be adjusted in payslip
Loan
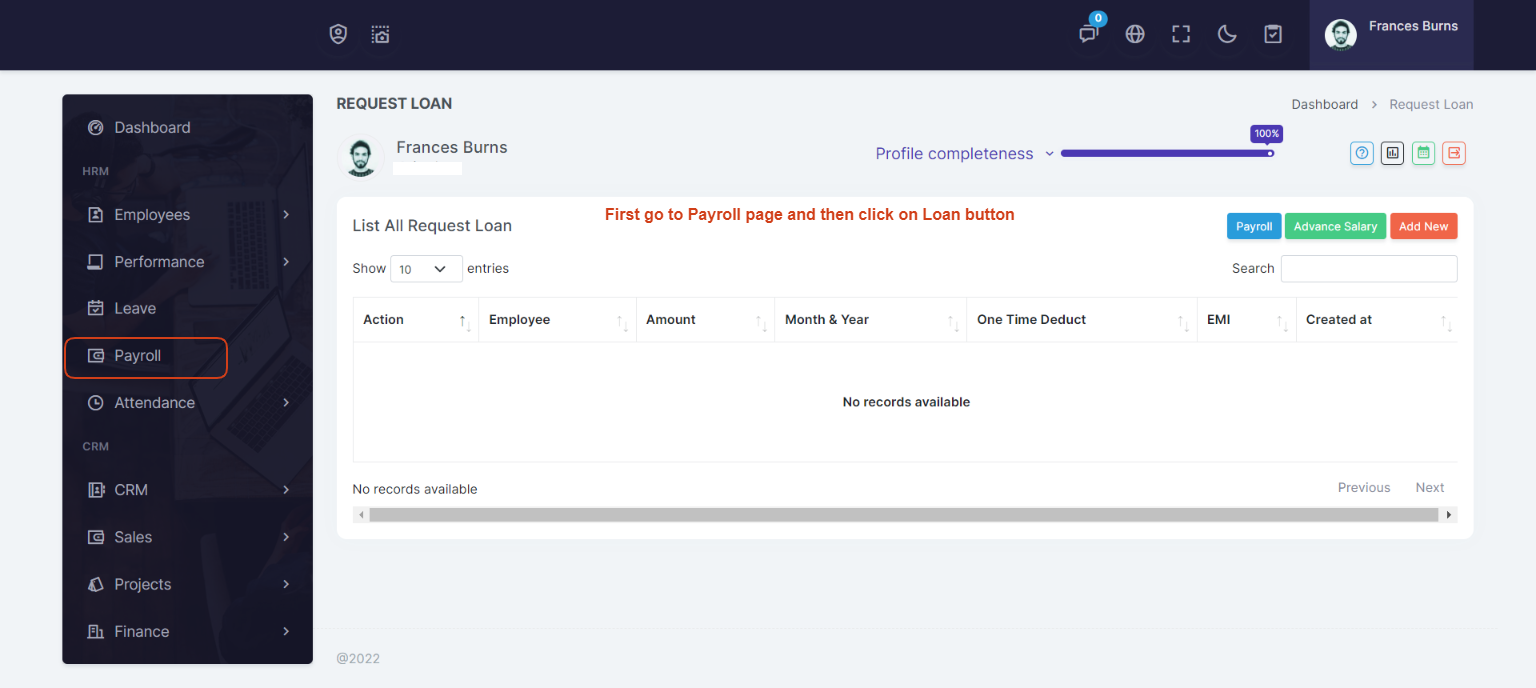
Go to Payroll > Loan page and enter Loan details. The taken loan amount will be adjusted in payslip
Leave
Each employee can see the balance of sick leave and vacation pay, and in one click, request a vacation or days off from the system. Approve or reject requests. The list of absentees and the dates of their return are now always in front of your eyes.
Leave is one of the key aspects of any human resource management software - therefore an easy and user friendly application handling facility is provided. Human Resource provides the following features:
Leave Type
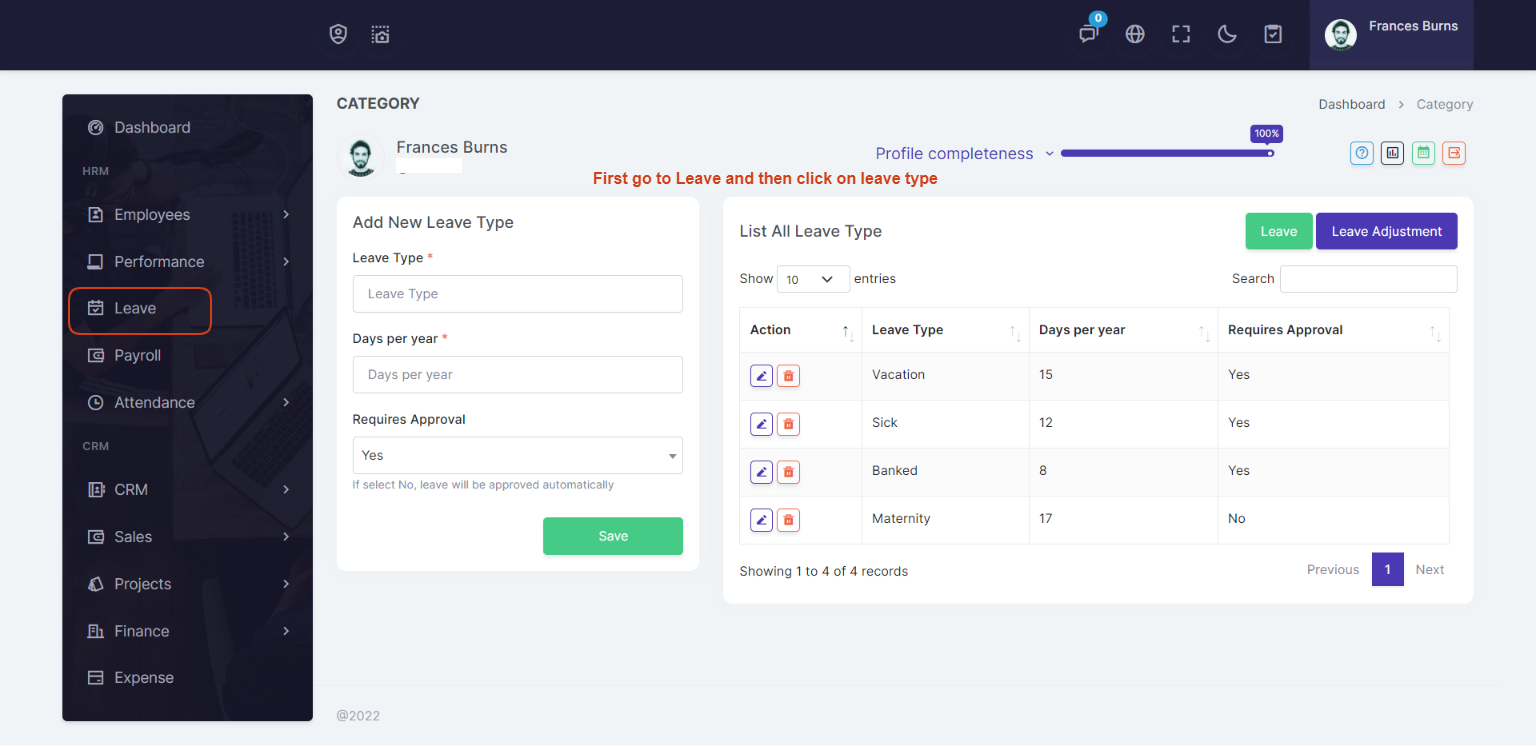
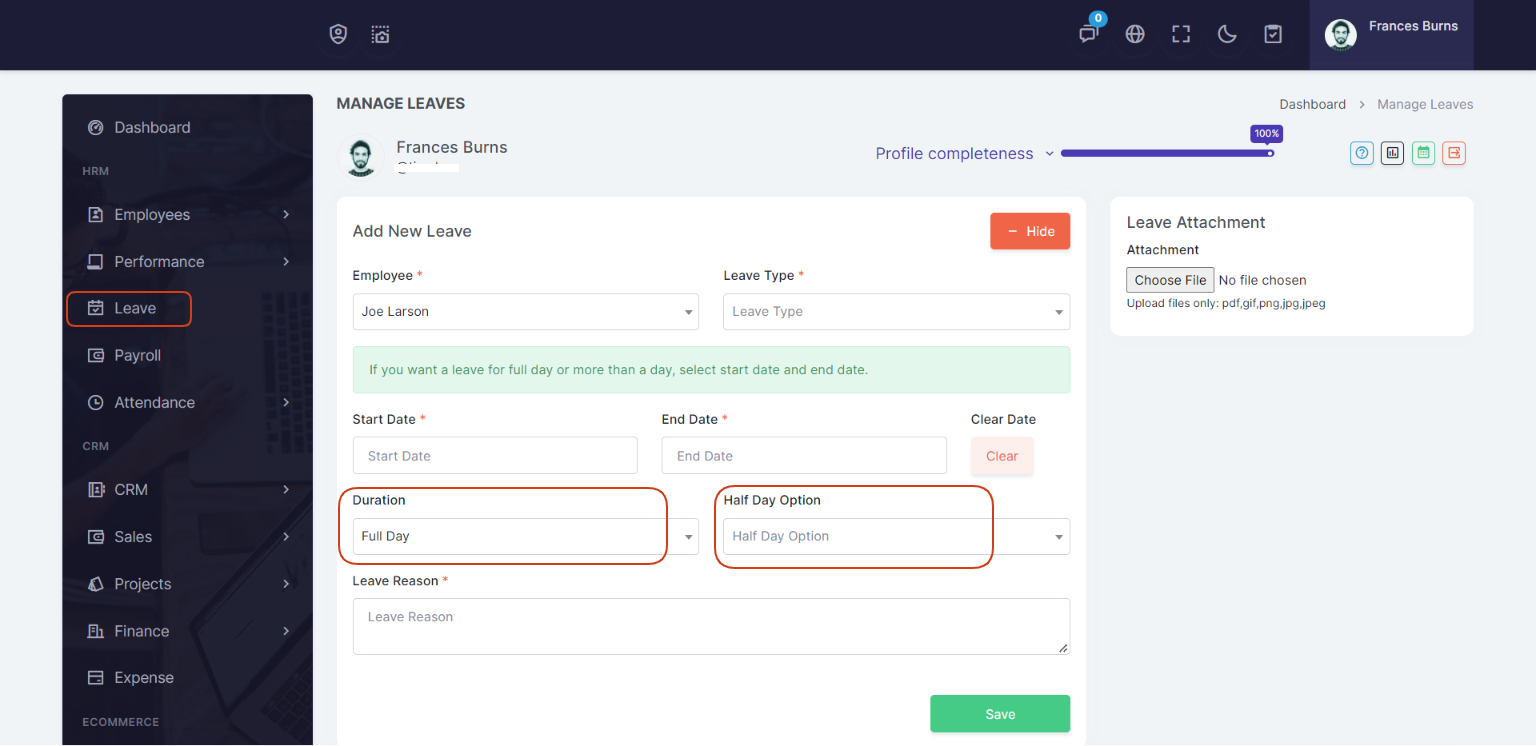
Go to Leave > Leave Types and add Leave Types details.
Admin from general settings can create leave type - which will be the key for every employees to apply for any leave application under those categroies.
Leave List
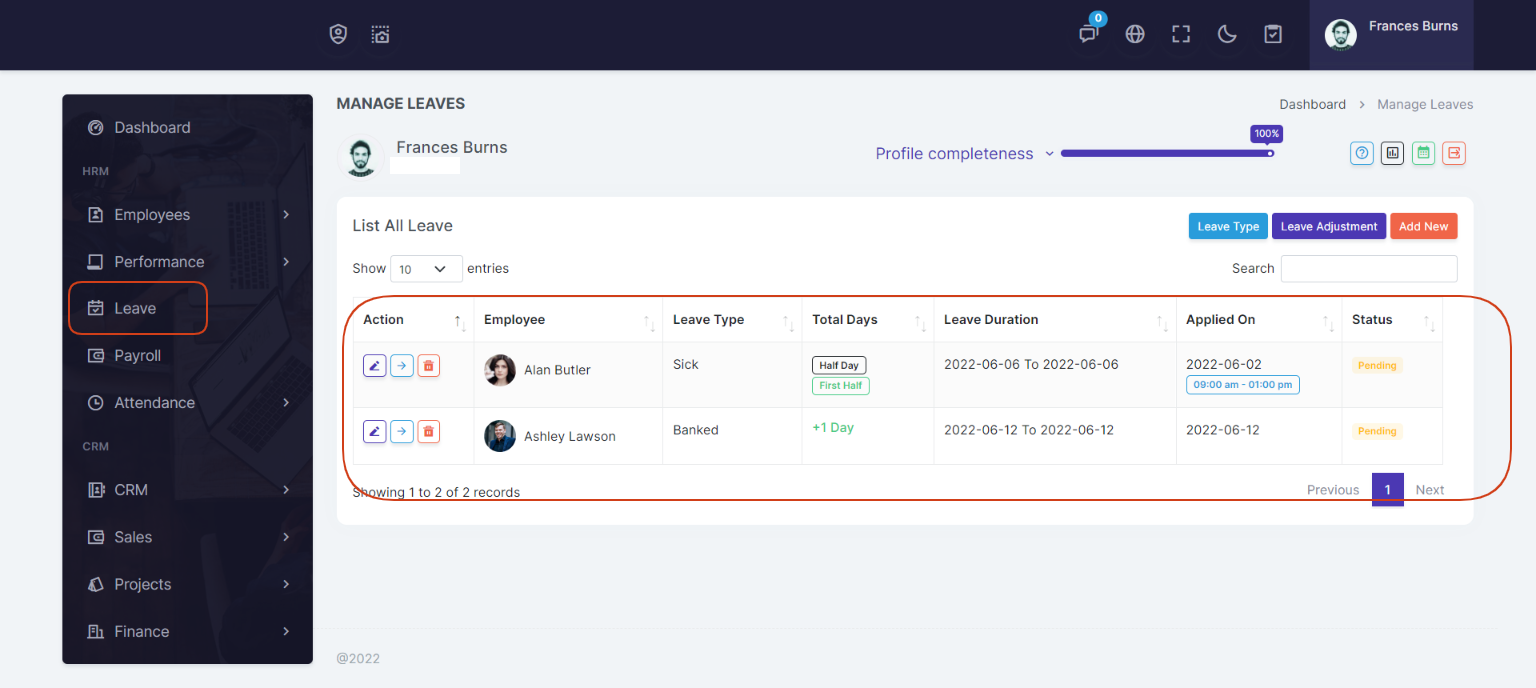
Go to Leave page and add Leave details.
You can see list of all leave at a glance.
Leave Details
Go to Leave > Click on leave details link
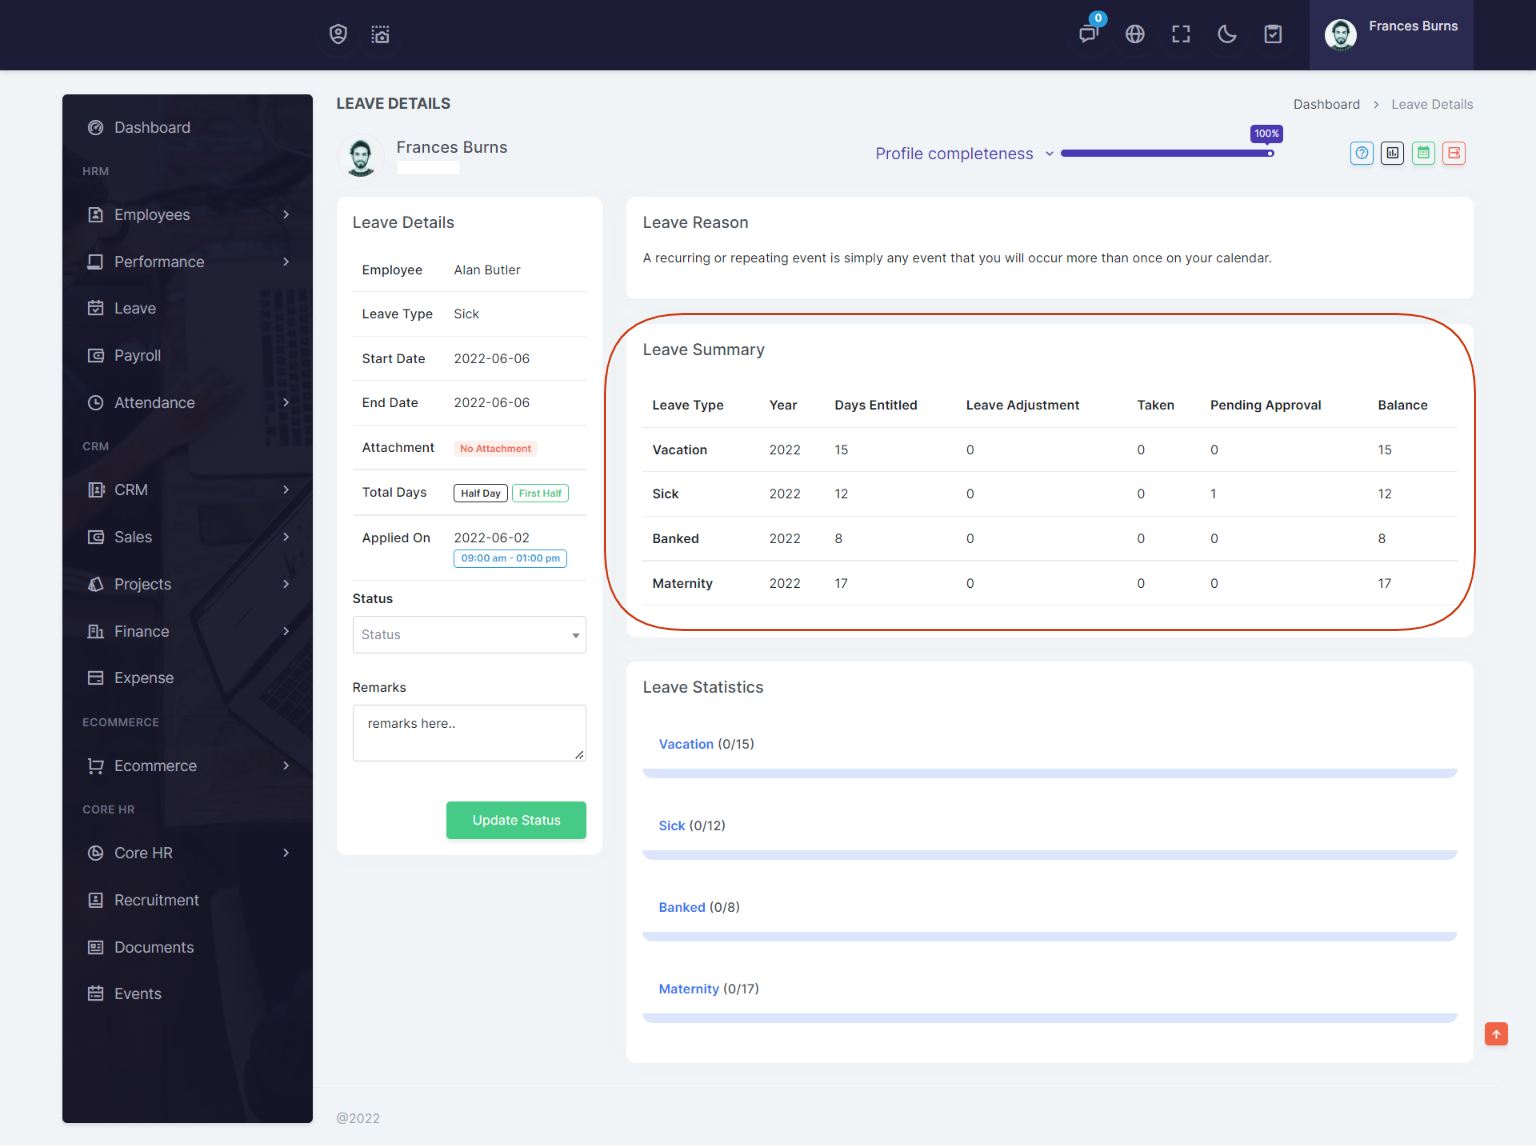
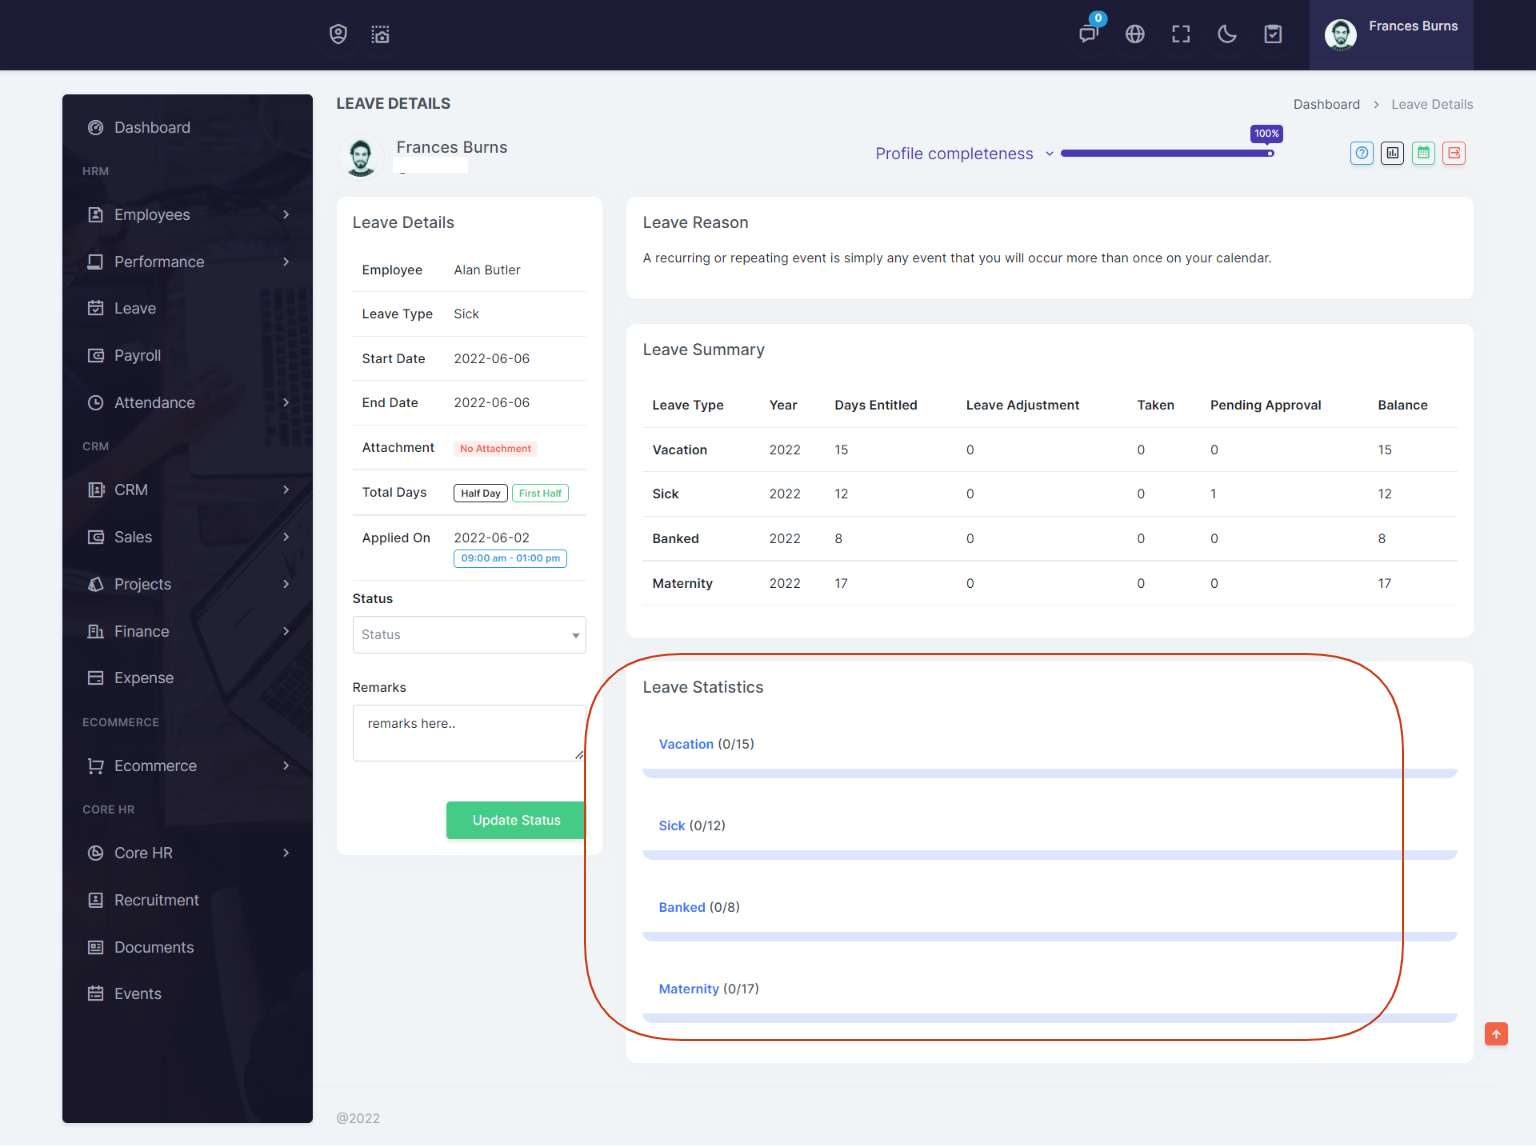
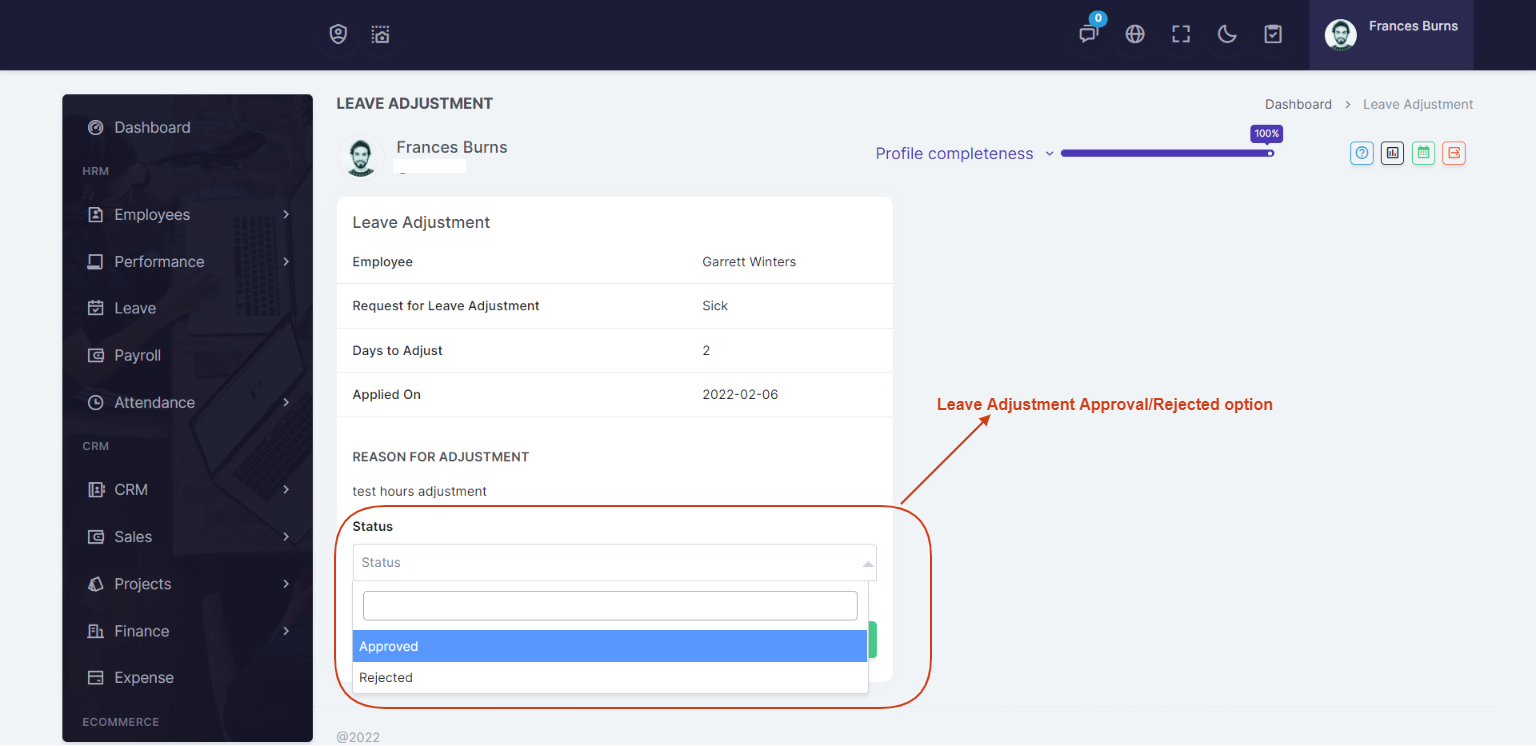
On leave details you can approve/reject the leave. Also you can see the Leave Summary of each leave type
For each leave type it will show Year, Days Entitled, Leave adjustment, Leave taken Pending approval and leave balance details
On leave details page you can also view the Leave Summary of each leave type
Leave Adjustment
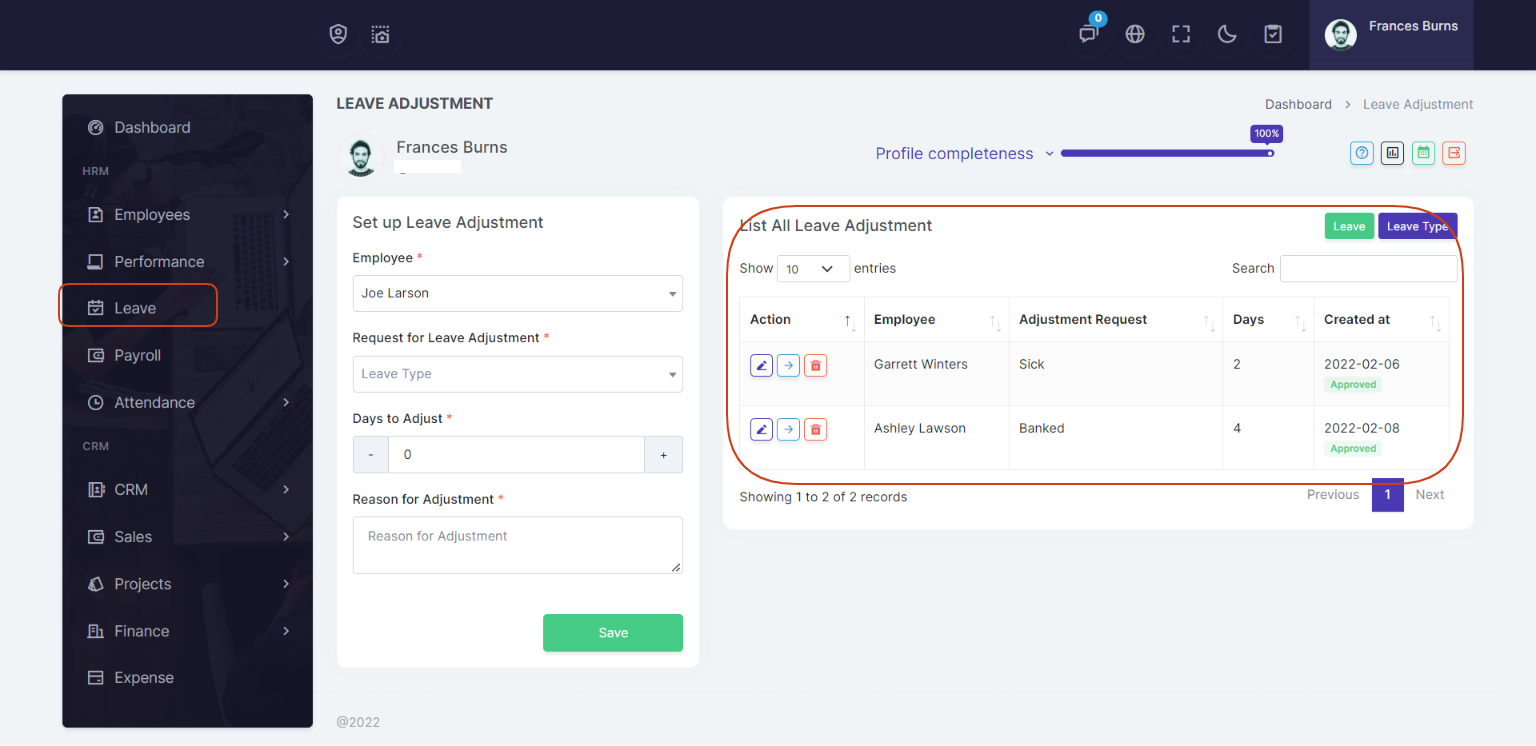
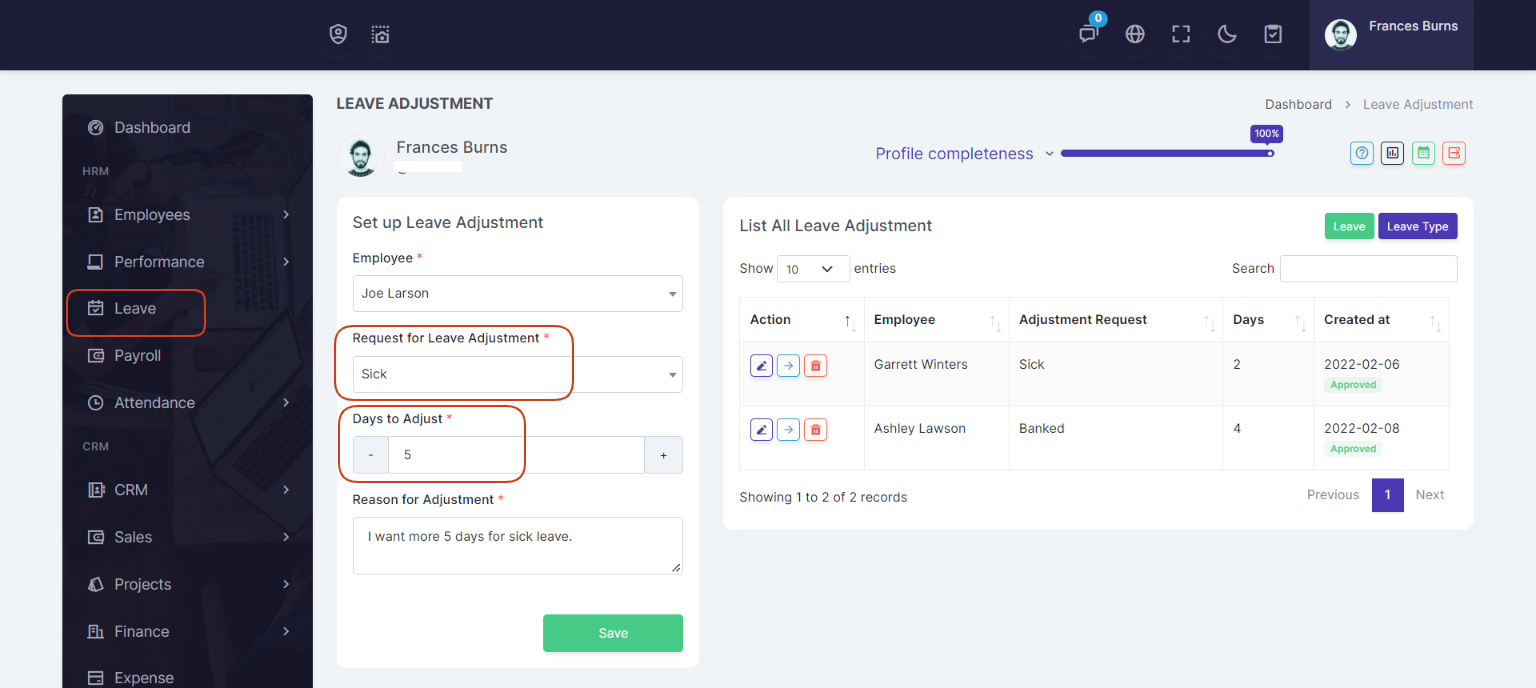
Go to Leave page and then click on Leave Adjustment.
You can see list of all leave adjustment at a glance.
Employee can apply for a leave adjustment when an employee needs more days for a leave.
For example: If Sick Leave Type has 15 days and employee wants 20 days for Sick Leave Type, then simply go to Leave Adjustment page and select Sick Leave Type and add 5 days for leave adjustment. If this request approve by admin then 5 days will be added to an employee account. After approve employee will be able to apply for a Sick Leave Type for 20 days.
Leave Adjustment approval/rejection options
Attendance
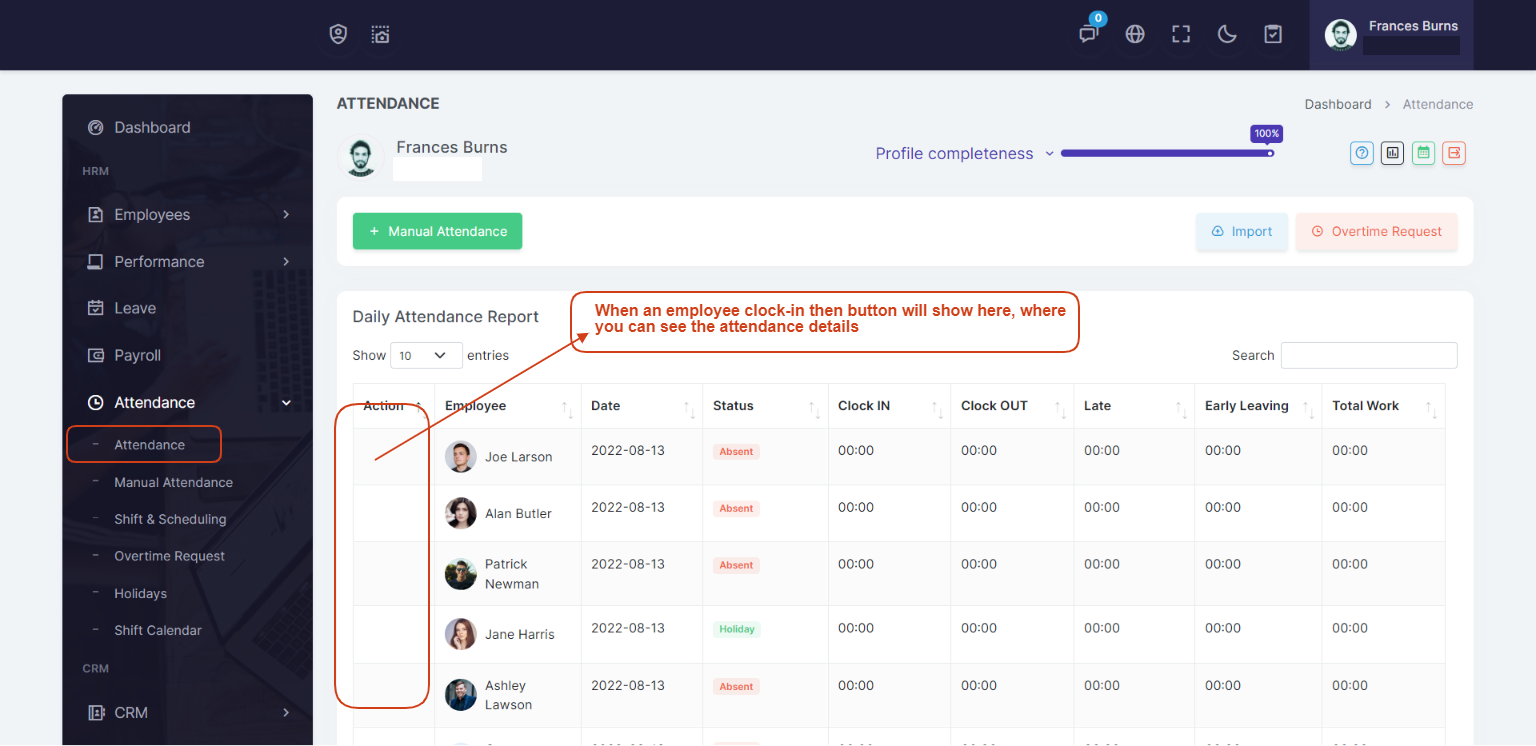
Daily Attendance is key for any Human Resource Management system to accurately manage and maintain employees. In MassHRM - a beautiful and very effective attendance management is provided. Employees will be using Clock In and Clock Out attendance for day to day attendance activities. Employees from their panel will get a beautiful button to Clock In and Clock Out as they require. They can provide comments and can also view their own attendance activities from their panel.
Go to Attendance > Attendance
You can also view the location of employees from where they clock-in and clock-out.
Manual Attendance
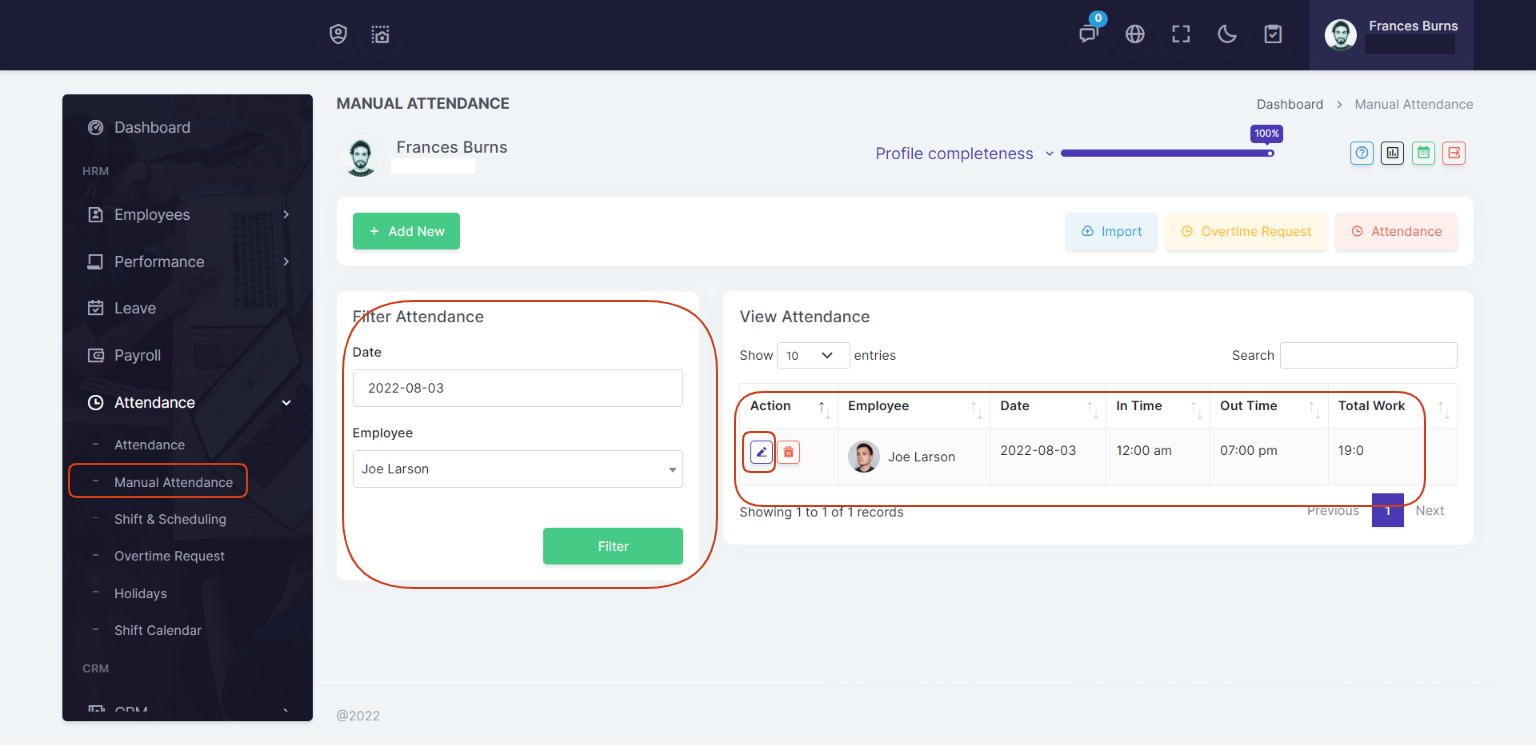
In Manual Attendance page you can update attendance for employees. First select any date in calendar and then employee, you will get attendances of that employee.
Go to Attendance > Manual Attendance
Manual Attendance list page according to selection of Date and Employee
Add Attendance for an employee
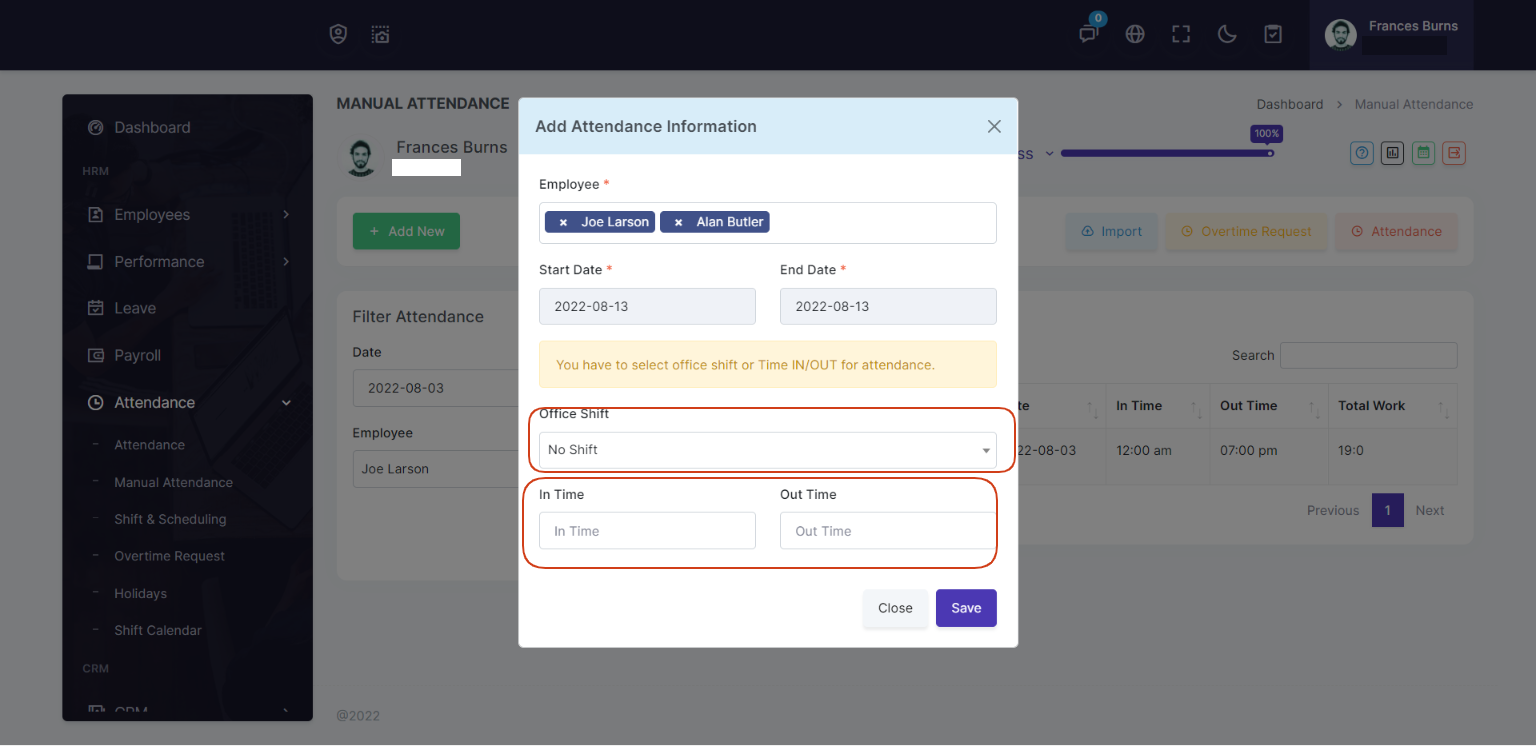
You can add attendance for an employee to select one or more employees, start date, end date, office shift. If you select office shift then time will be added according to shift, or if no shift selected then you can add time in and time out for attendance.
Overtime Request
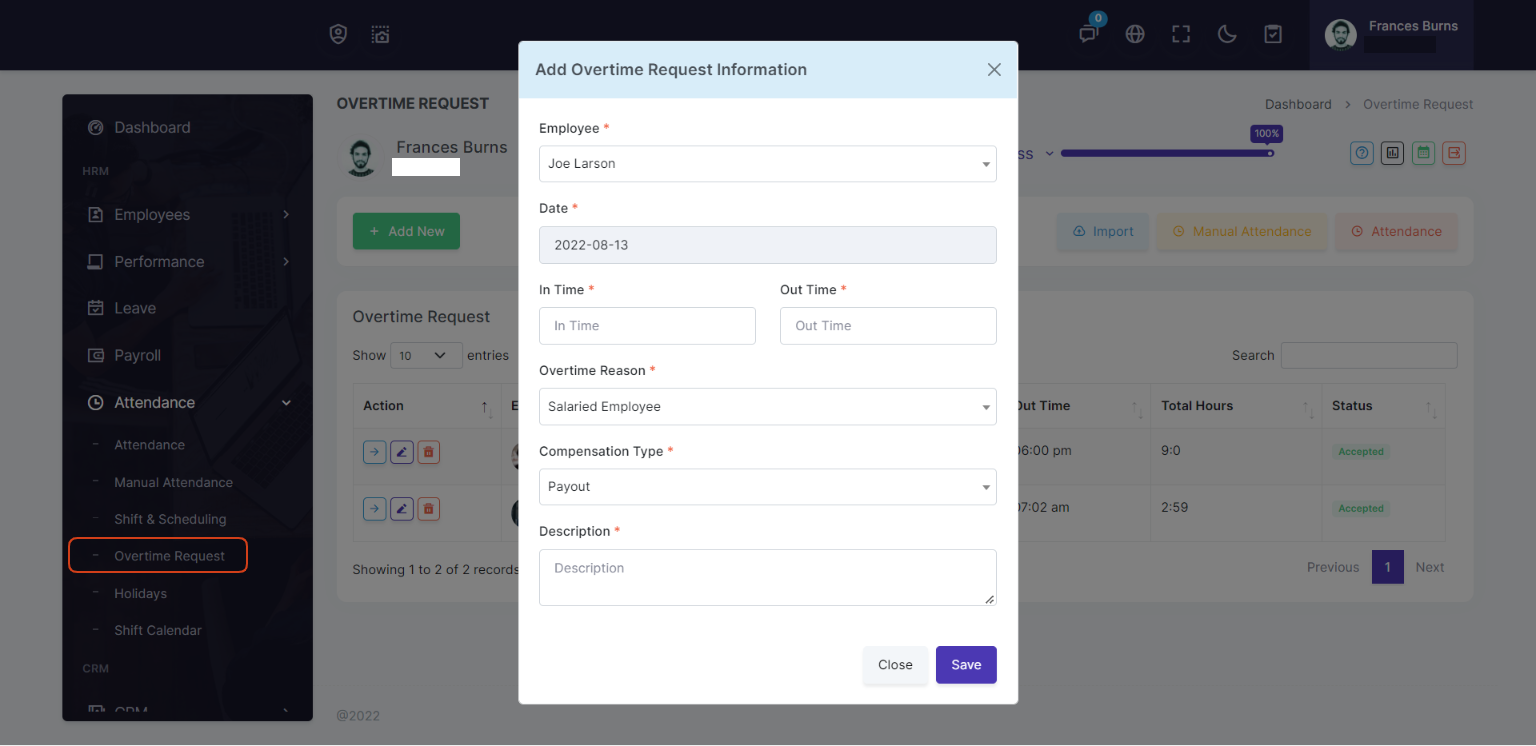
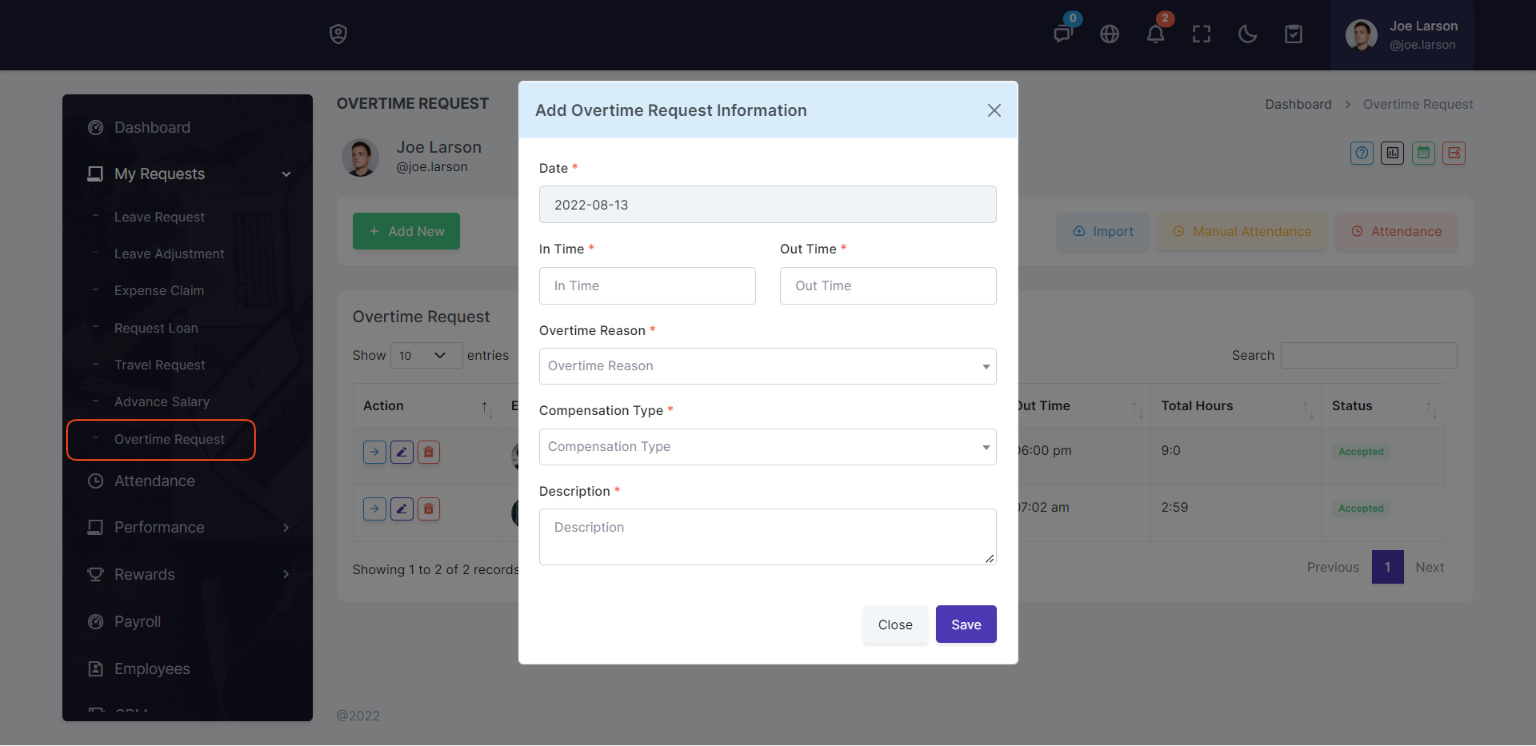
In Overtime Request page an employee can send request for overtime
In company portal menu, Go to Attendance > Overtime Request
In employee portal menu, Go to My Requests > Overtime Request
Holidays
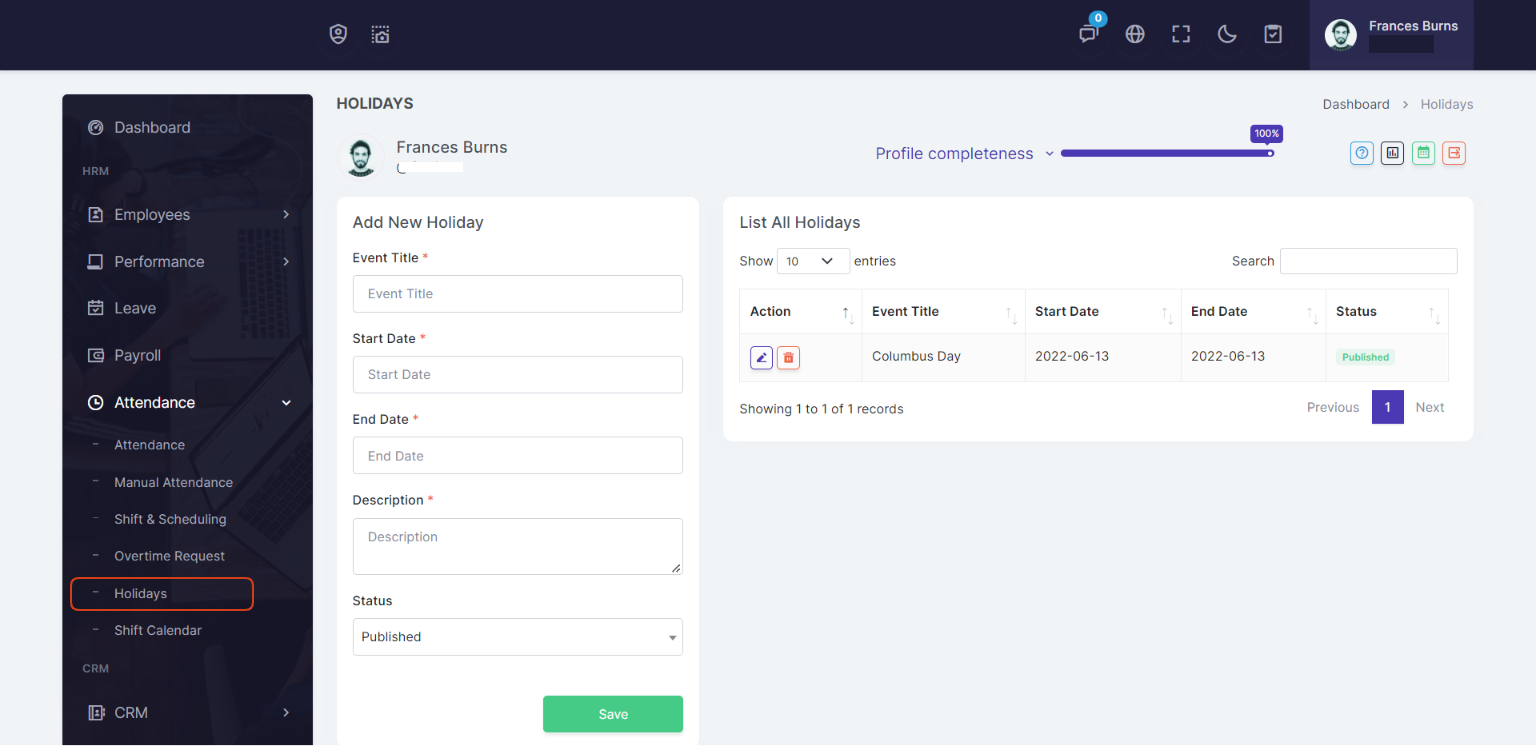
On holidays page you can announce holidays for employees
To add holiday first you need to enter Event name, then start date, then end date and then holiday description.
Go to Attendance > Holidays
Add Holiday and Holidays List
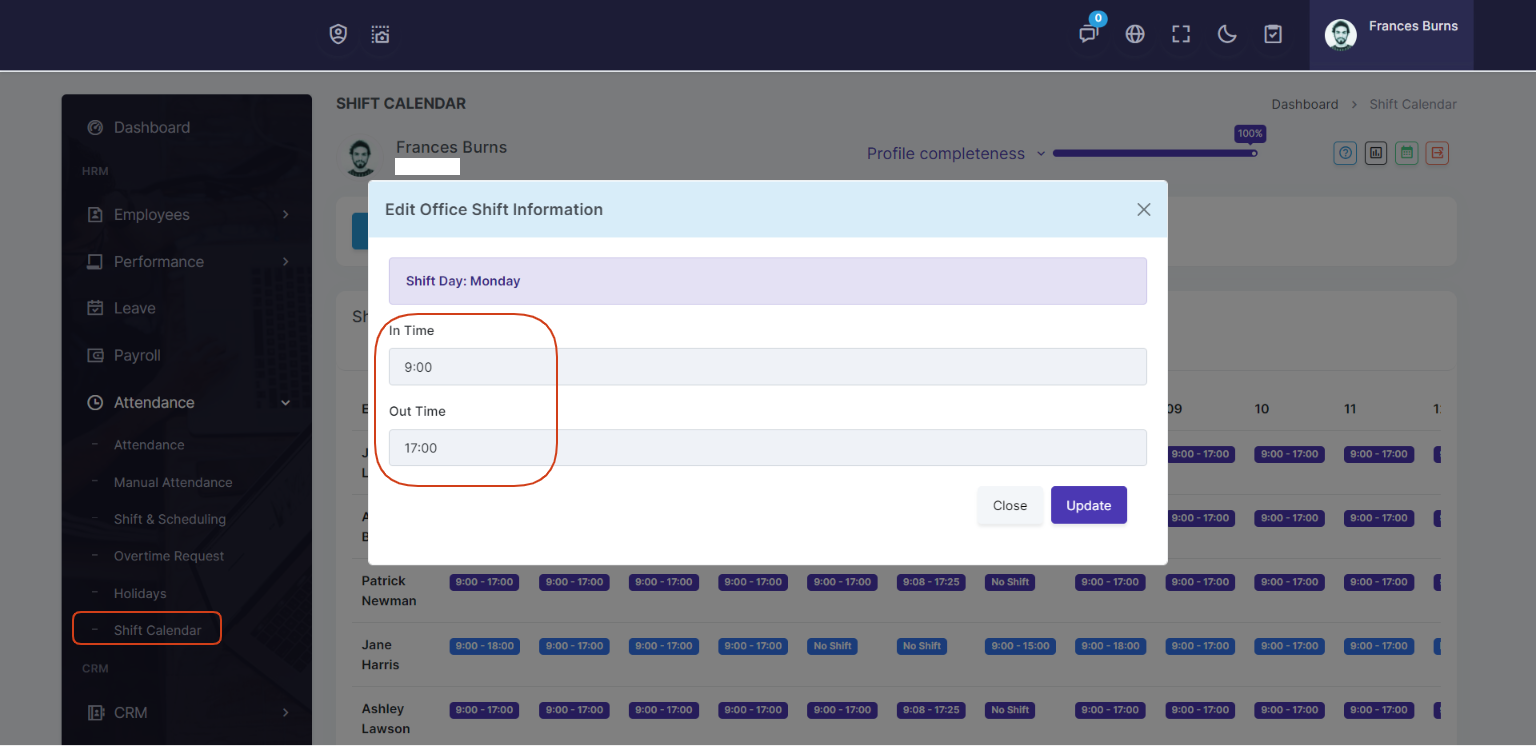
Shift Calendar
On shift calendar page you can update shift time for employees
Go to Attendance > Shift Calendar
CRM
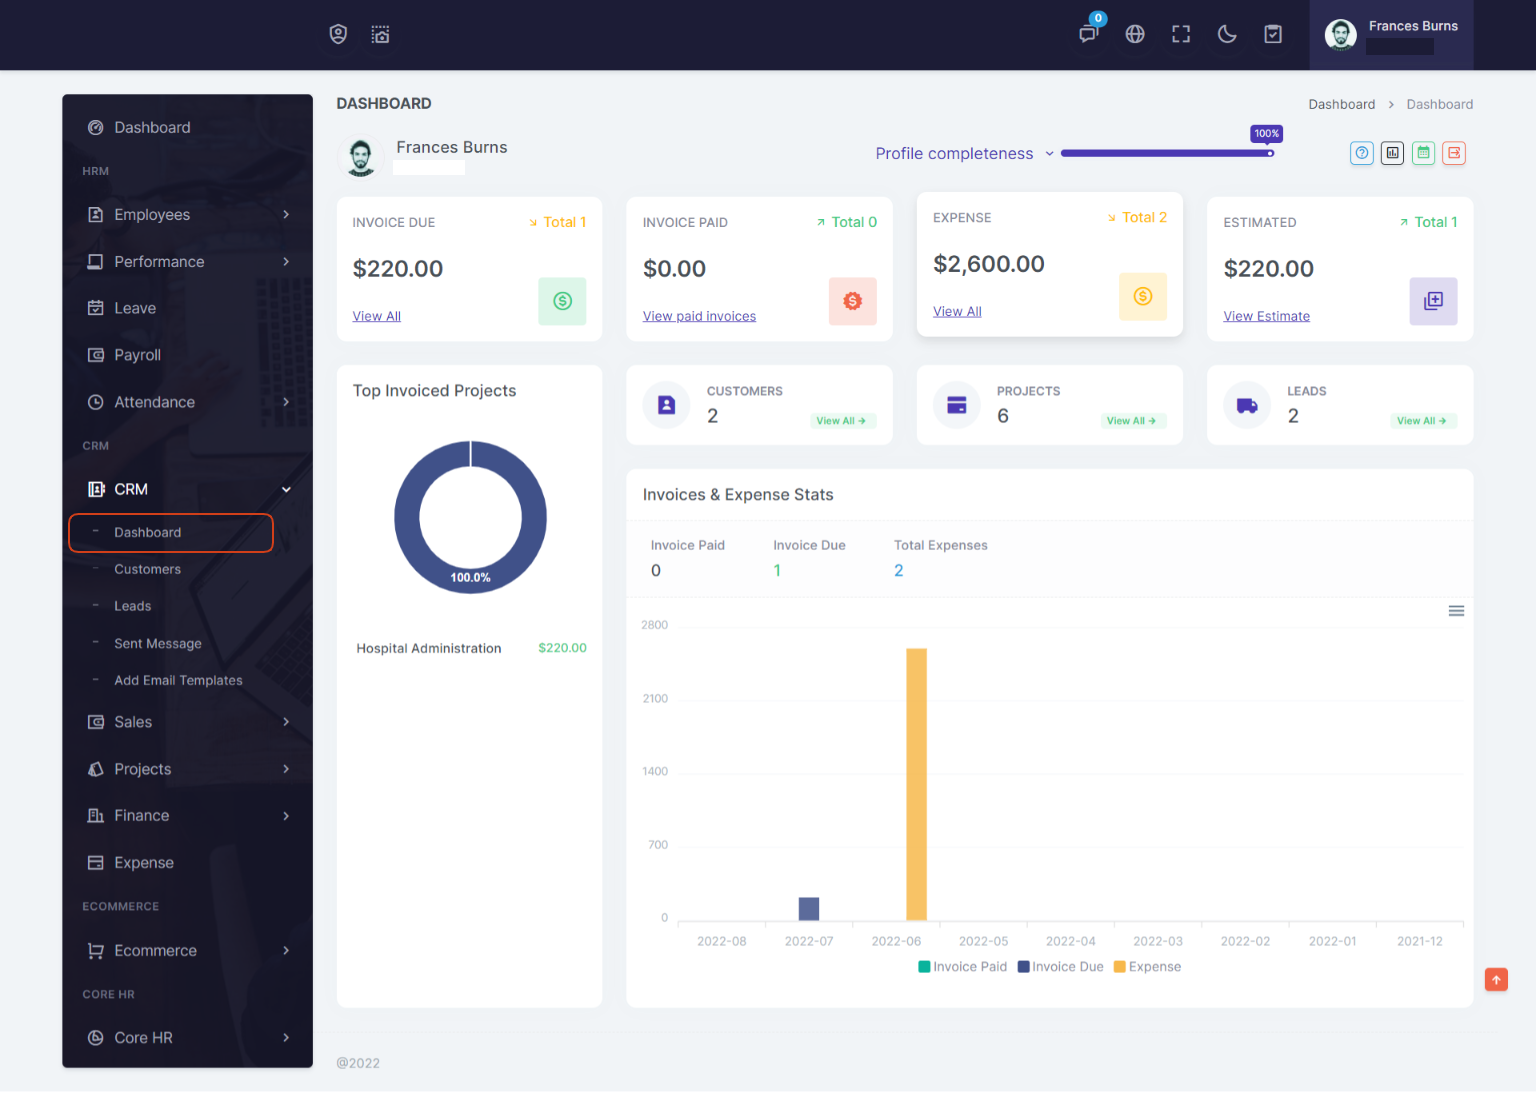
CRM Dashboard
On CRM dashboard you can view the summary of:
- Invoice Due
- Paid Invoices
- Expenses
- Estimates
- Total Customers, Projects and Leads
- Top Invoiced Projects
- Invoices & Expense Stats
Customers
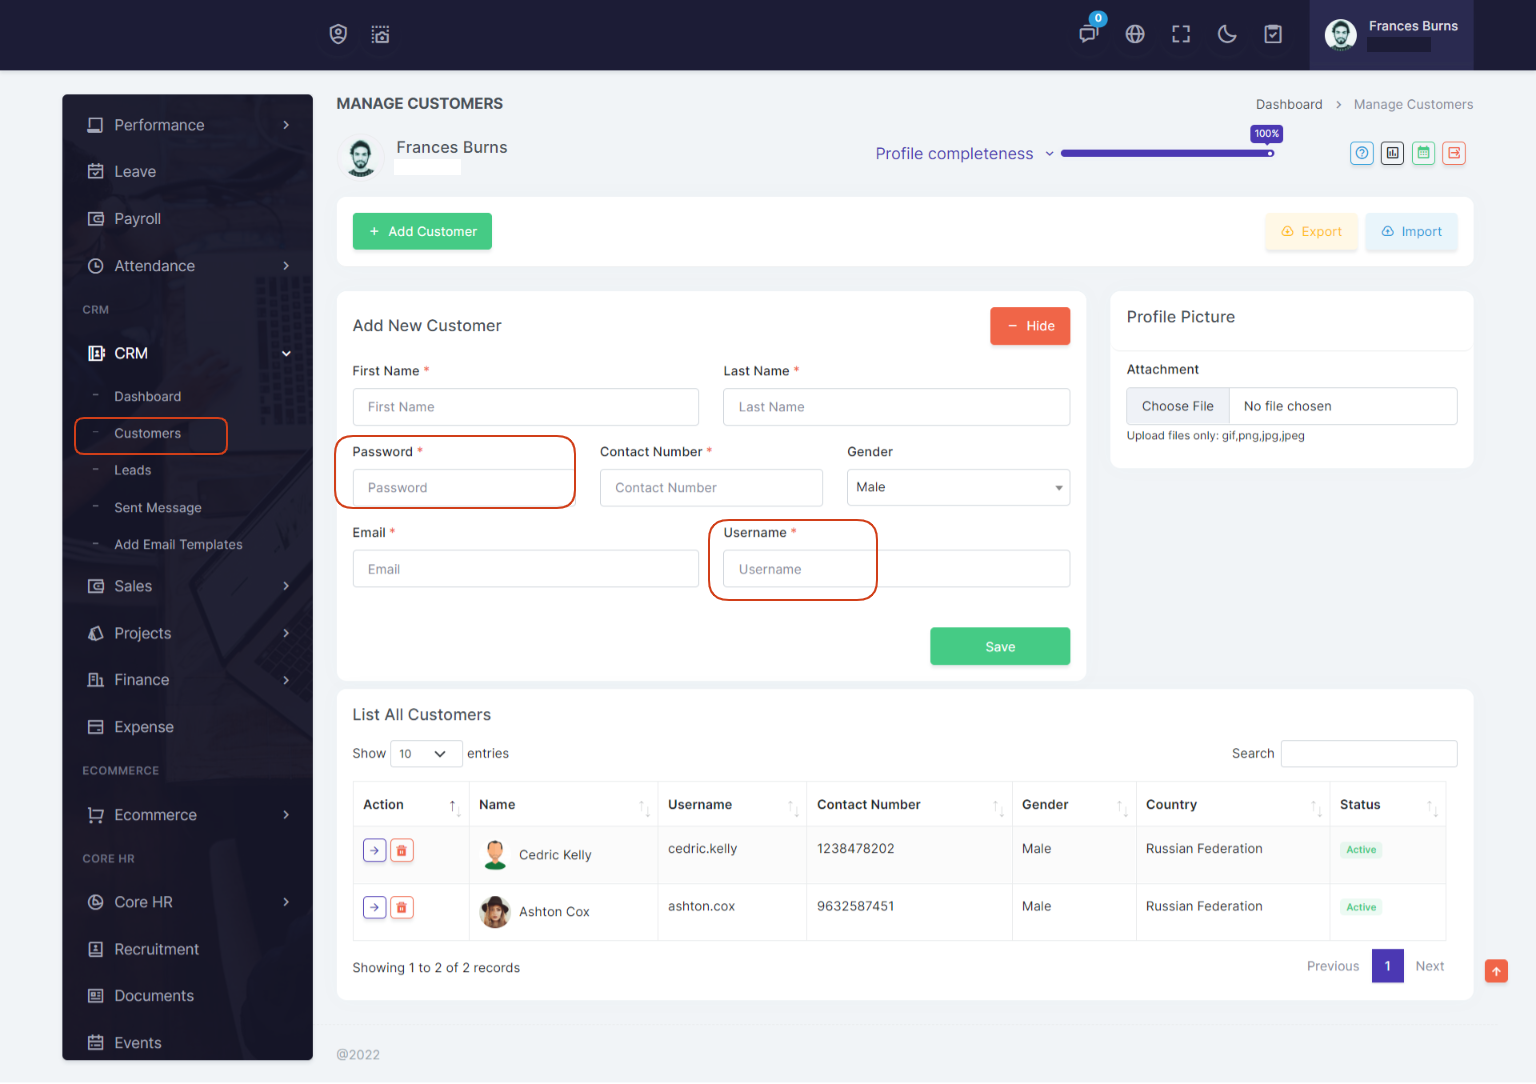
On Customers page you can add customer for projects. While adding a new customer you can add username and password for a customer, then customer will use username/password to login to their dashboard. Customer will see the related projects, invoices and tasks.
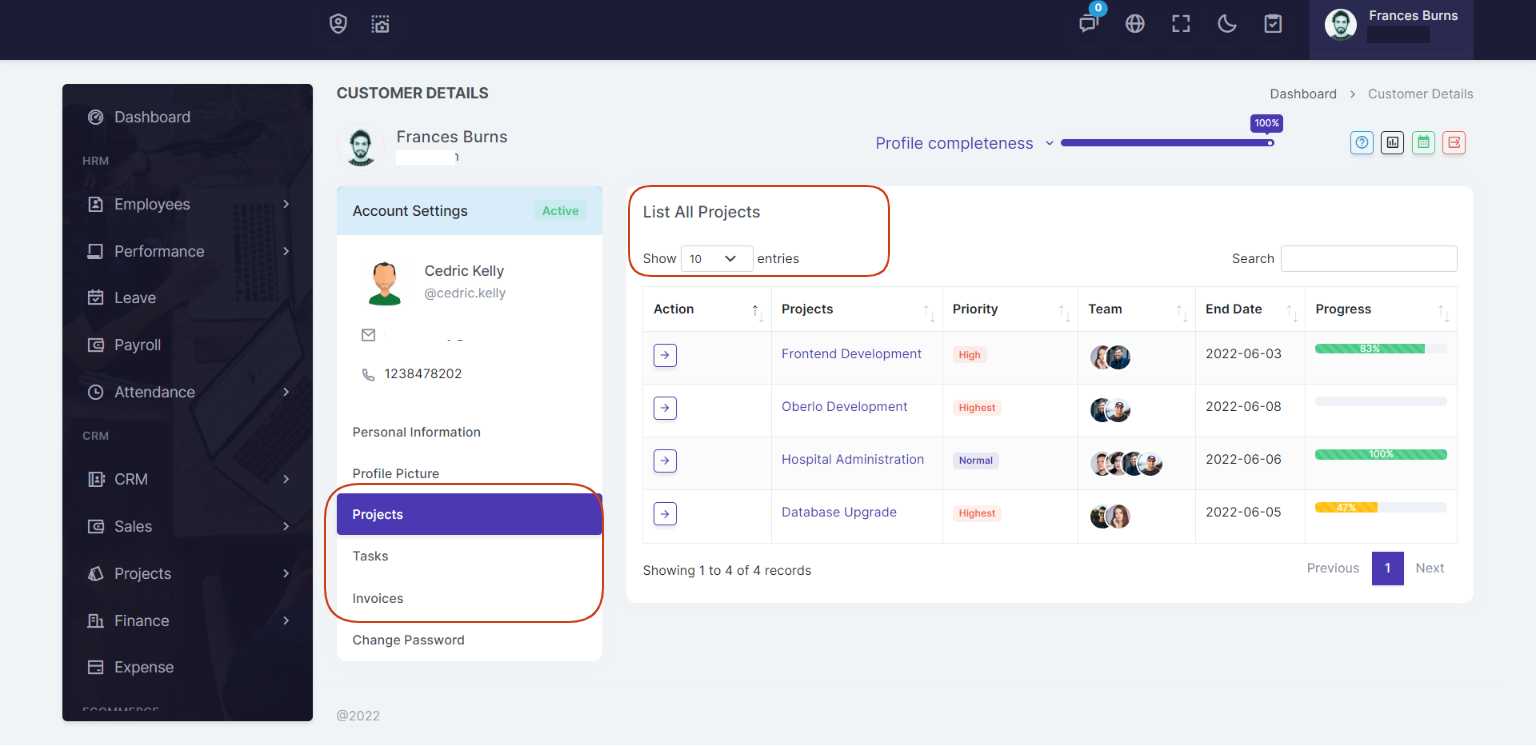
When you add new customer then click on customer details link it will be redirected customer view page, here you can see the assigned projects, tasks and invoices.
Leads
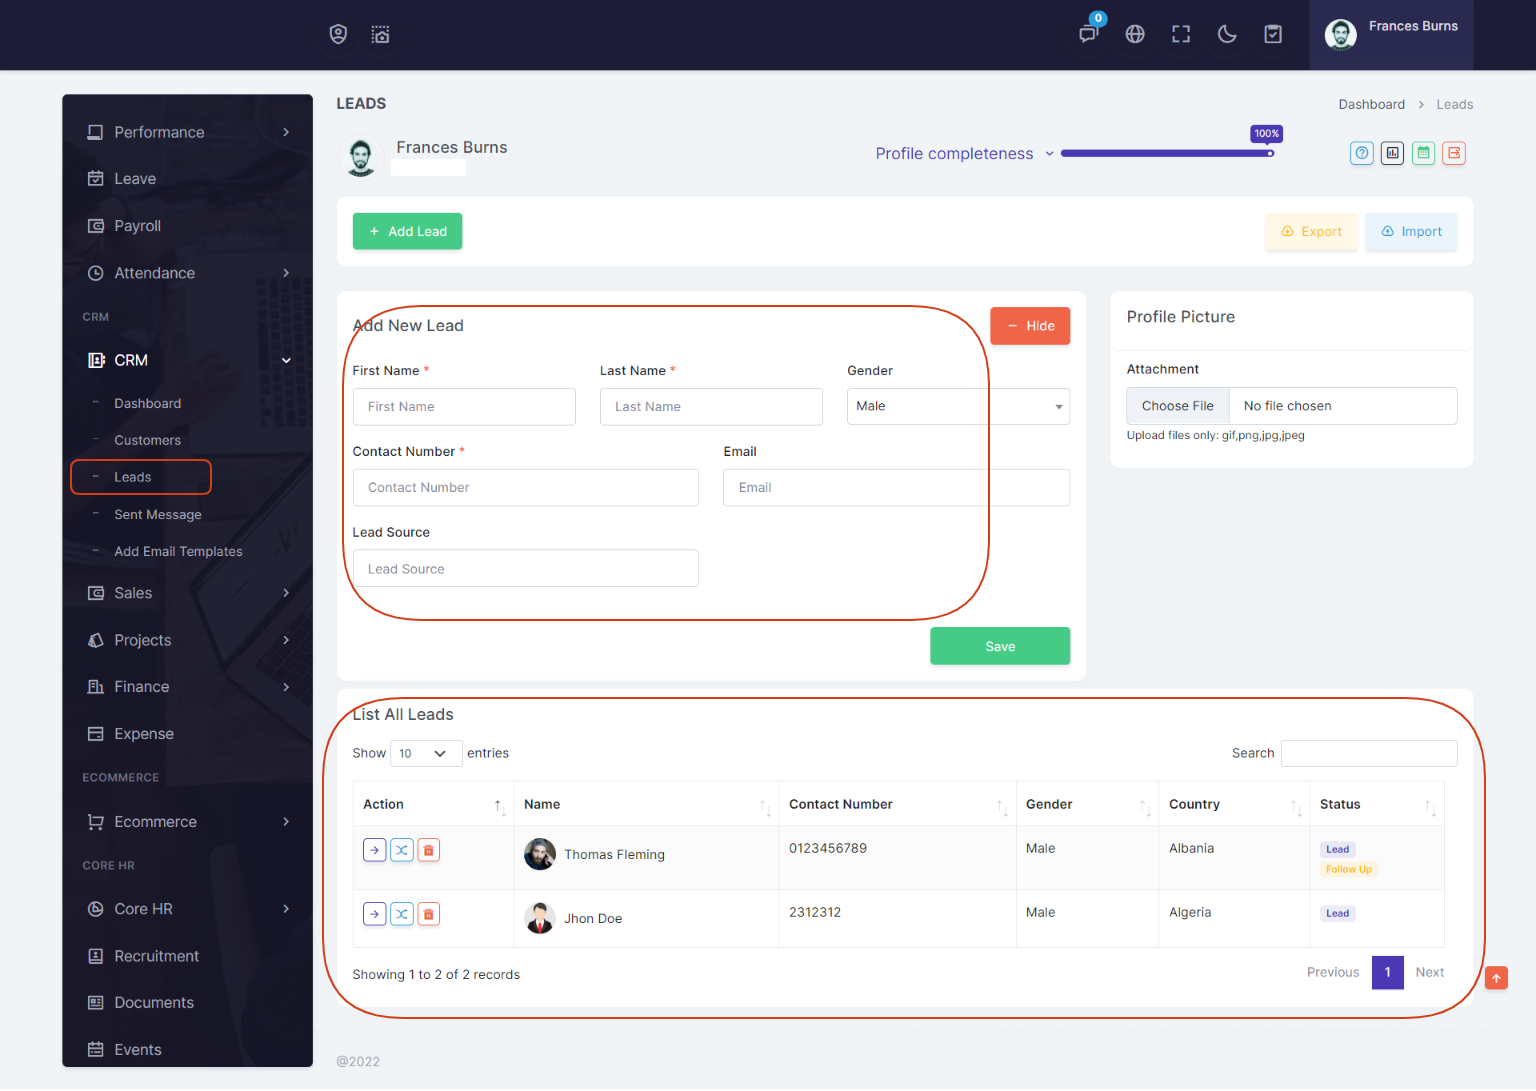
On Leads page you can add lead with basic information
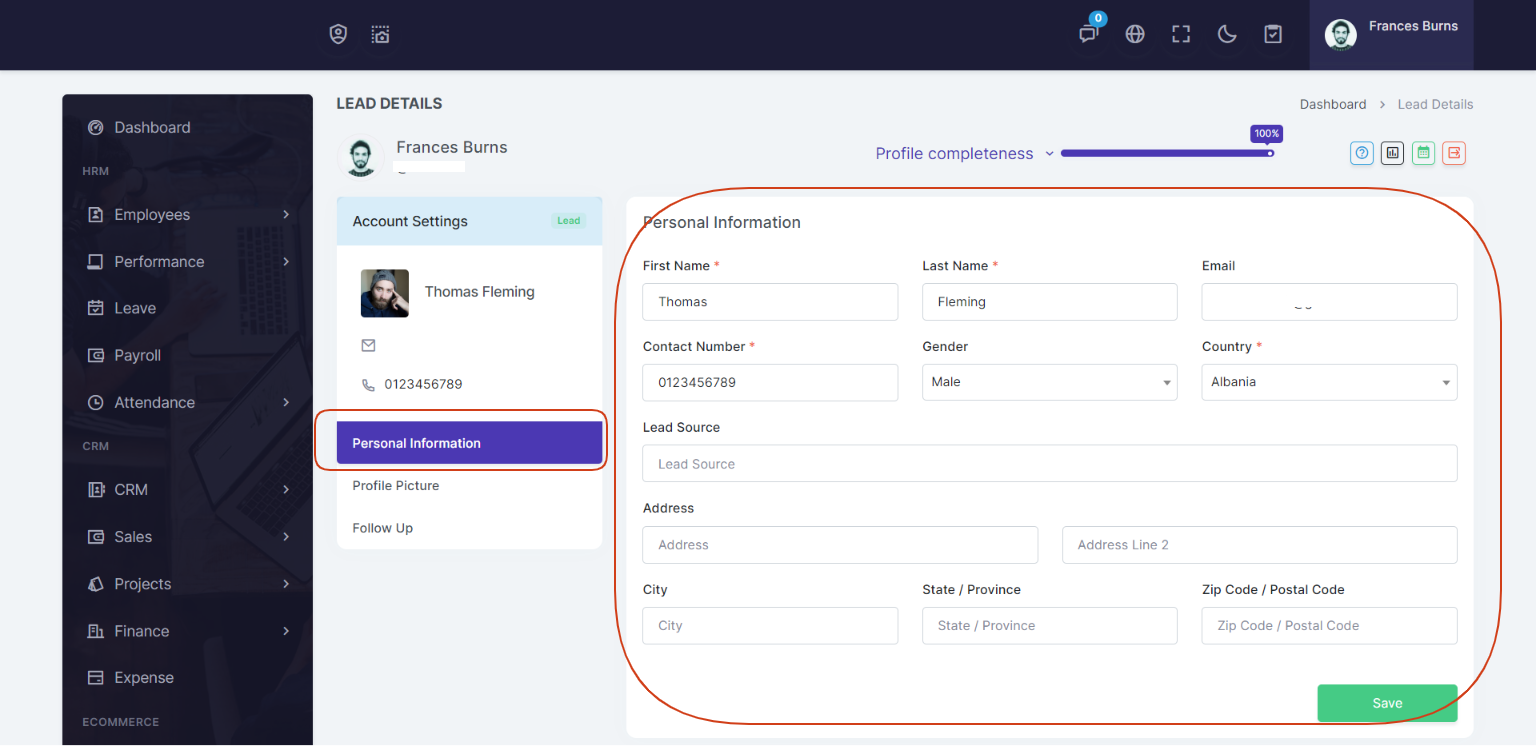
When you add lead then click on lead details link it will be redirected lead view page, here you can see the basic information of lead.
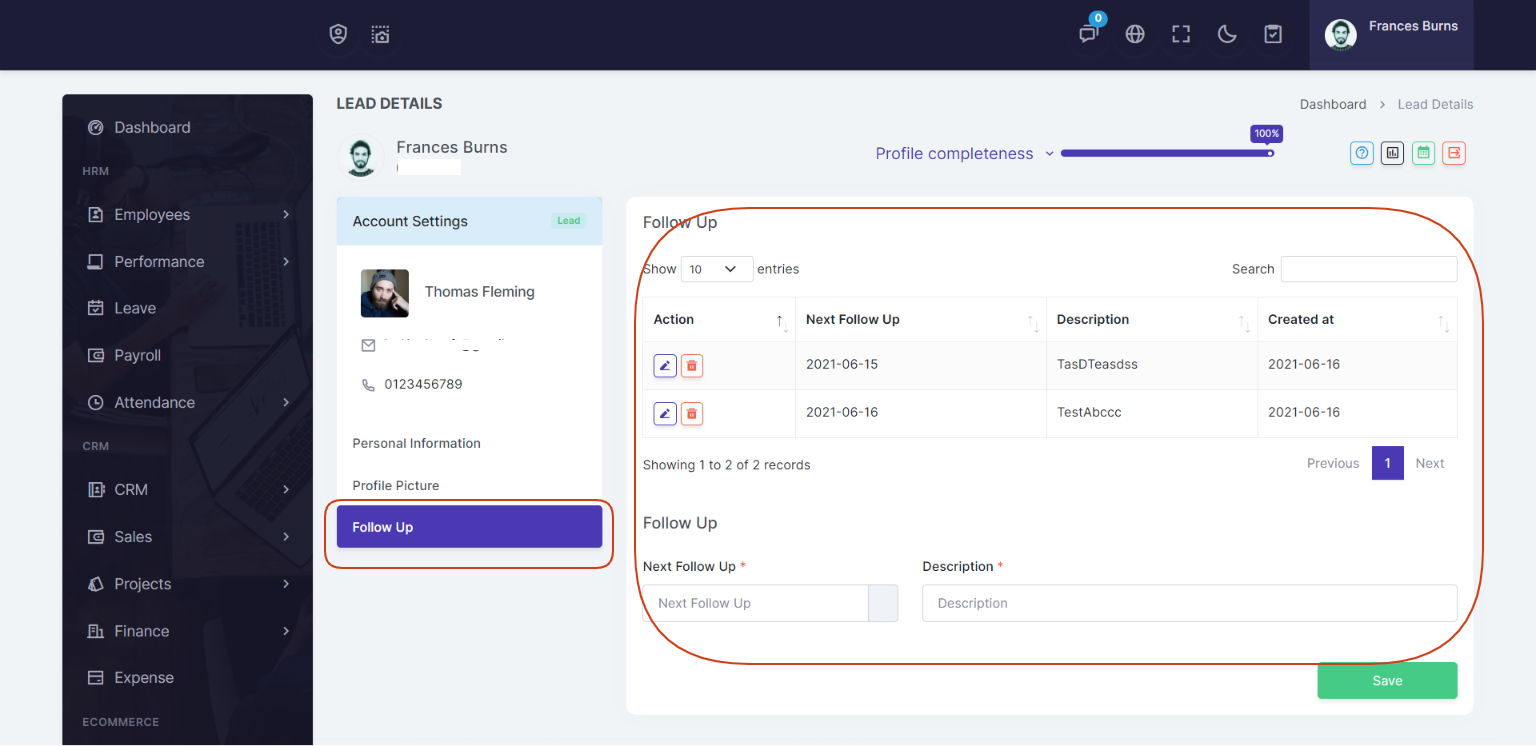
You can also add Lead followup
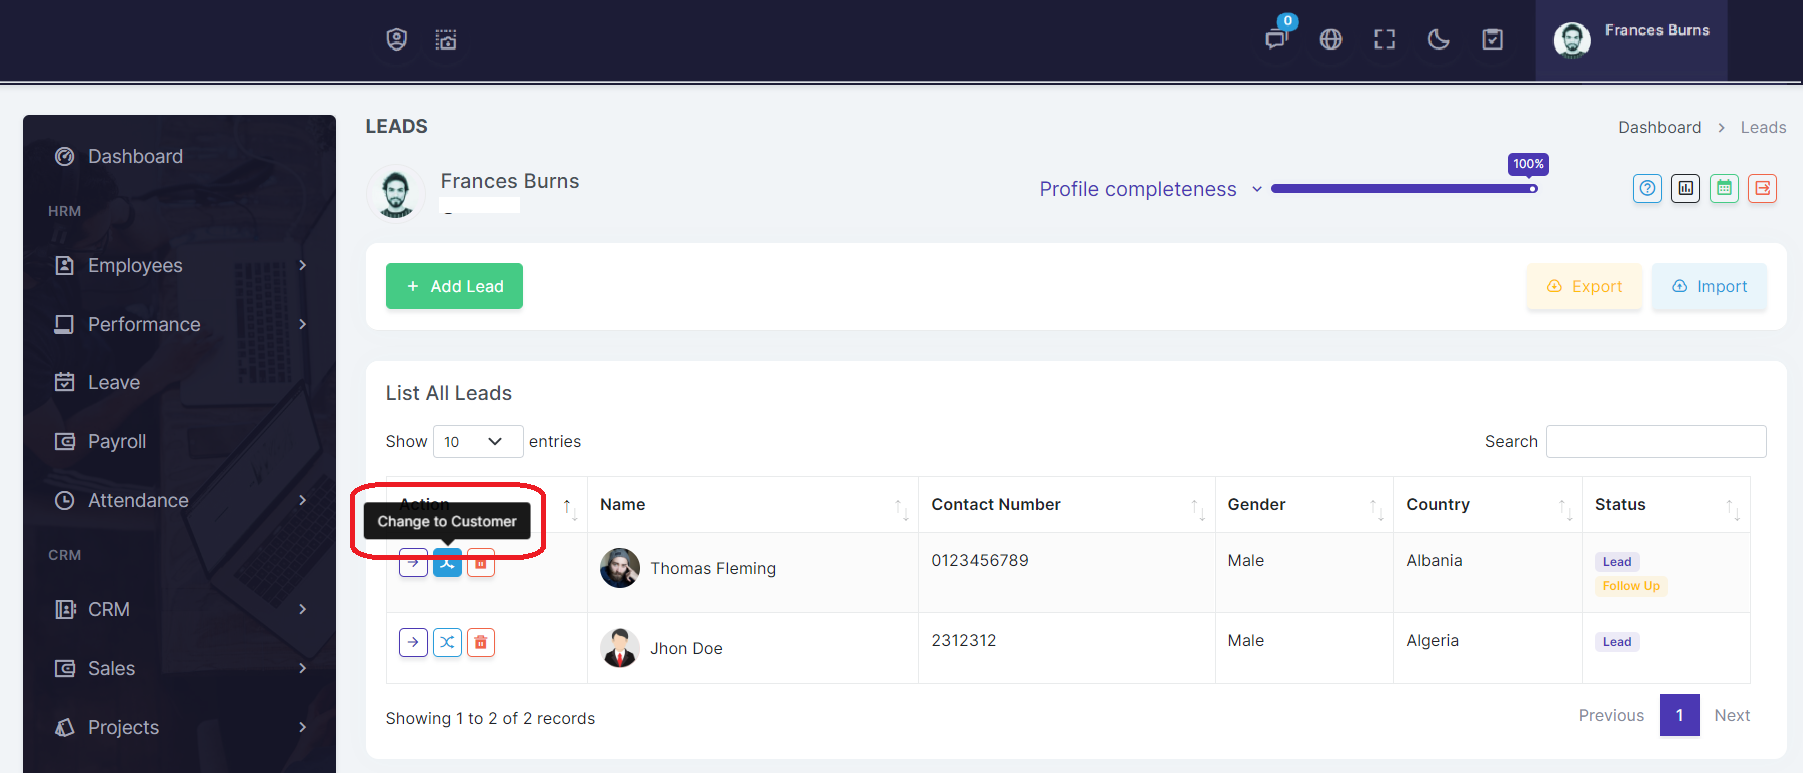
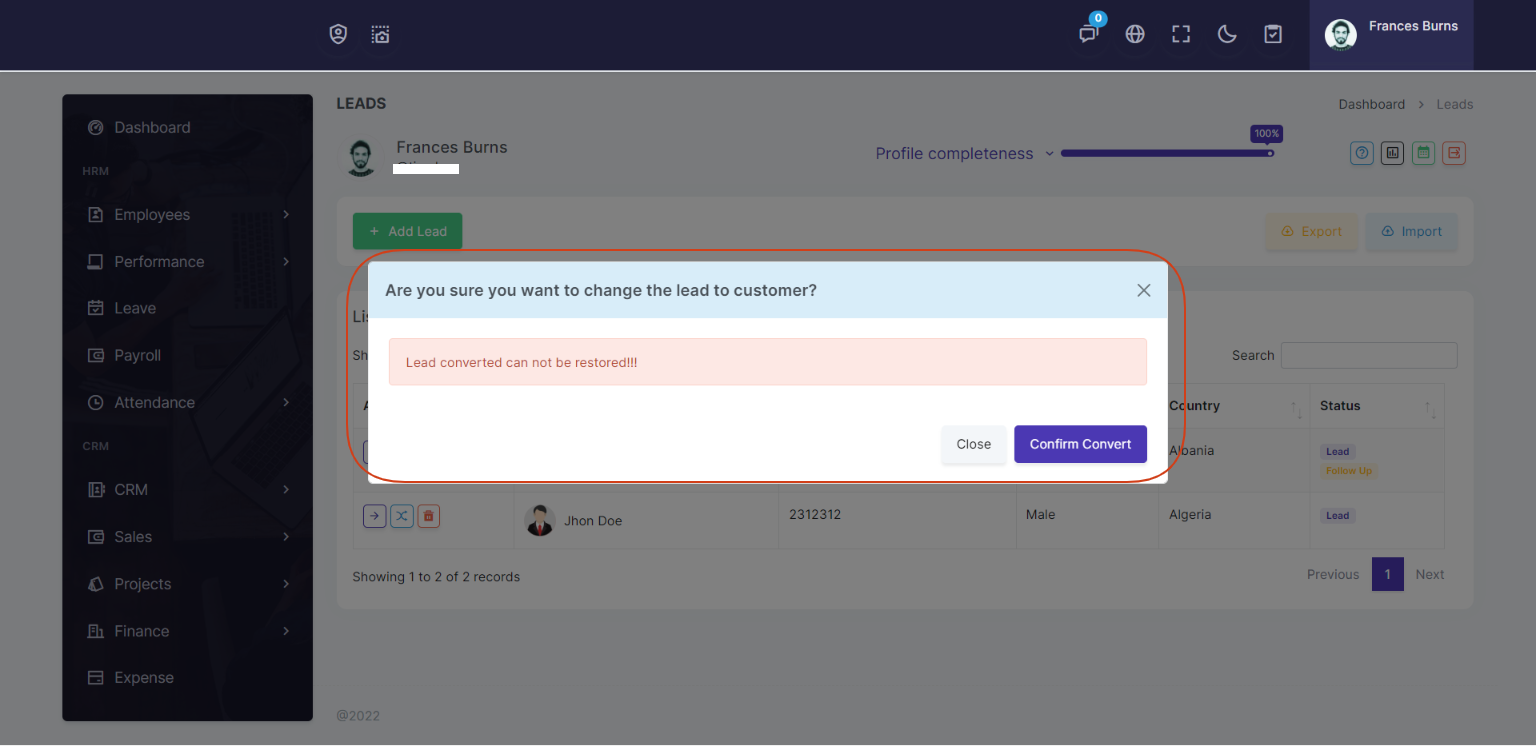
Later you can convert the lead to customer from lead list page
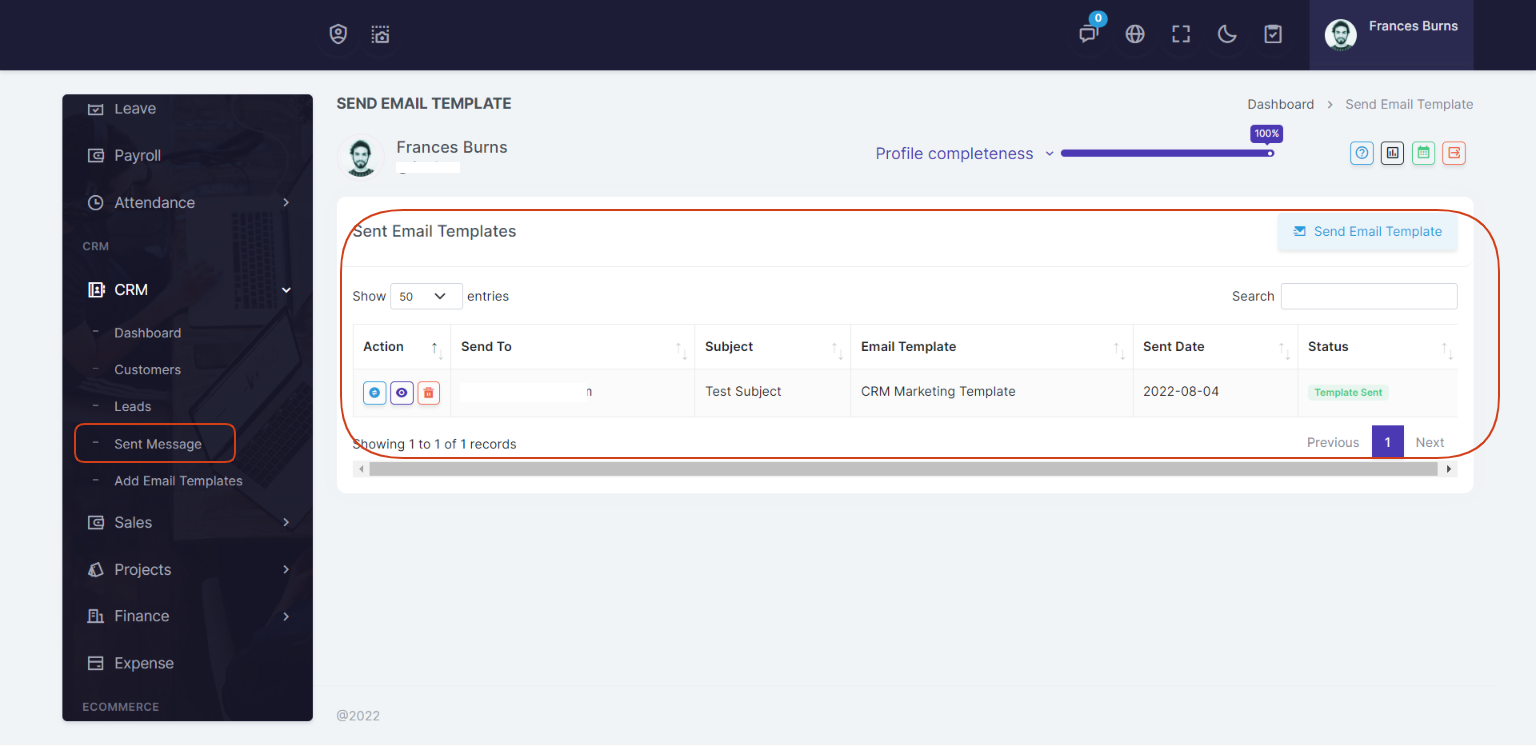
Sent Message
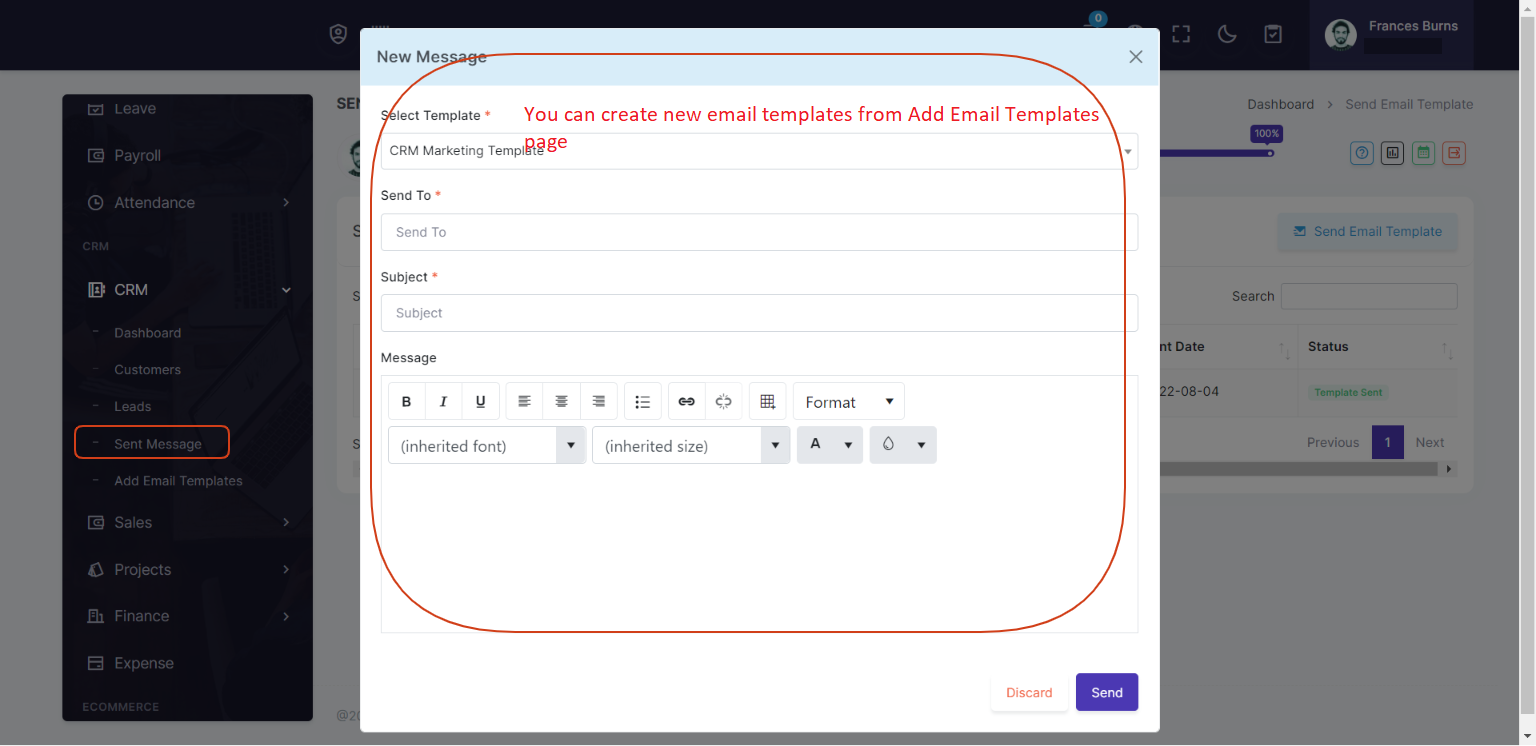
On Sent Message page you can send messages to client to select an email template
While sending a new message you can select an email template, then client/customer will receive the email with that template. You can put directly a client/customer email address with subject and message.
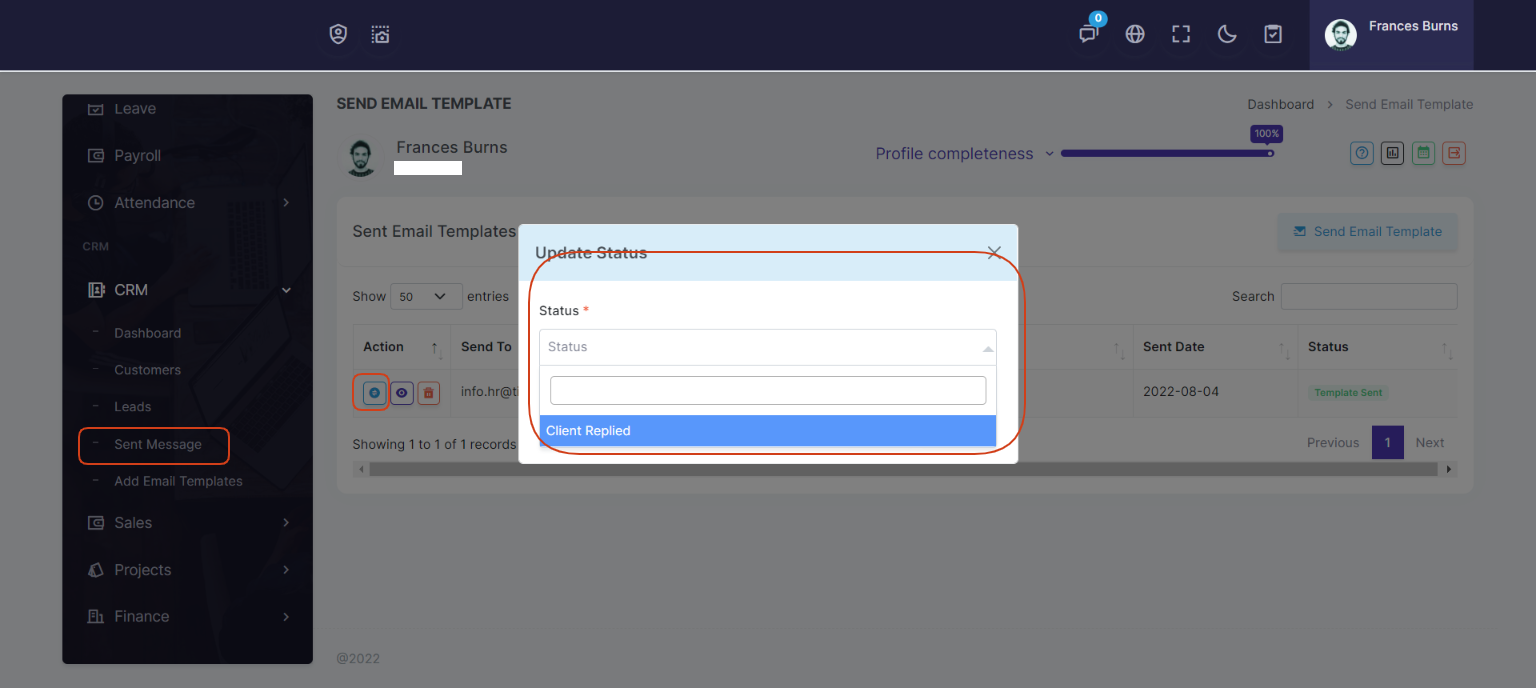
After sending a message you can change the status here.
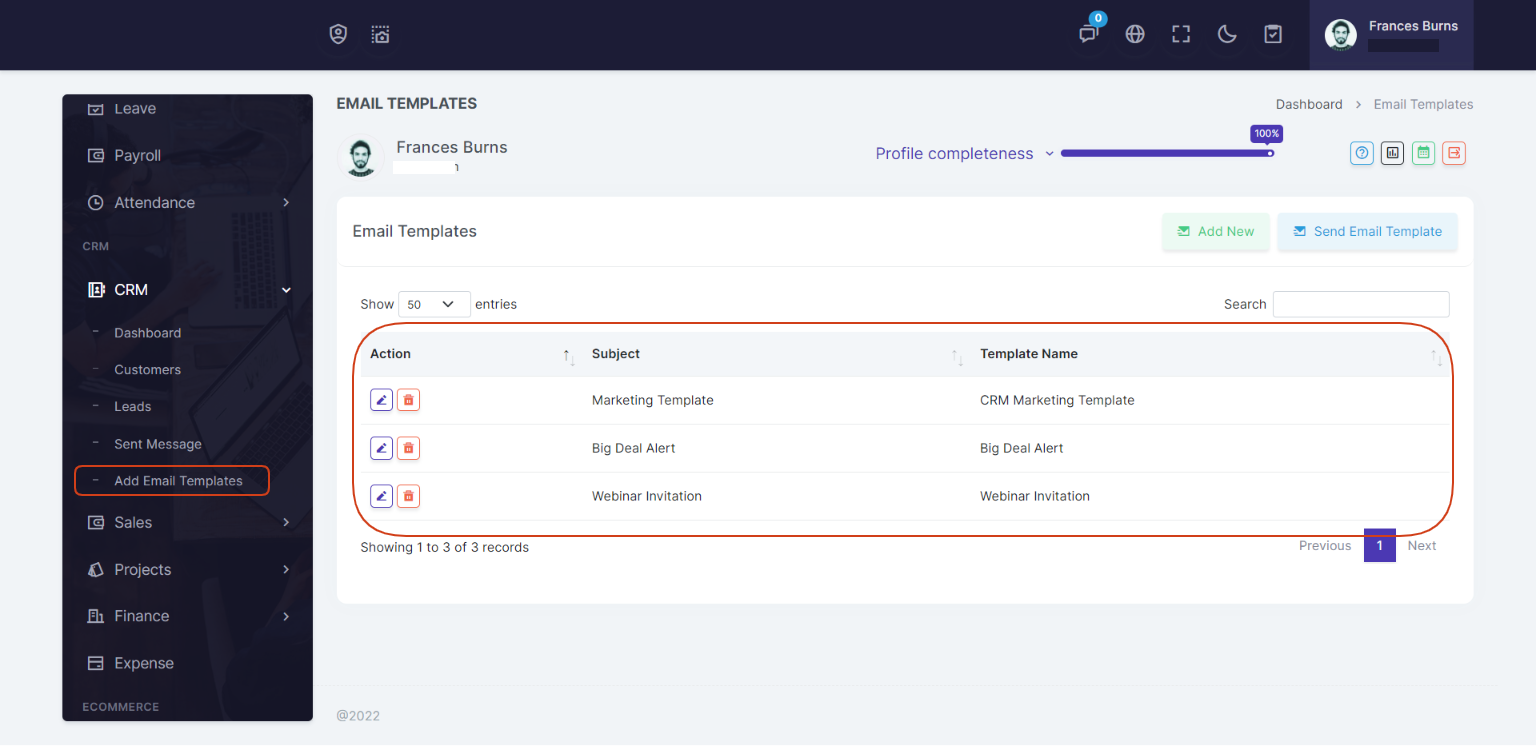
Add Email Templates
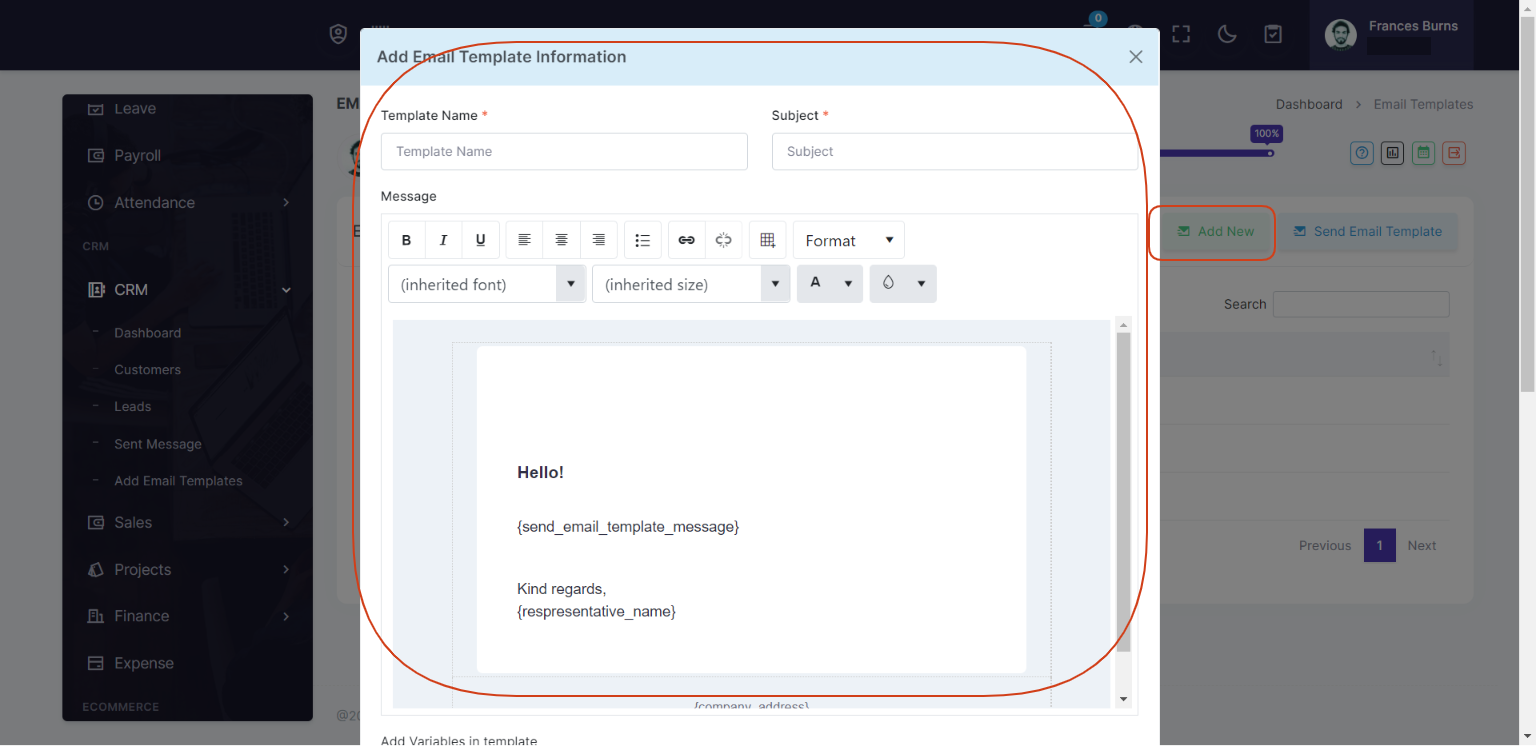
On Add Email Templates page you can add new email template and can view all list of email templates.
You can add new email template to click on Add New button
Sales
Items
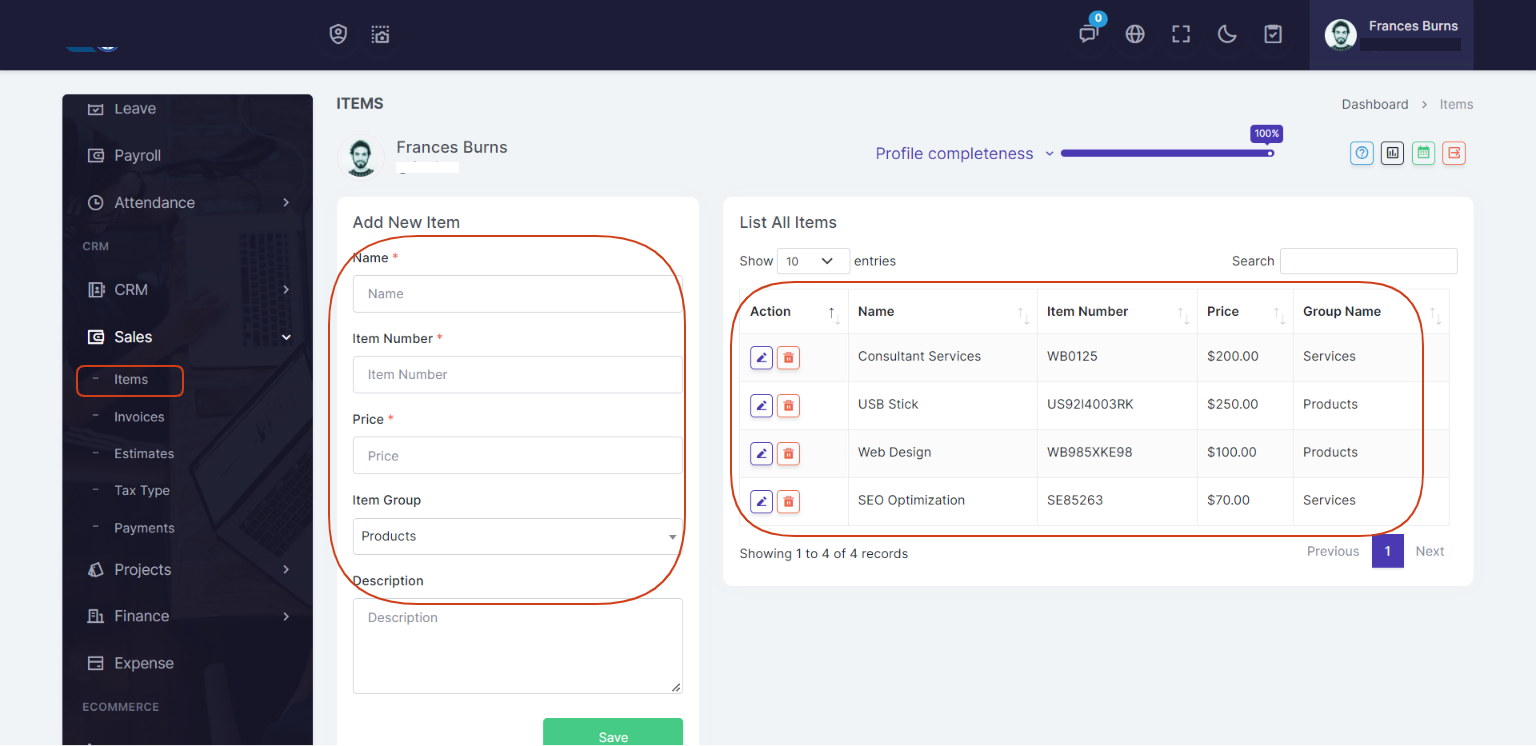
On Items page you can add new items (products or services) for invoices and estimates.
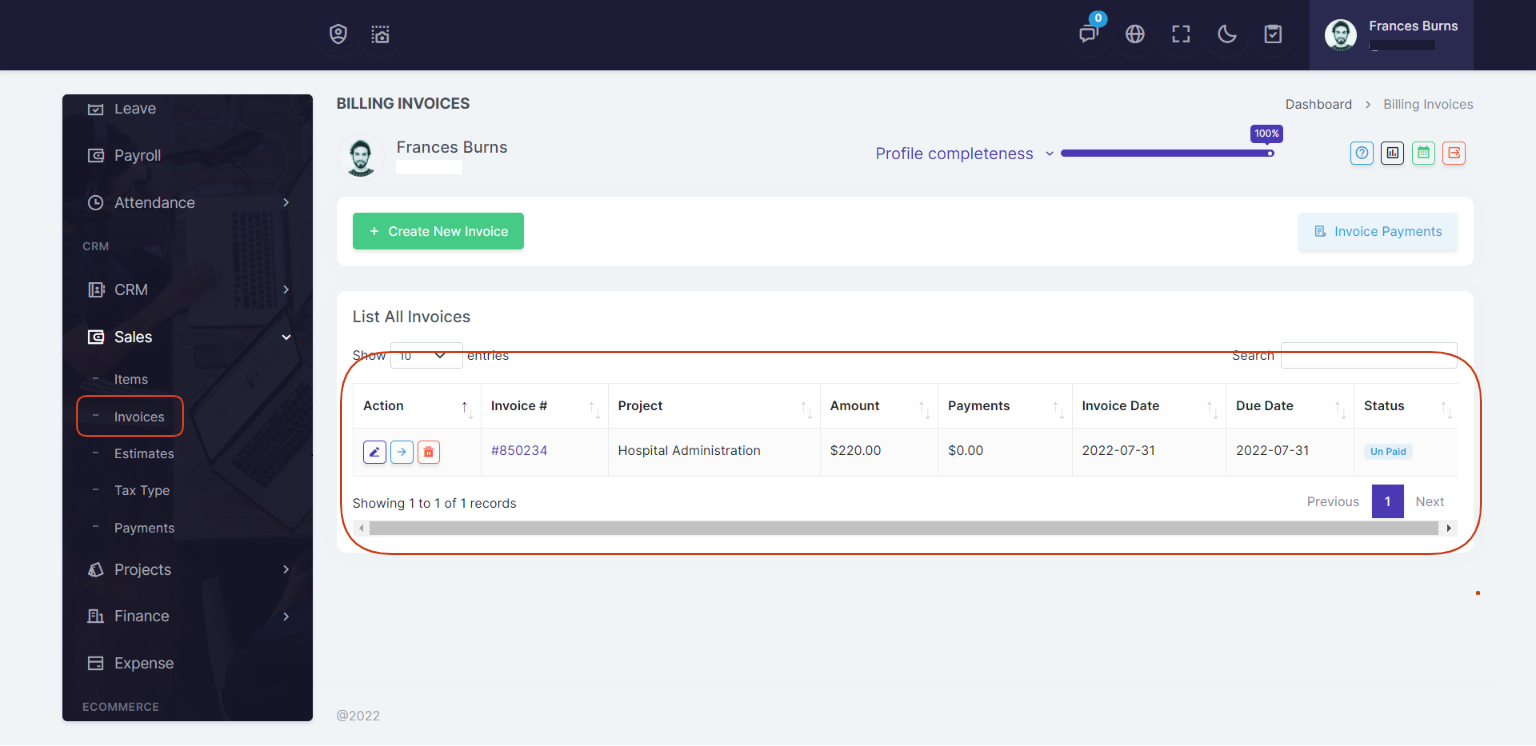
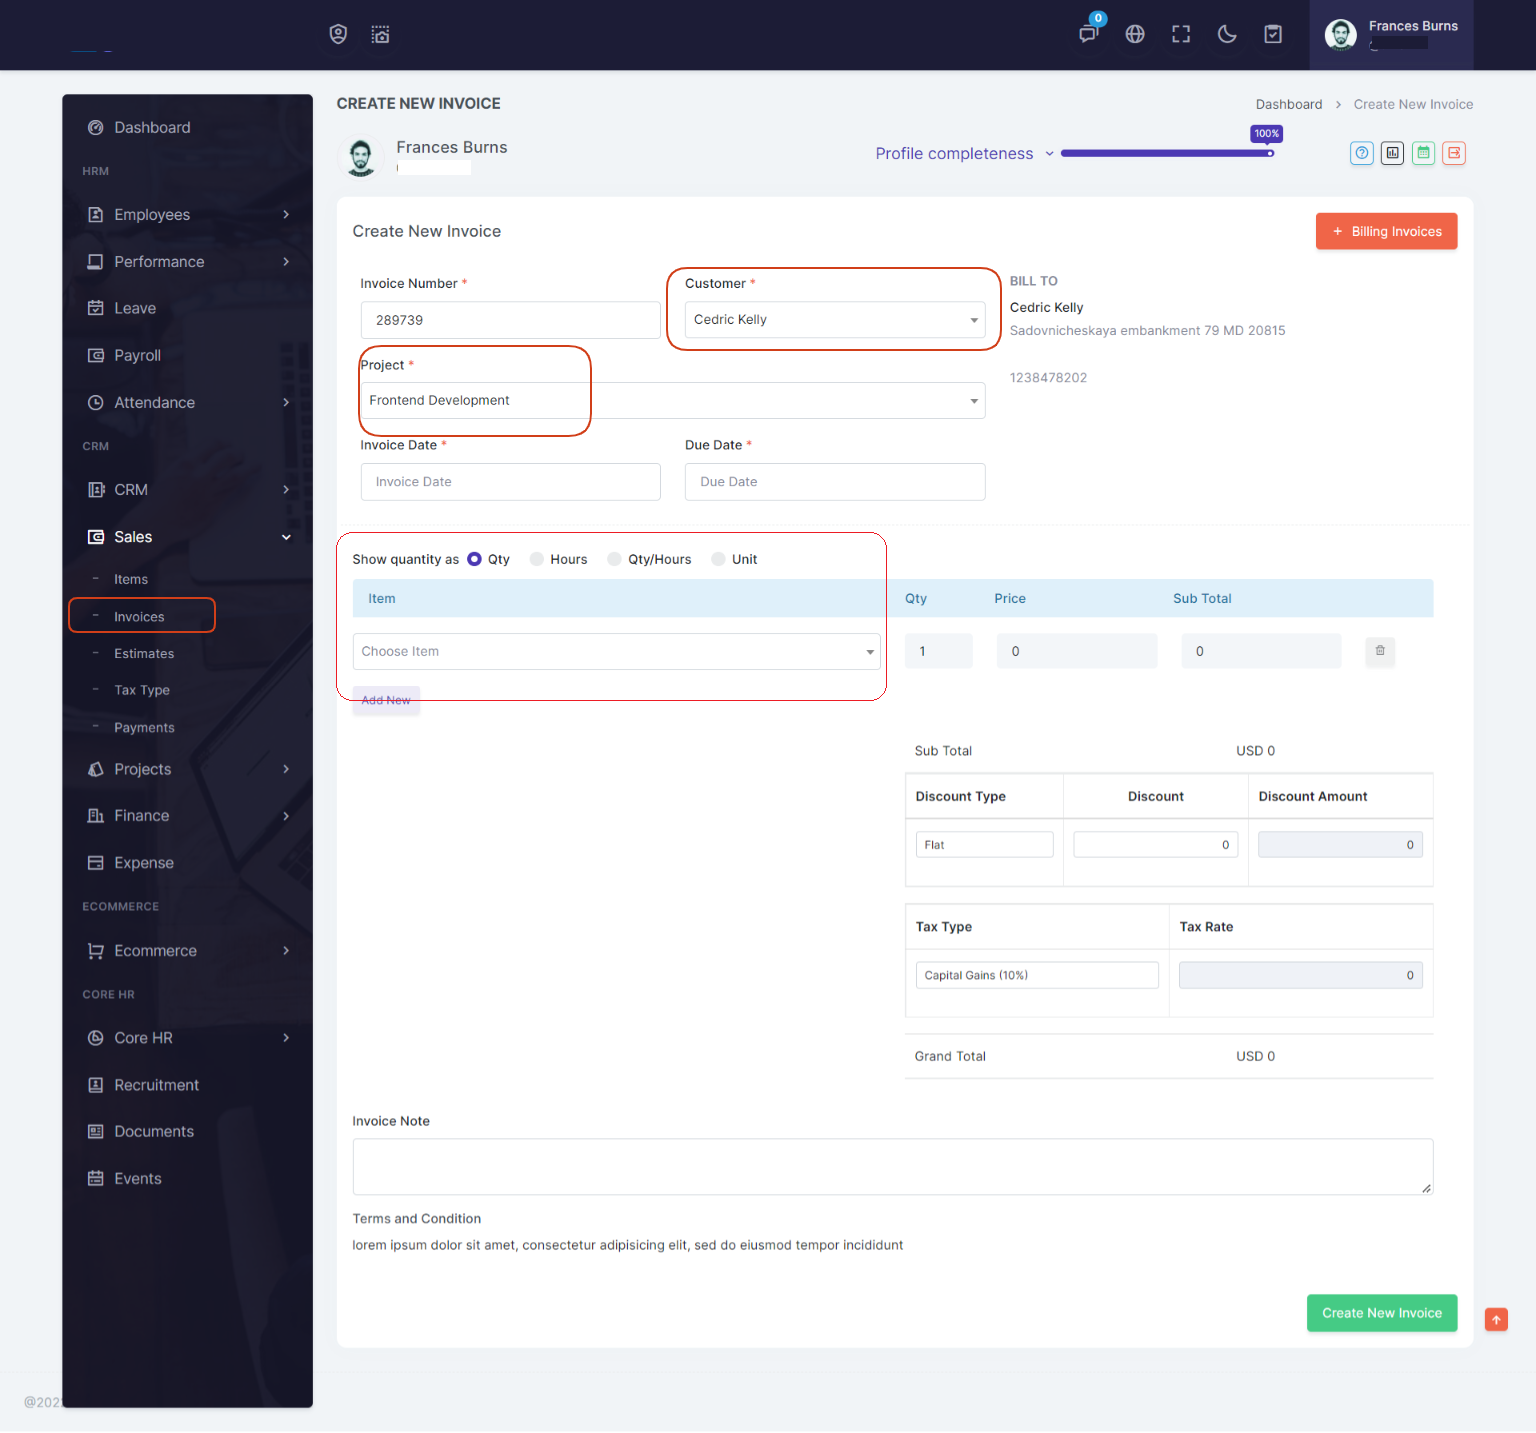
Invoices
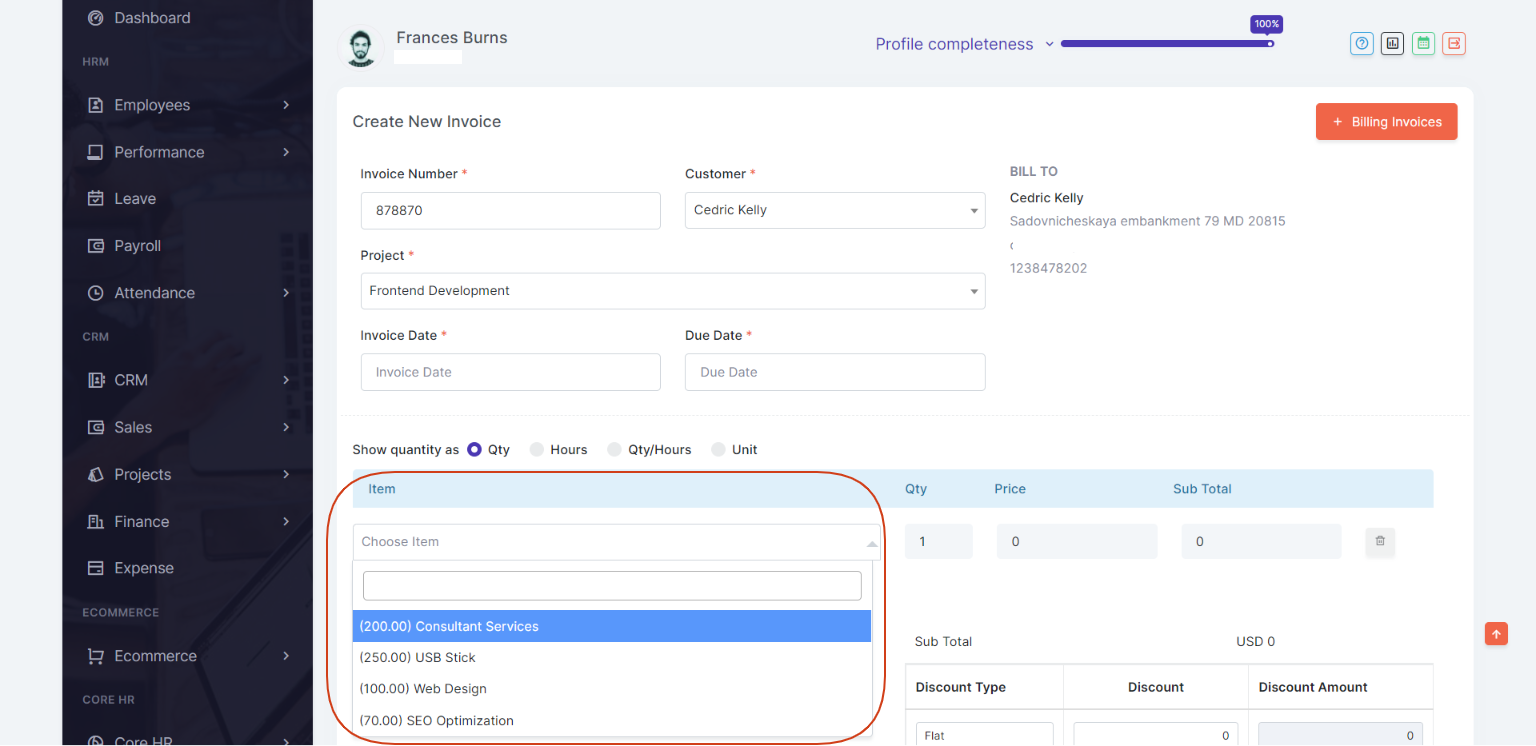
On Invoices page you can view all invoices and can add new invoices.
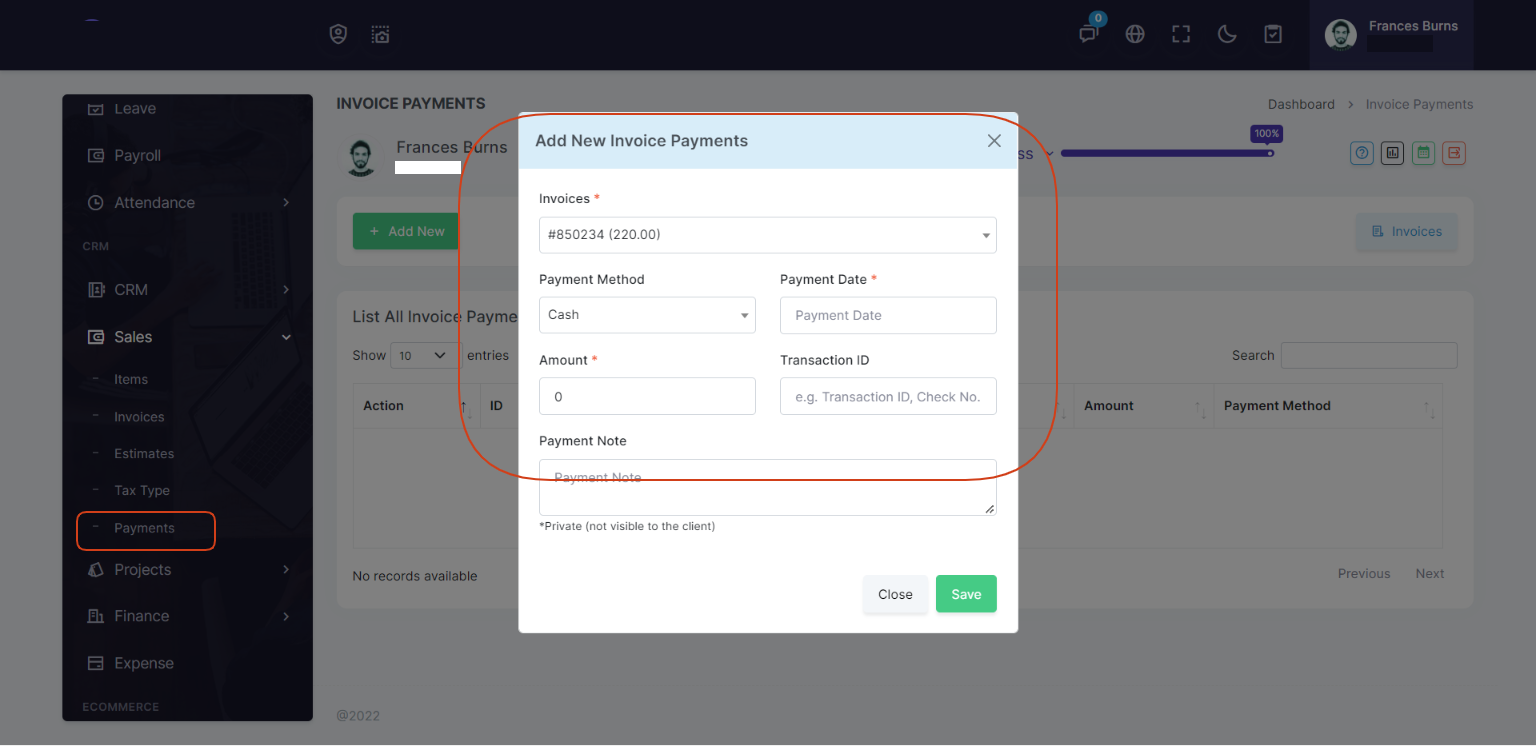
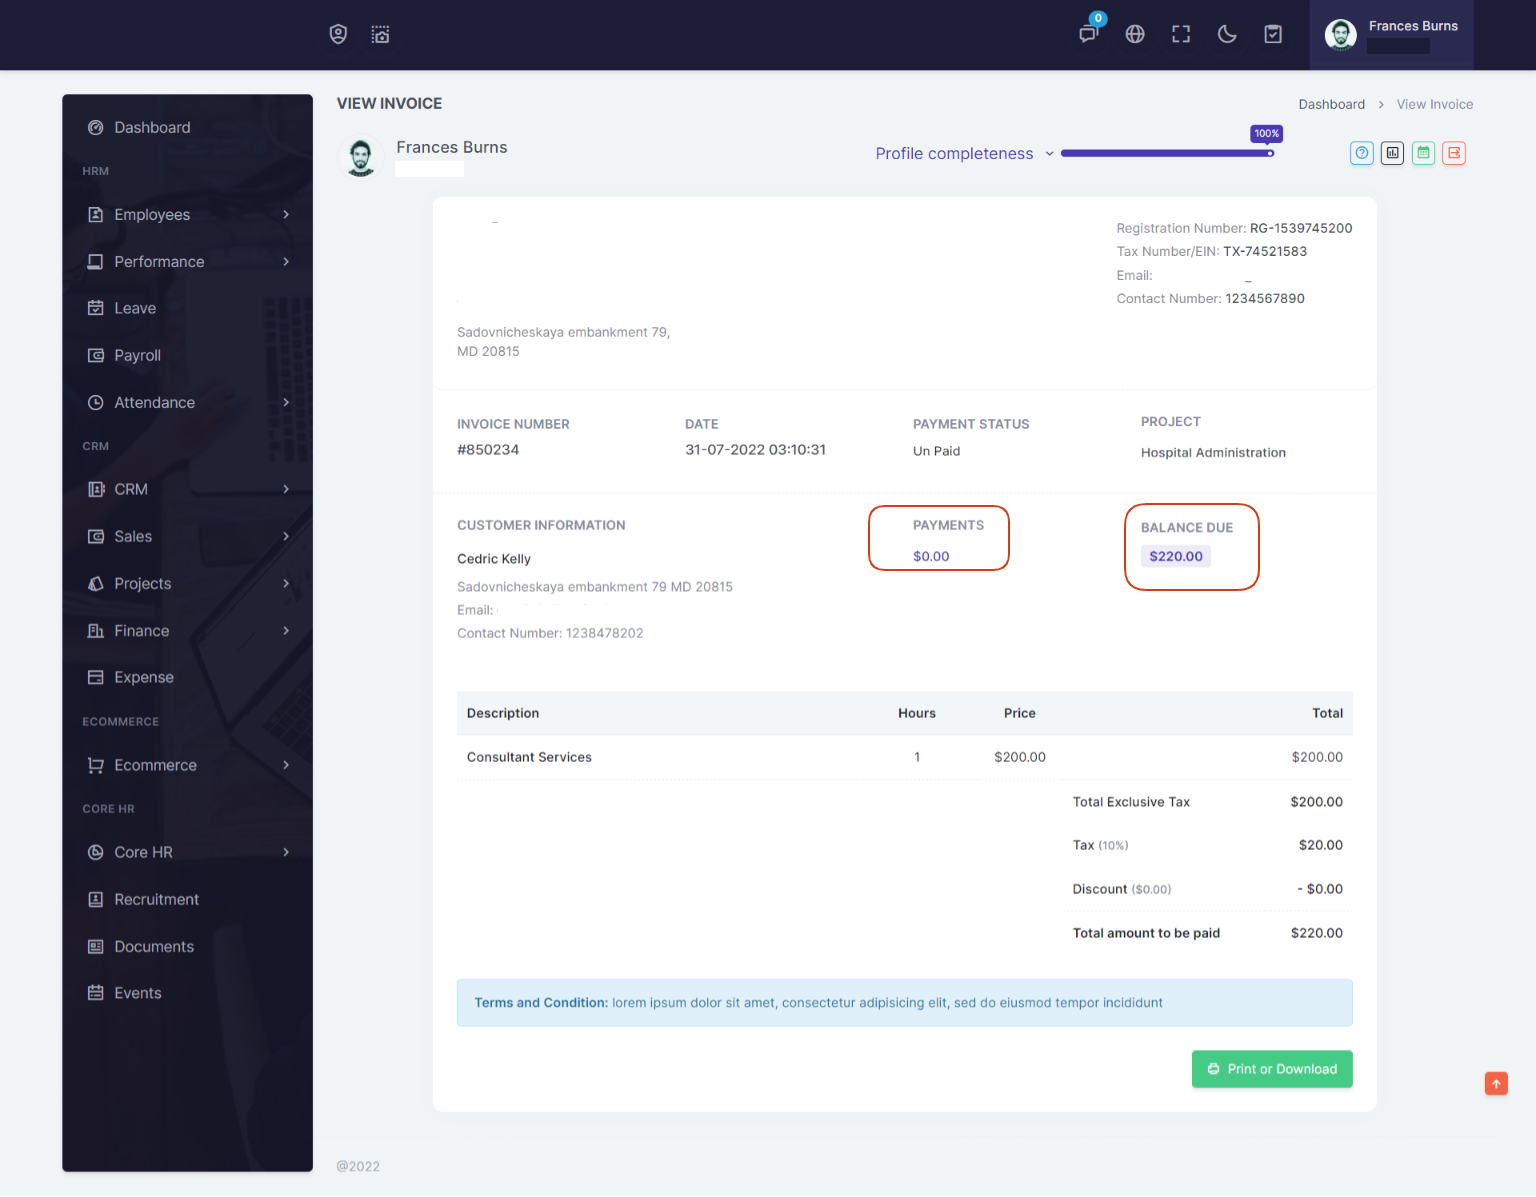
After create new Invoice you can add payments for an invoice. The payments will show on payments list page and also on invoice view page.
Estimates
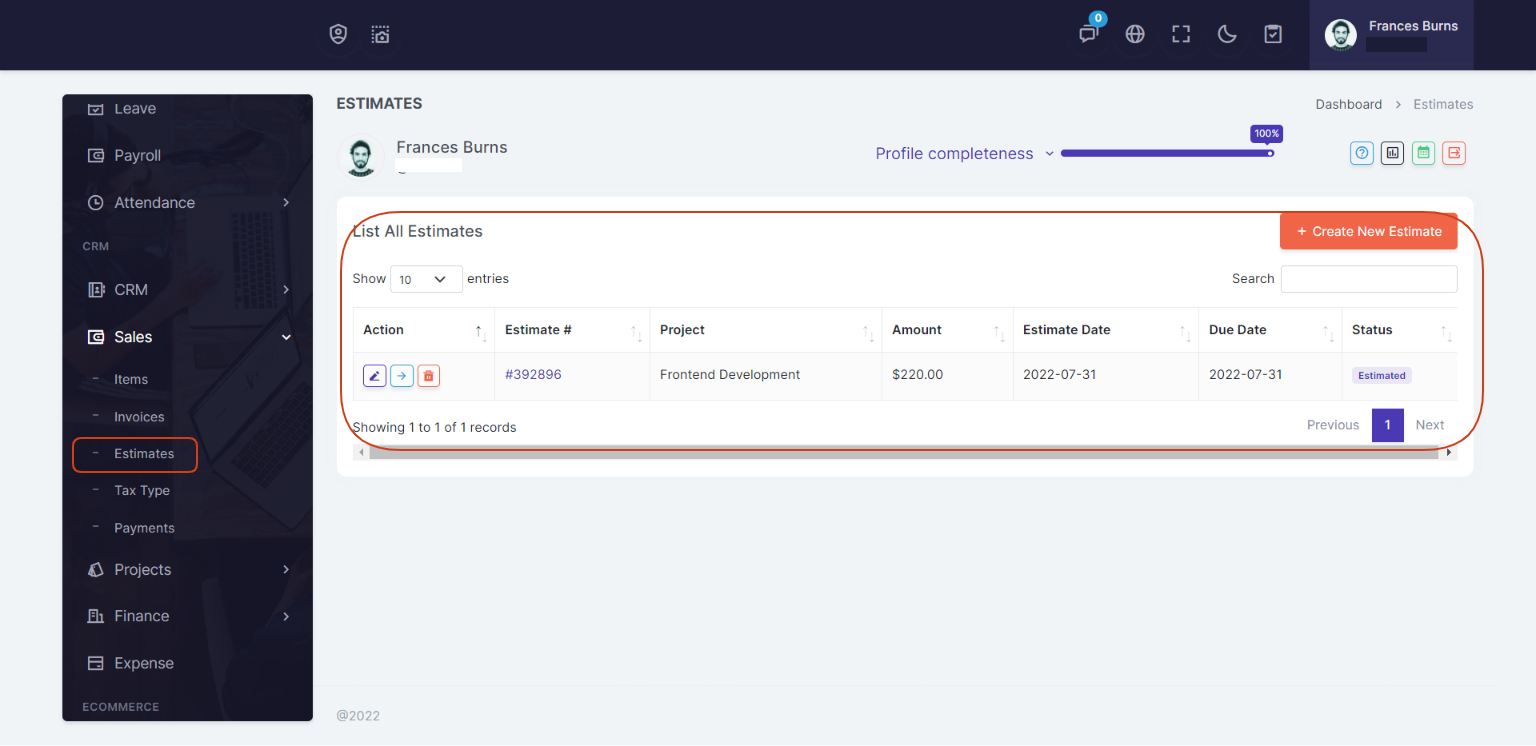
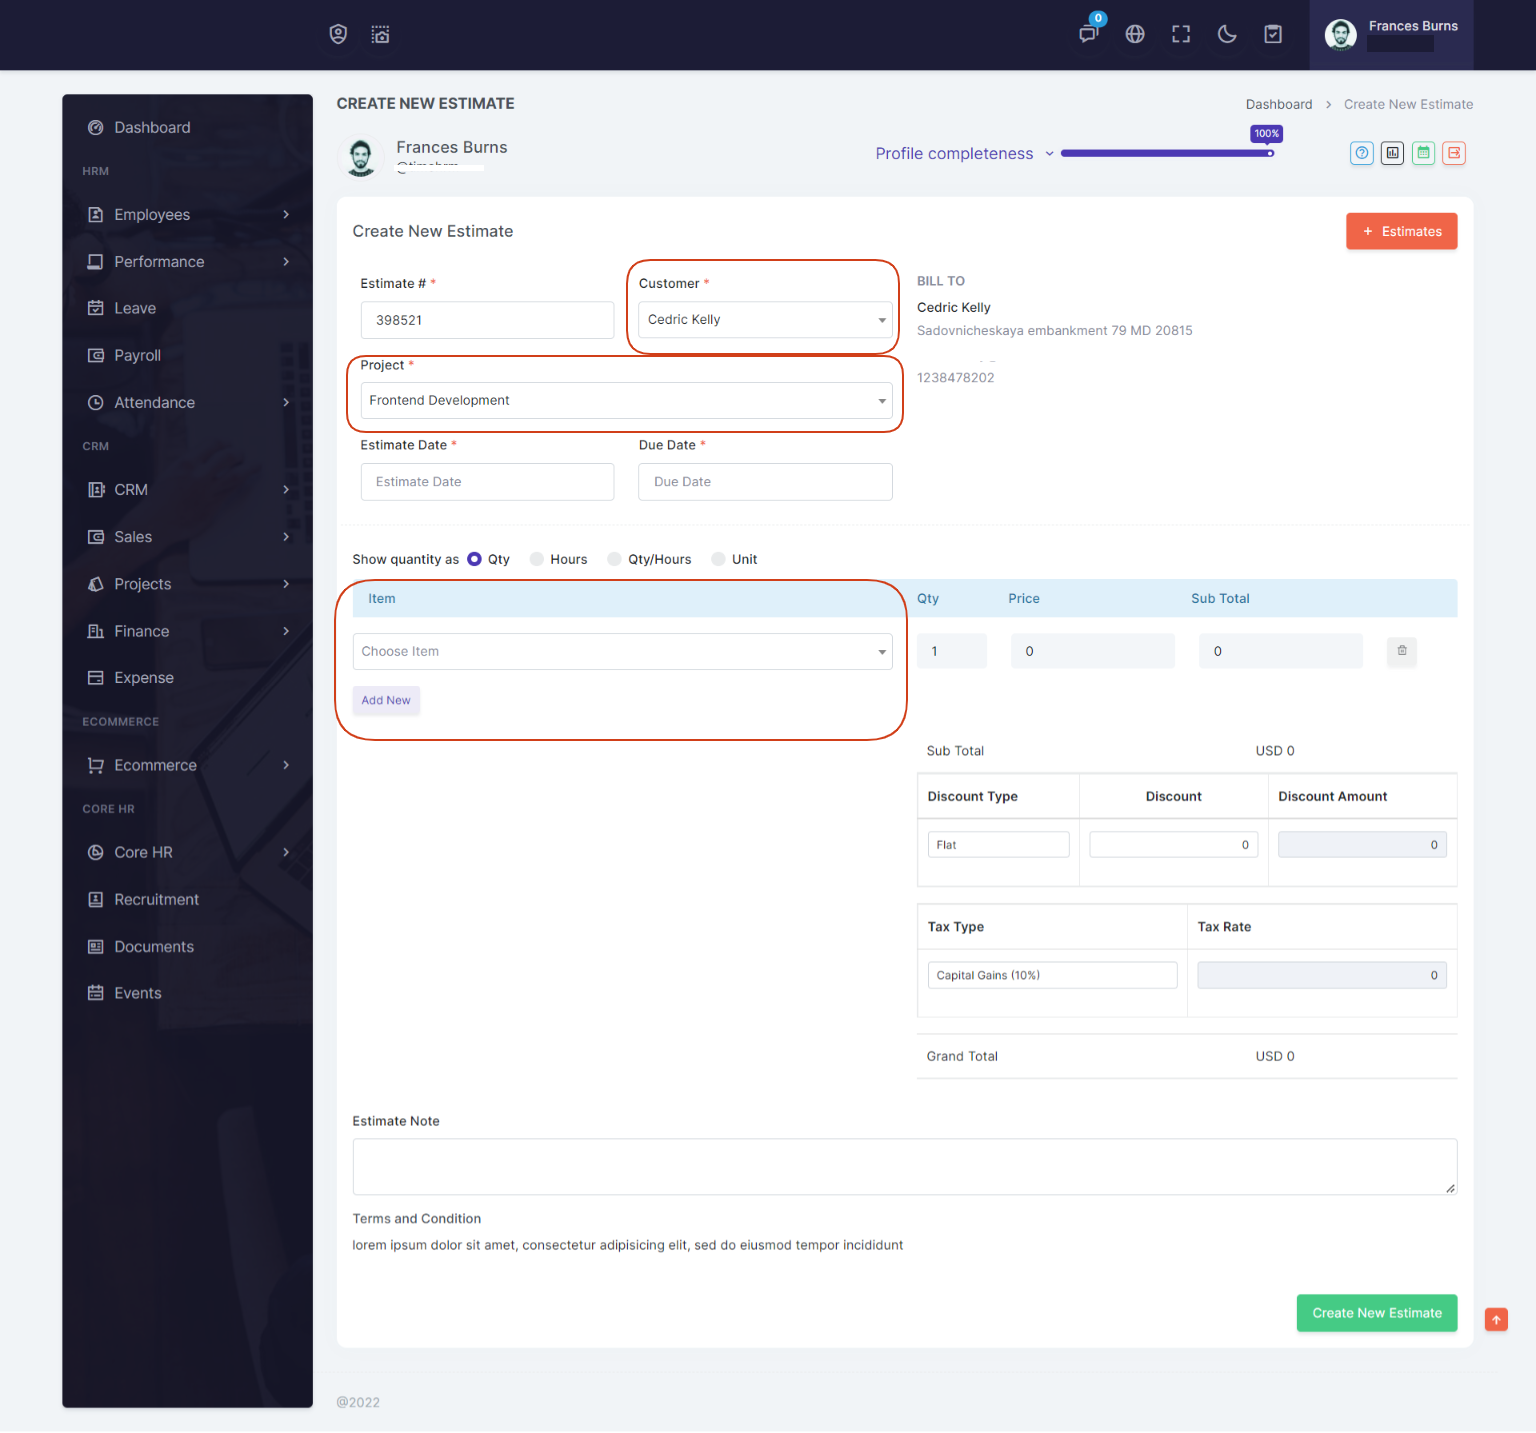
On Estimates page you can view all estimates and can add new estimate.
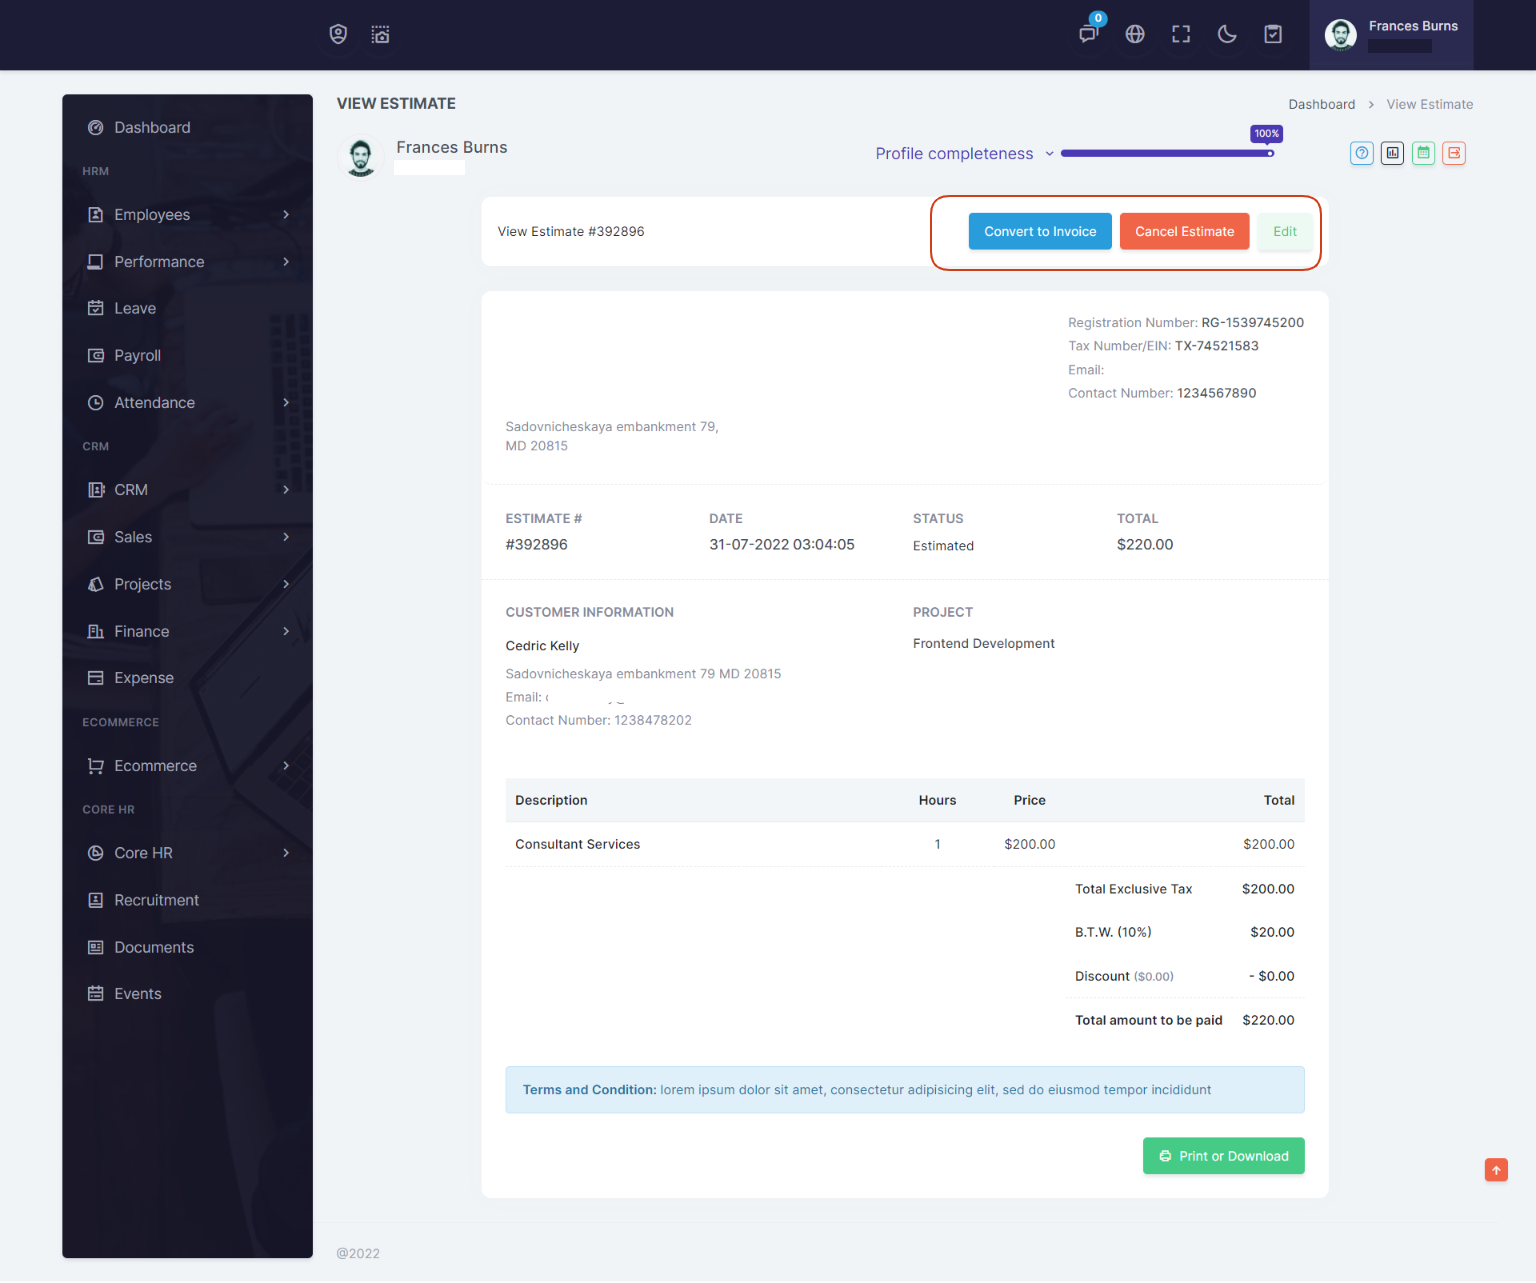
After create new Estimate you can go to estimate view page. here you can convert the estimate to an invoice or cancel the estimate.
Tax Type
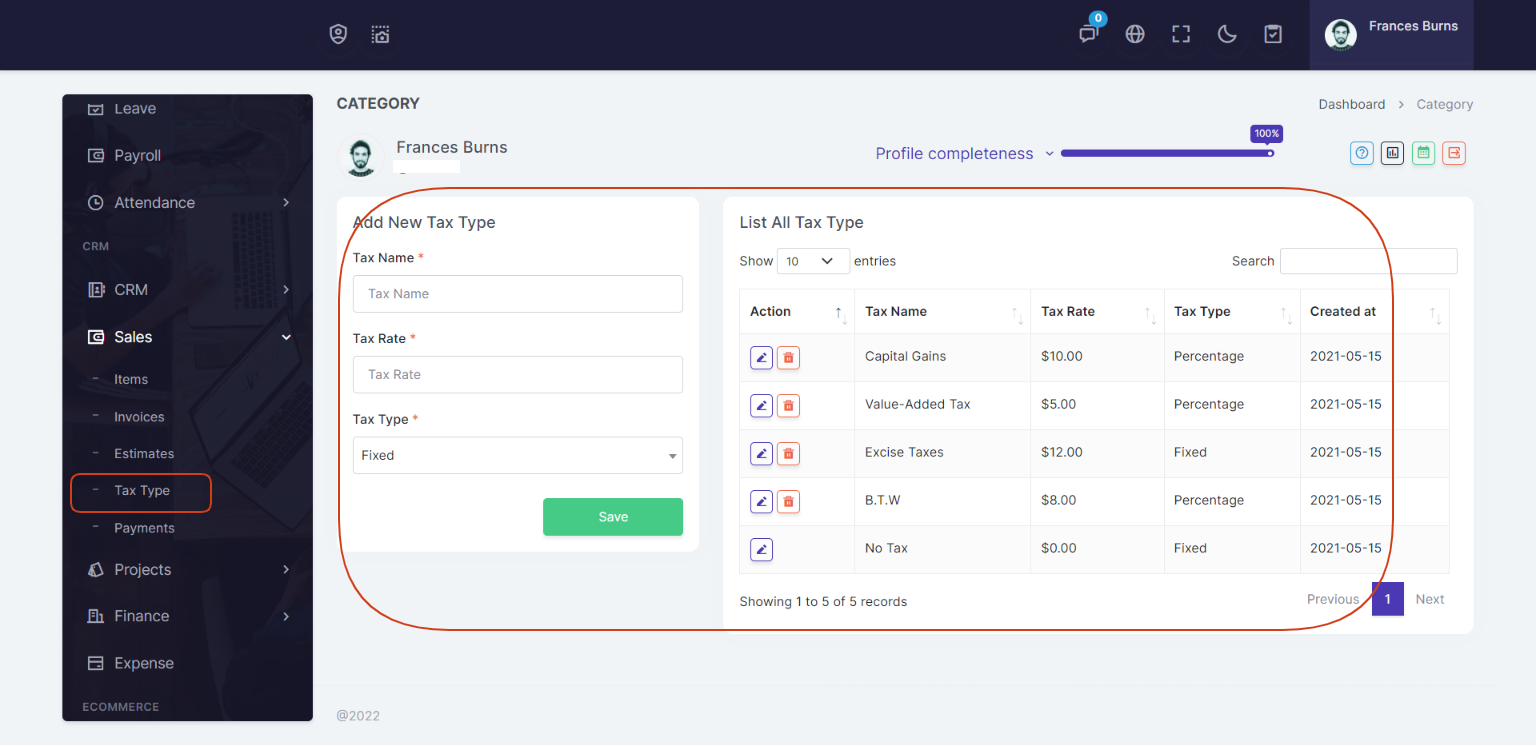
On Tax Type page you can add more taxes for invoices and estimates.
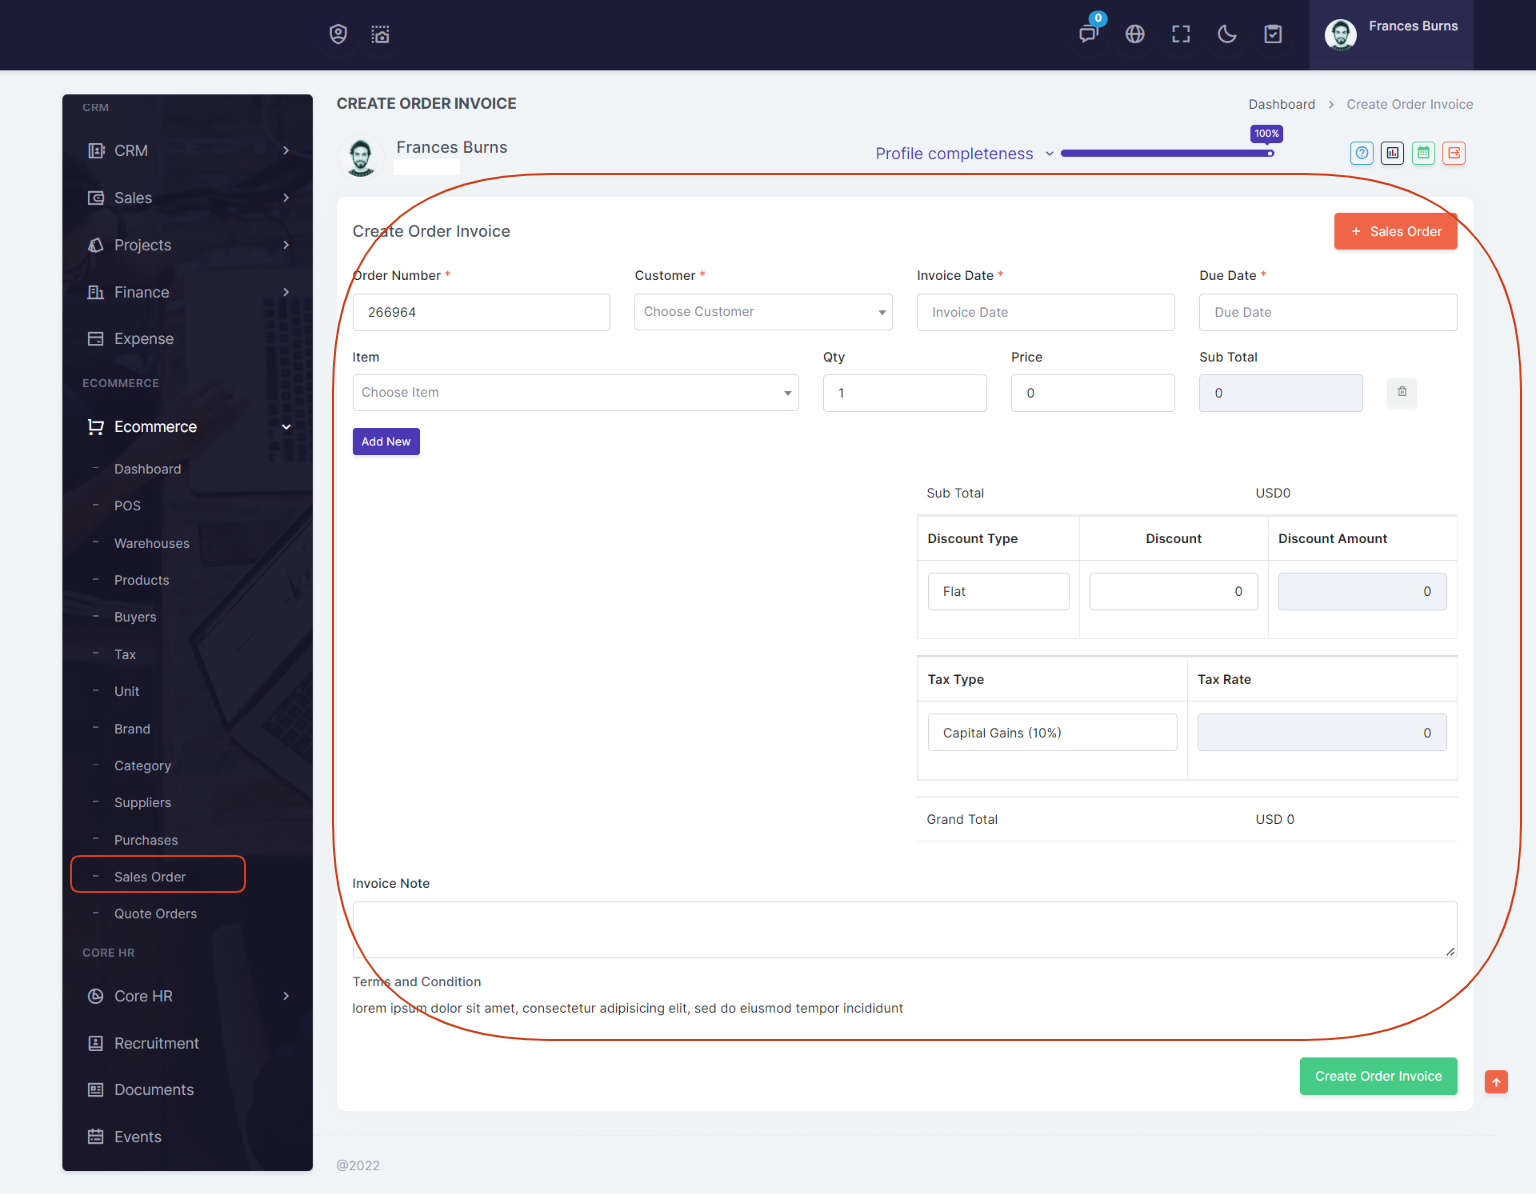
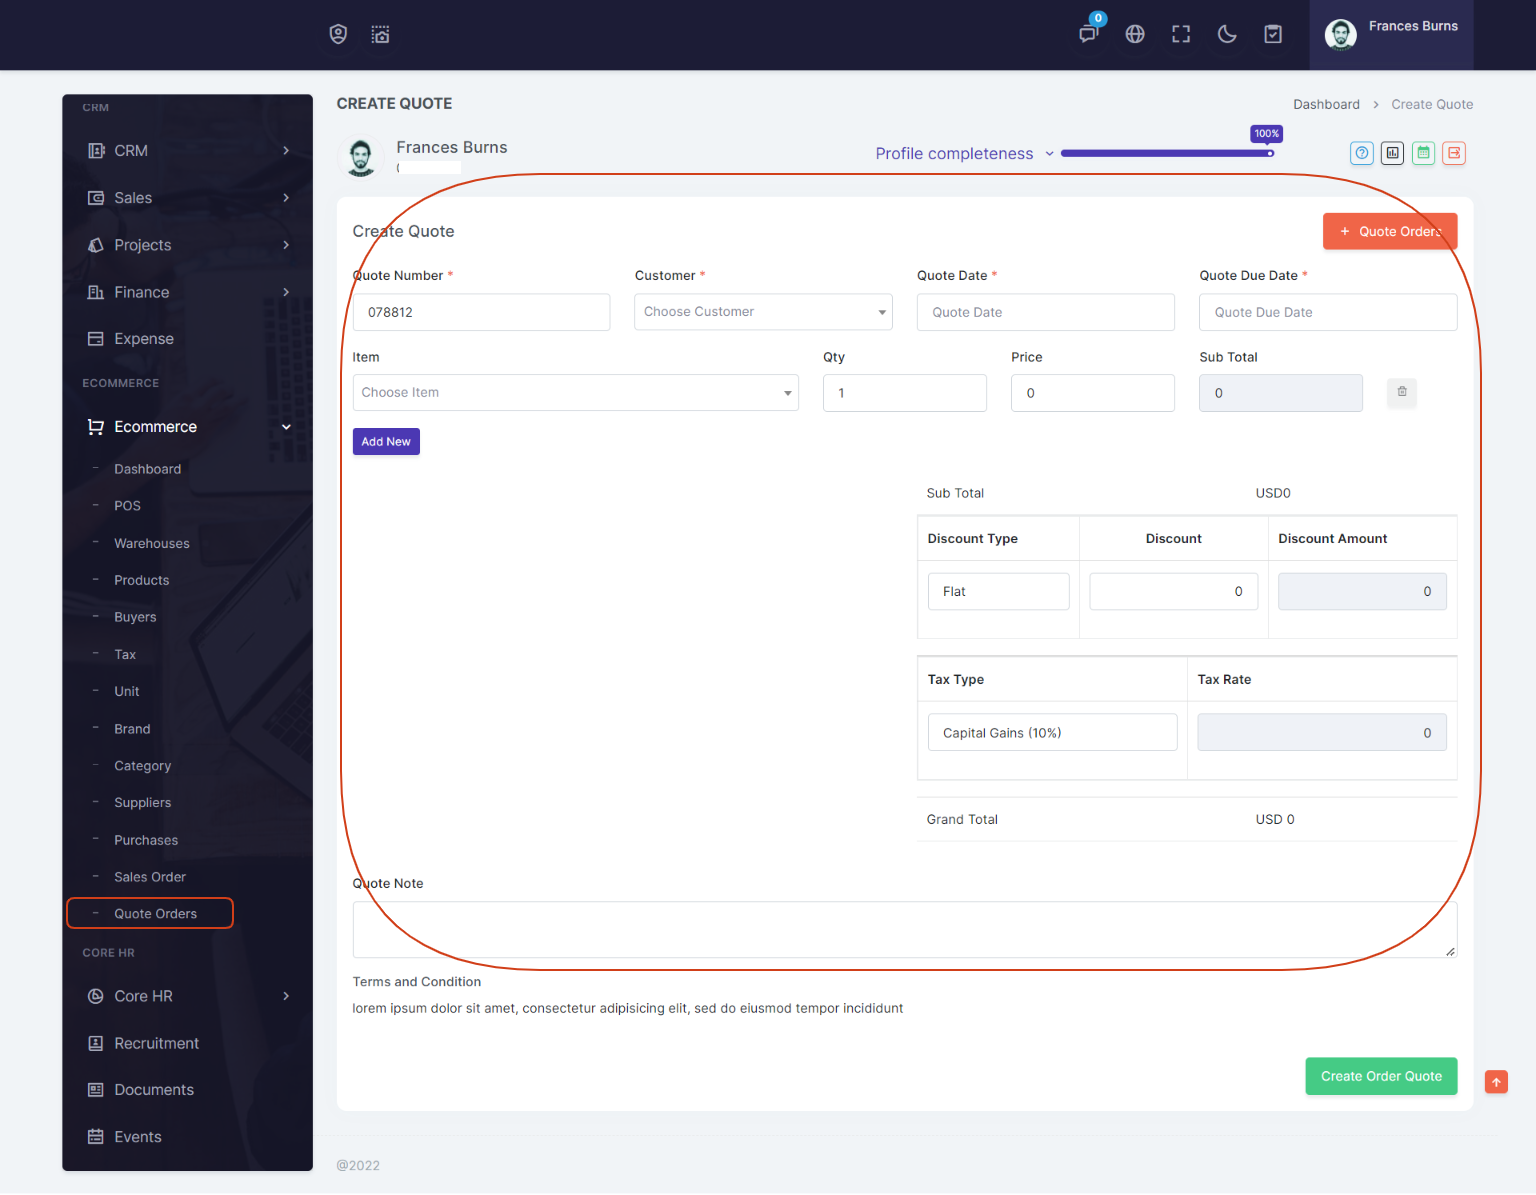
Note: This tax type will also show for Ecommerce module for products (Sales order and Quote Orders).
Payments
On Payments page you can add Payments for an invoices. The payments will show on list page and also it will show on invoice view page.
Projects
Projects
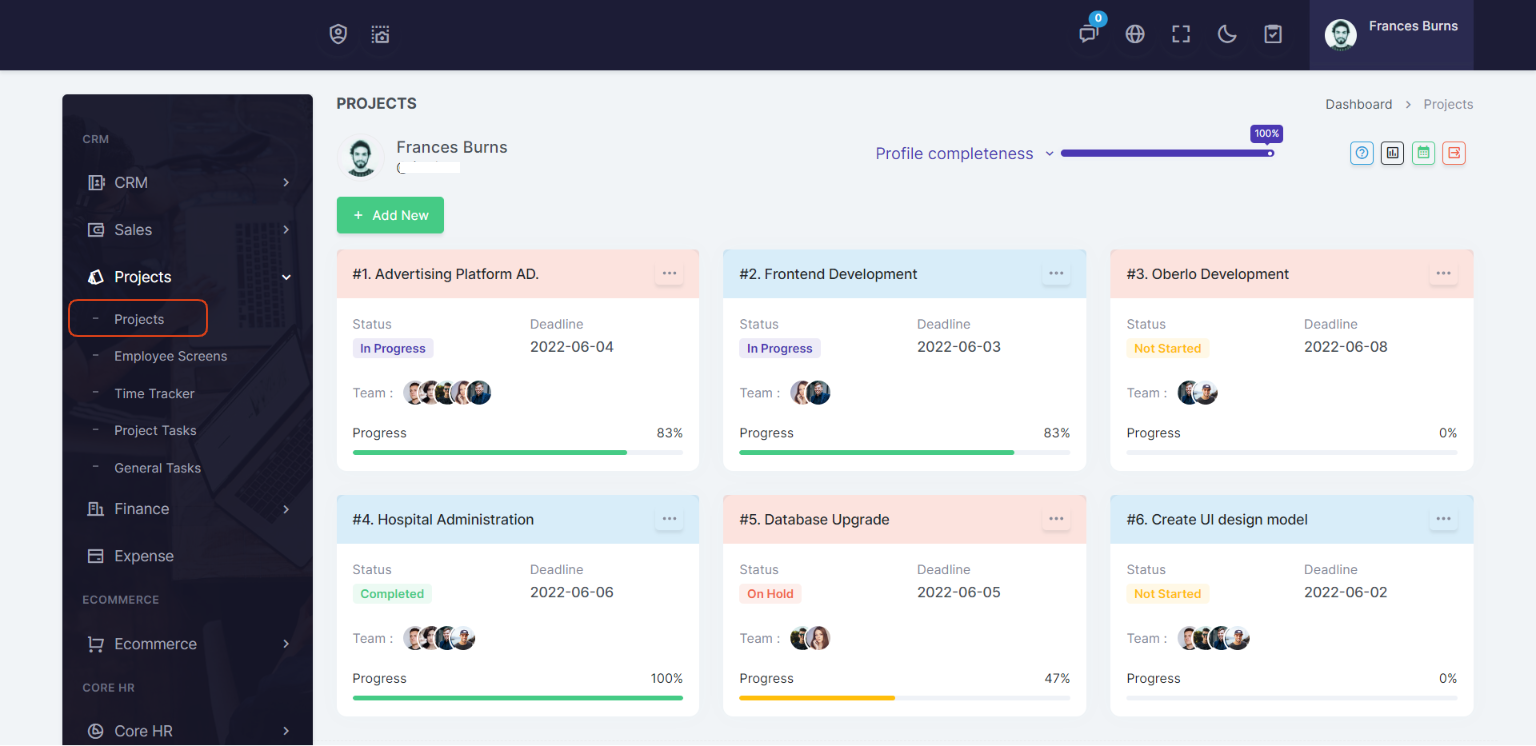
Projects Management is an important feature every company needs to accomplish various projects. Projects has been provided in MassHRM to facilitate admins and employees to create, track, and discuss in between various projects.
You can assign one project to many employees at a time, and can define start and end date of the project.
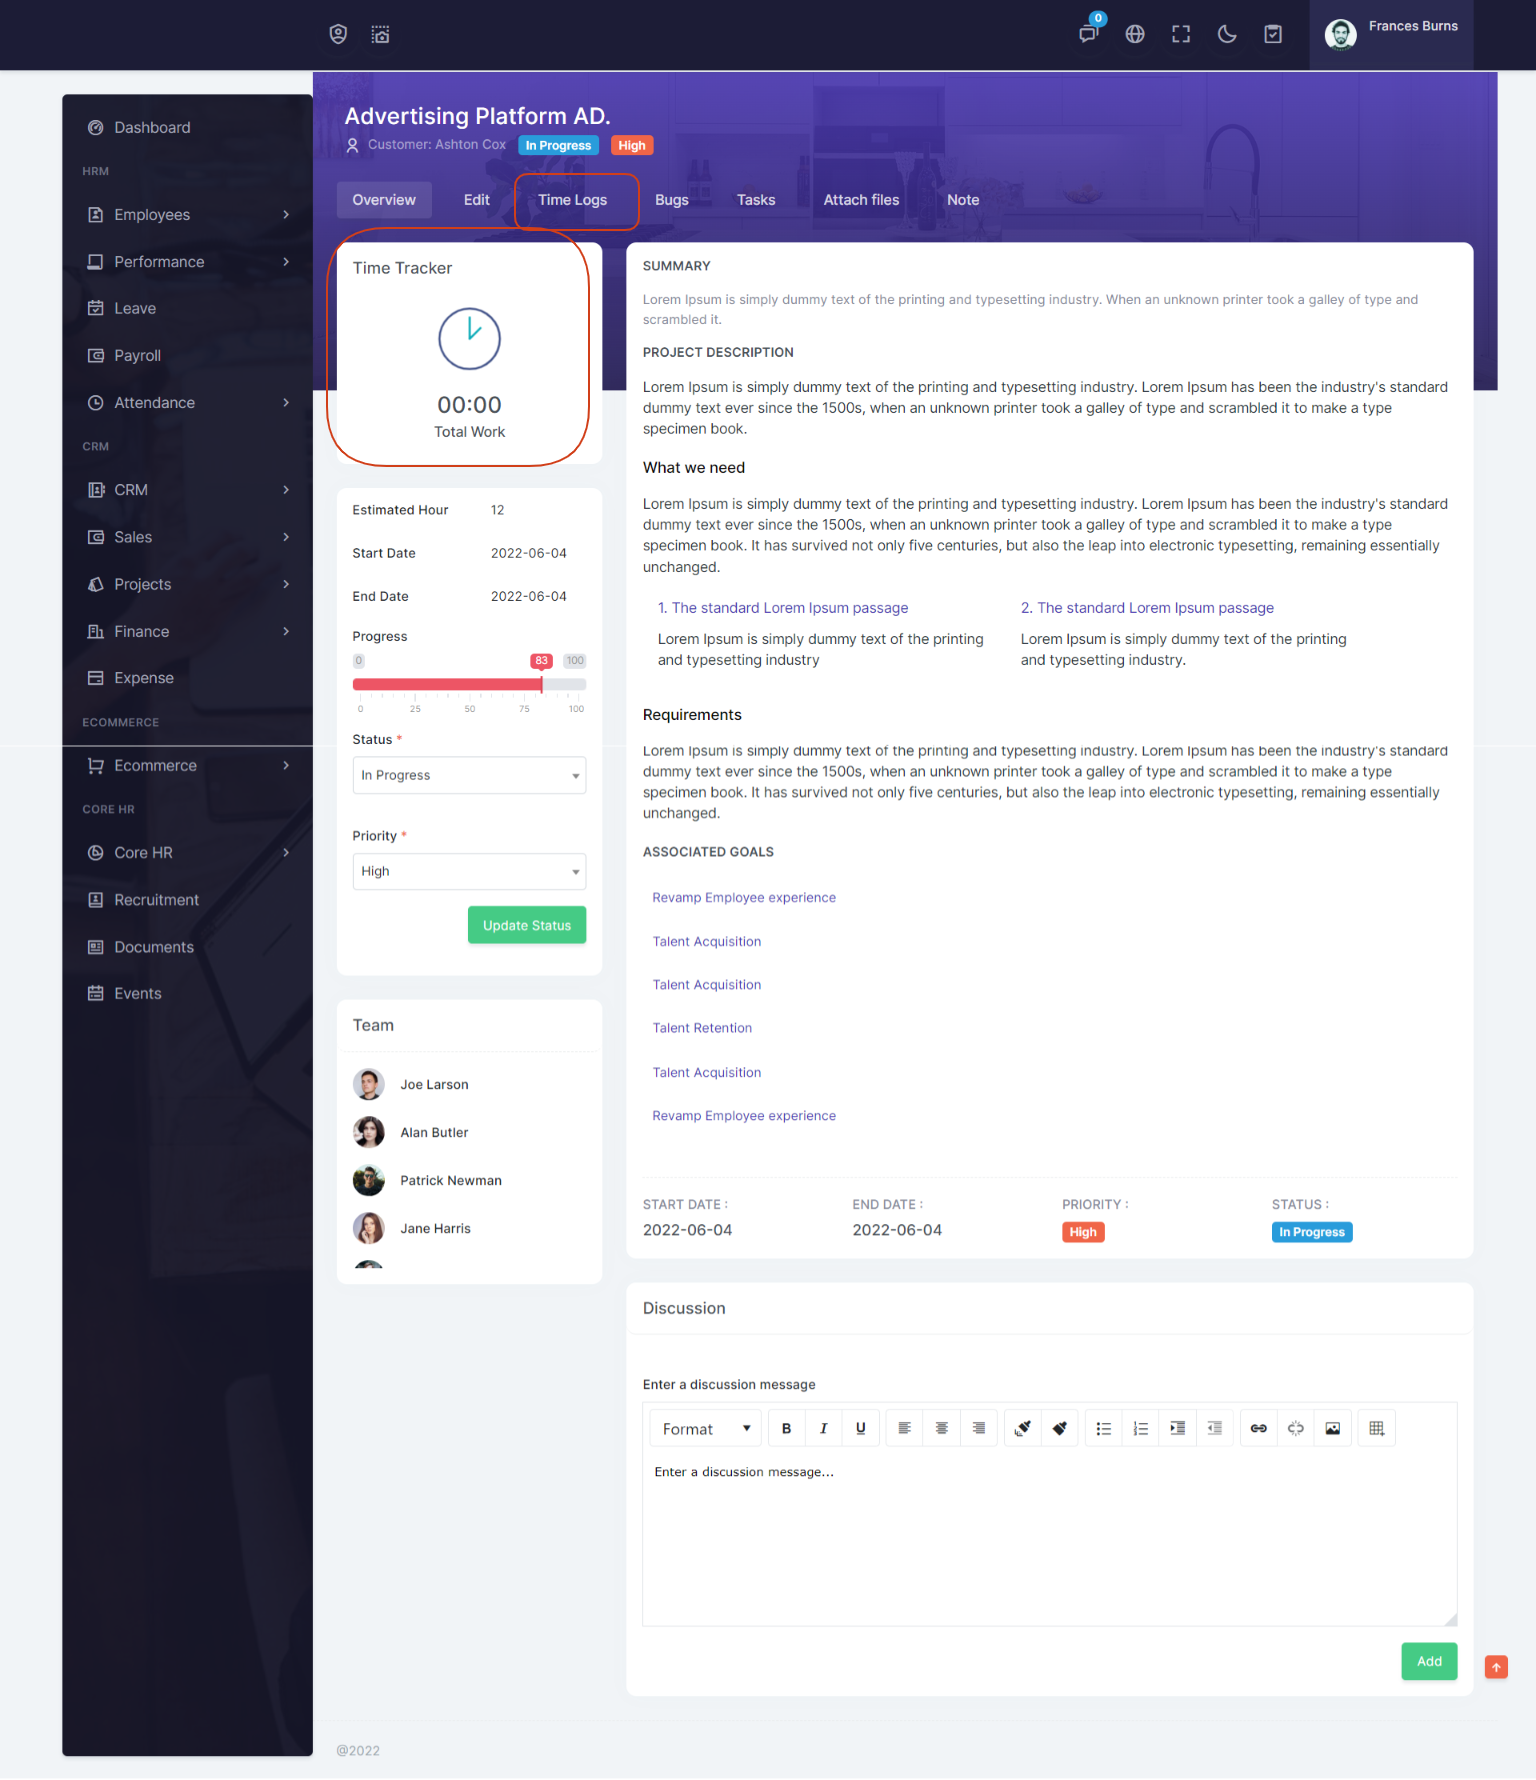
After create new project, go to details page, here you can edit project, add bugs, tasks, attach files, note and time logs
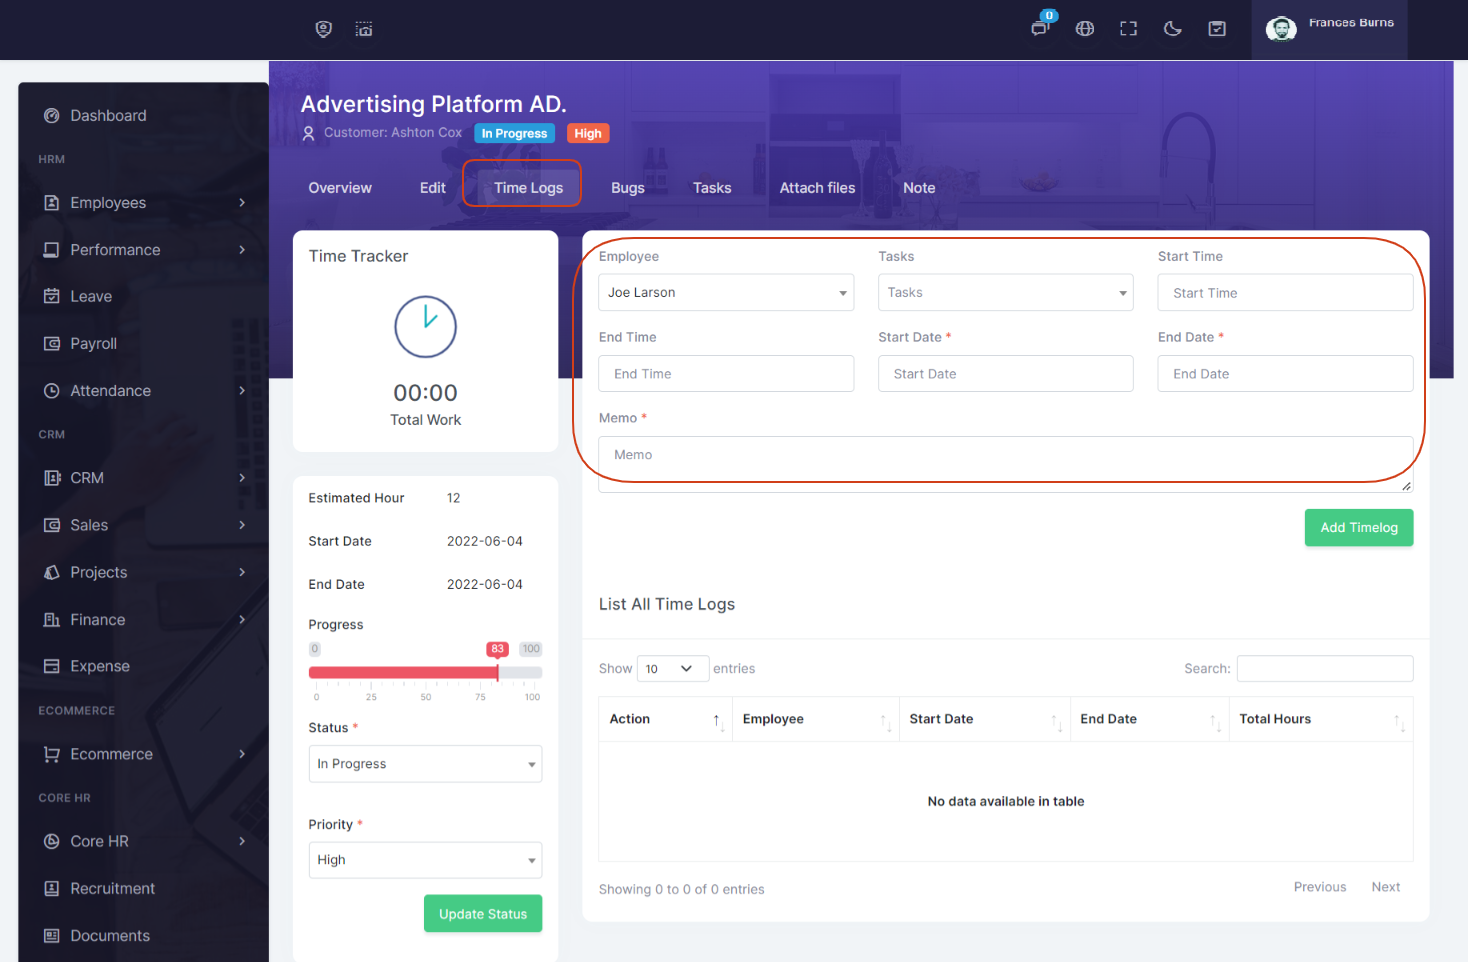
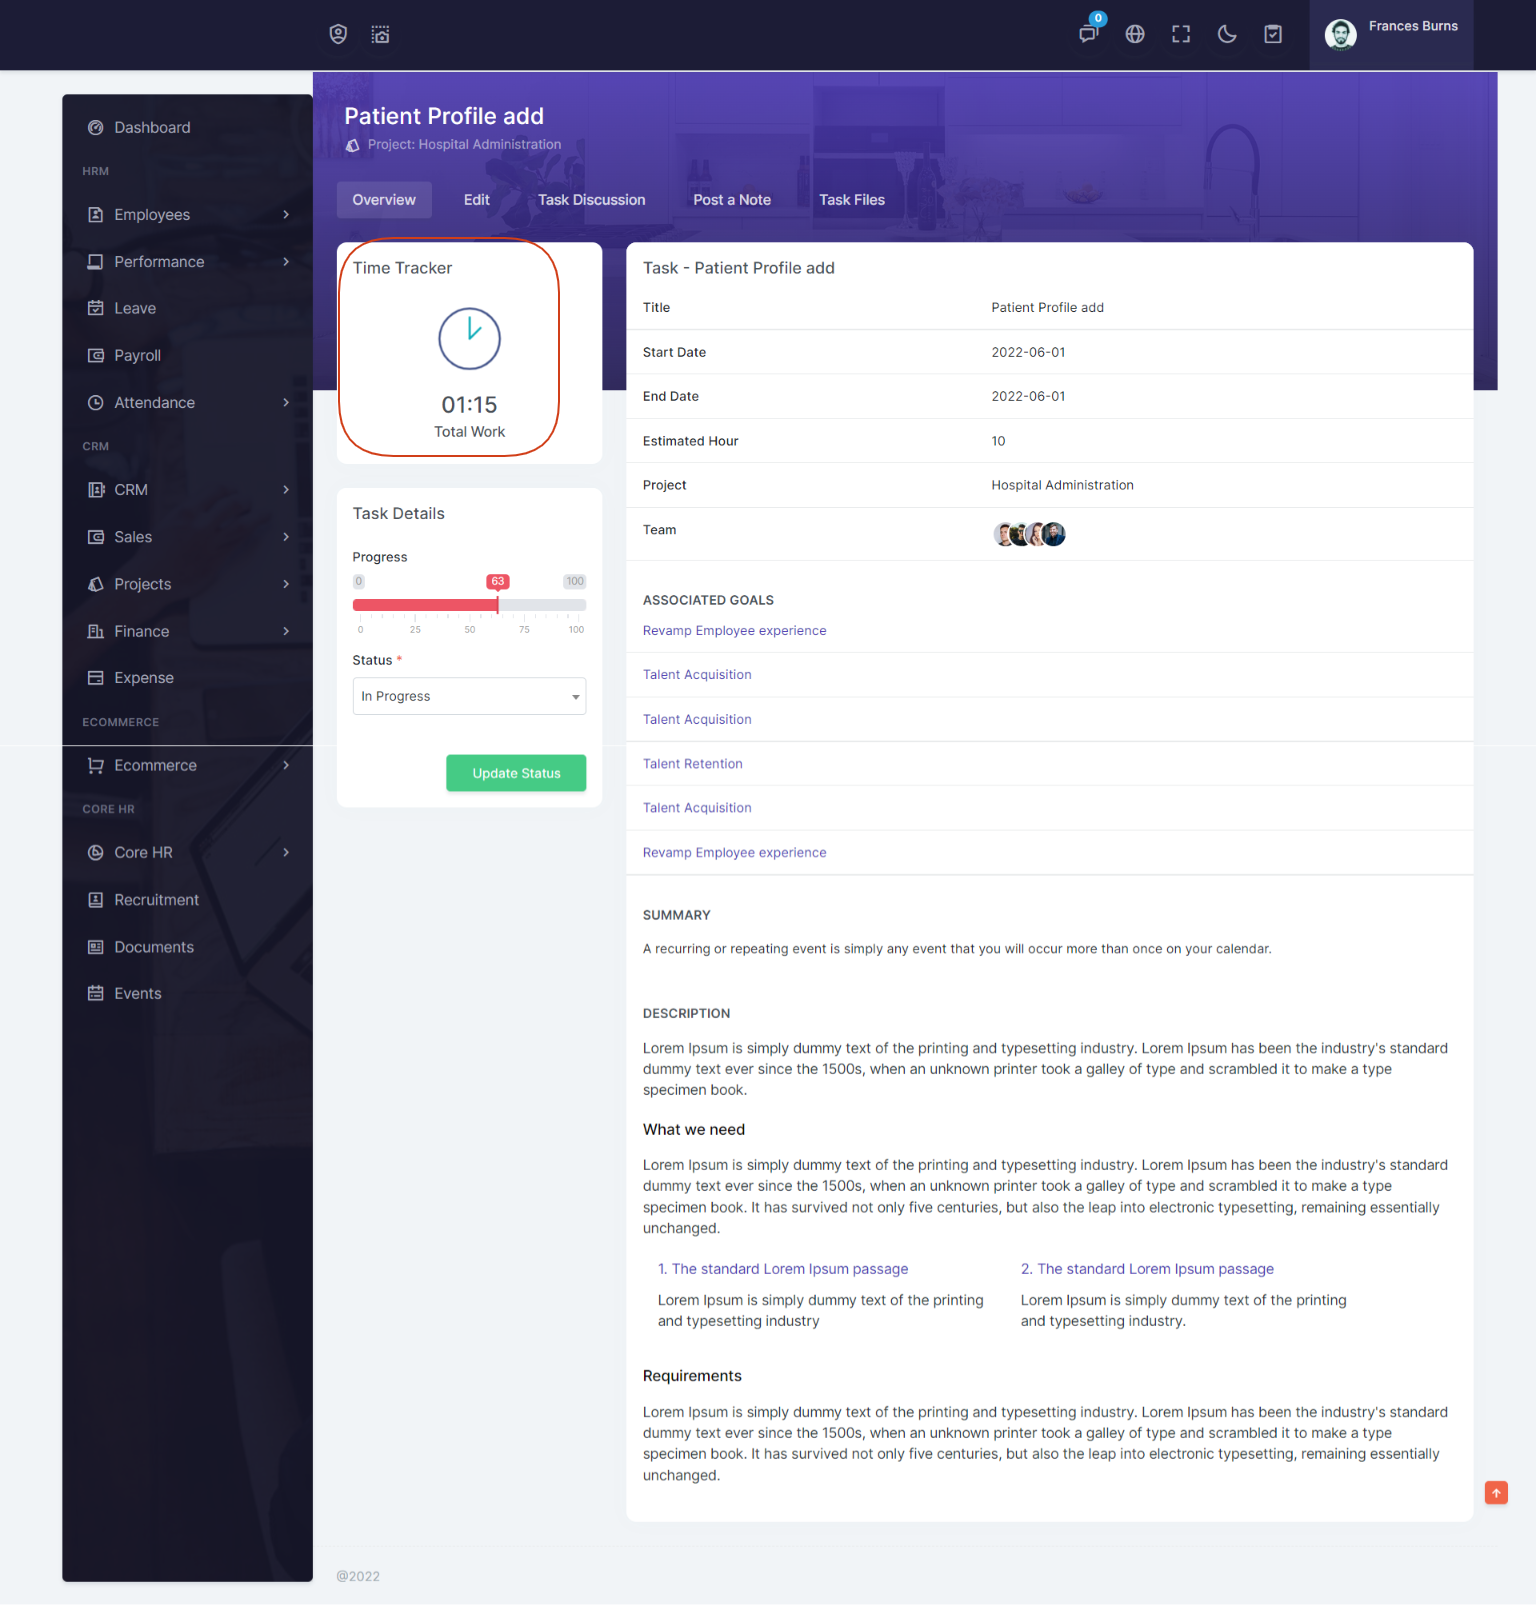
Note: You can add time log manually and also using time tracker. From employee dashboard when employee start time for project then total time will show on project details page
Here you can add time manually for a project
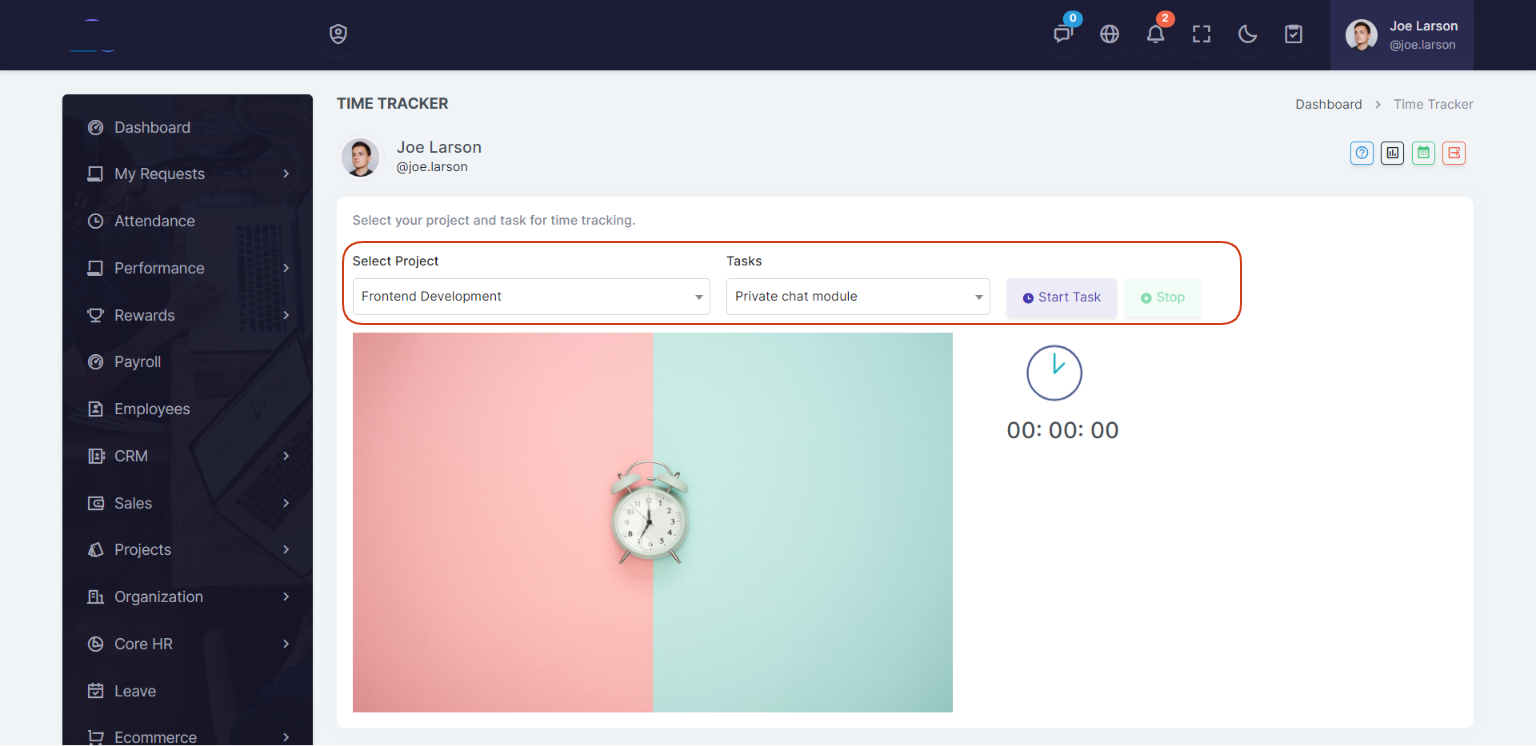
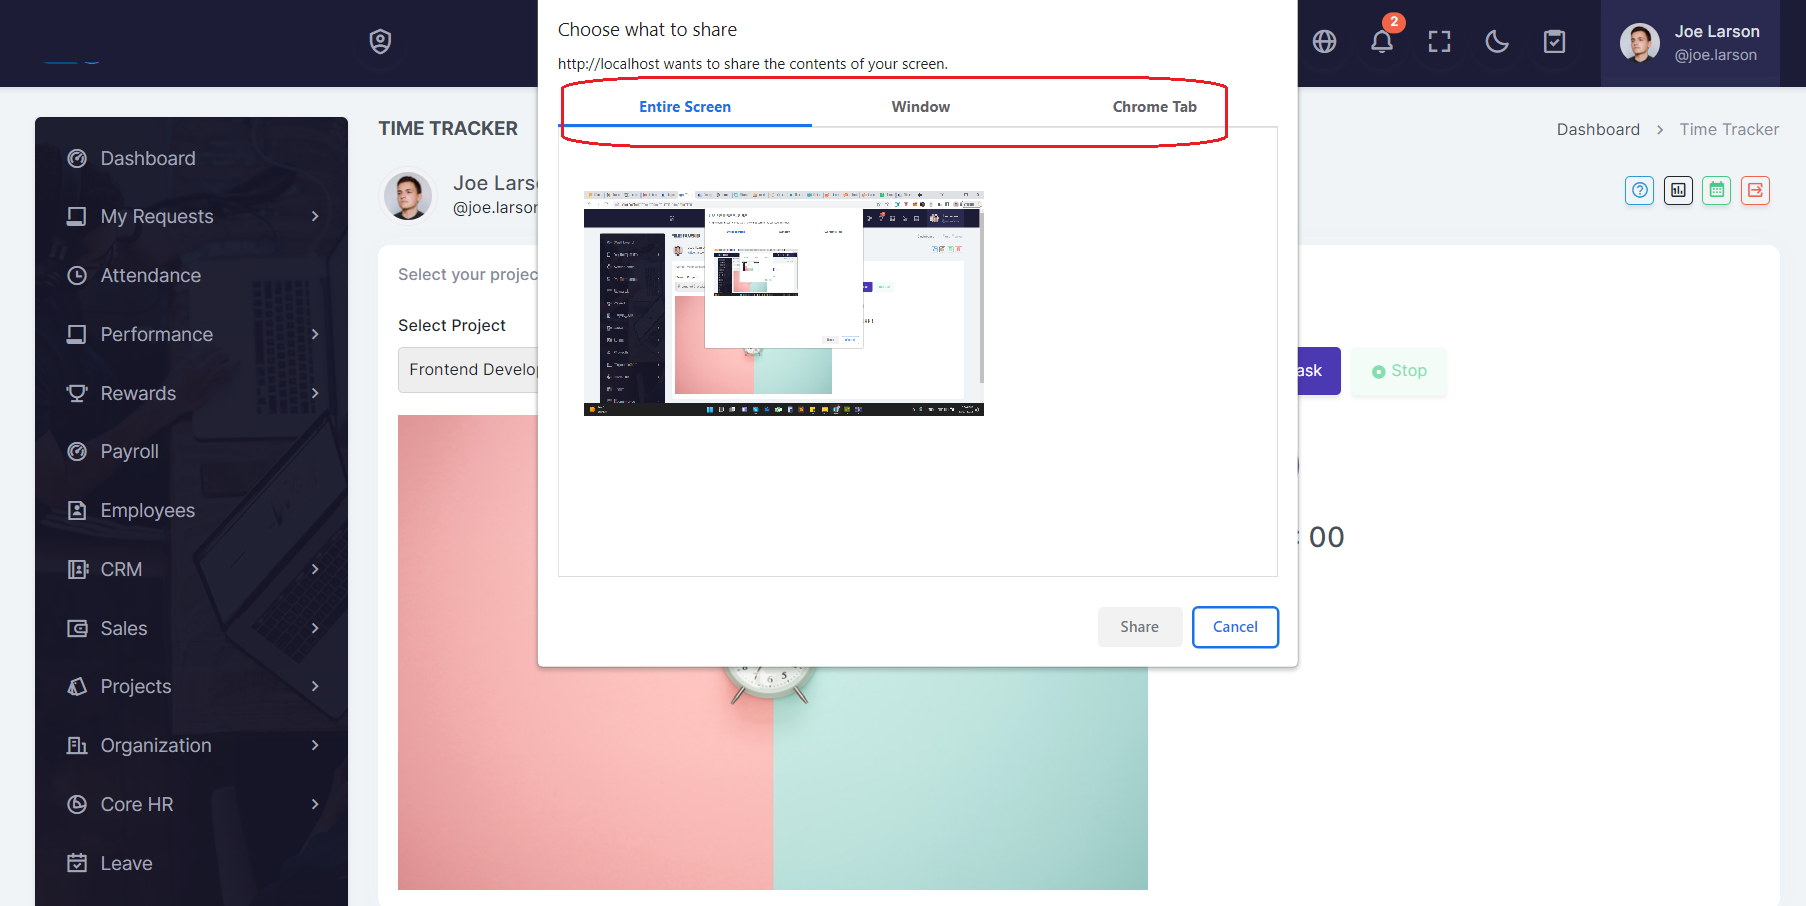
Time Tracker from employee dashboard, When employee click on Start Time, the time will start for selected project and task, and automatically it will store the time logs in database.
Employee Screens
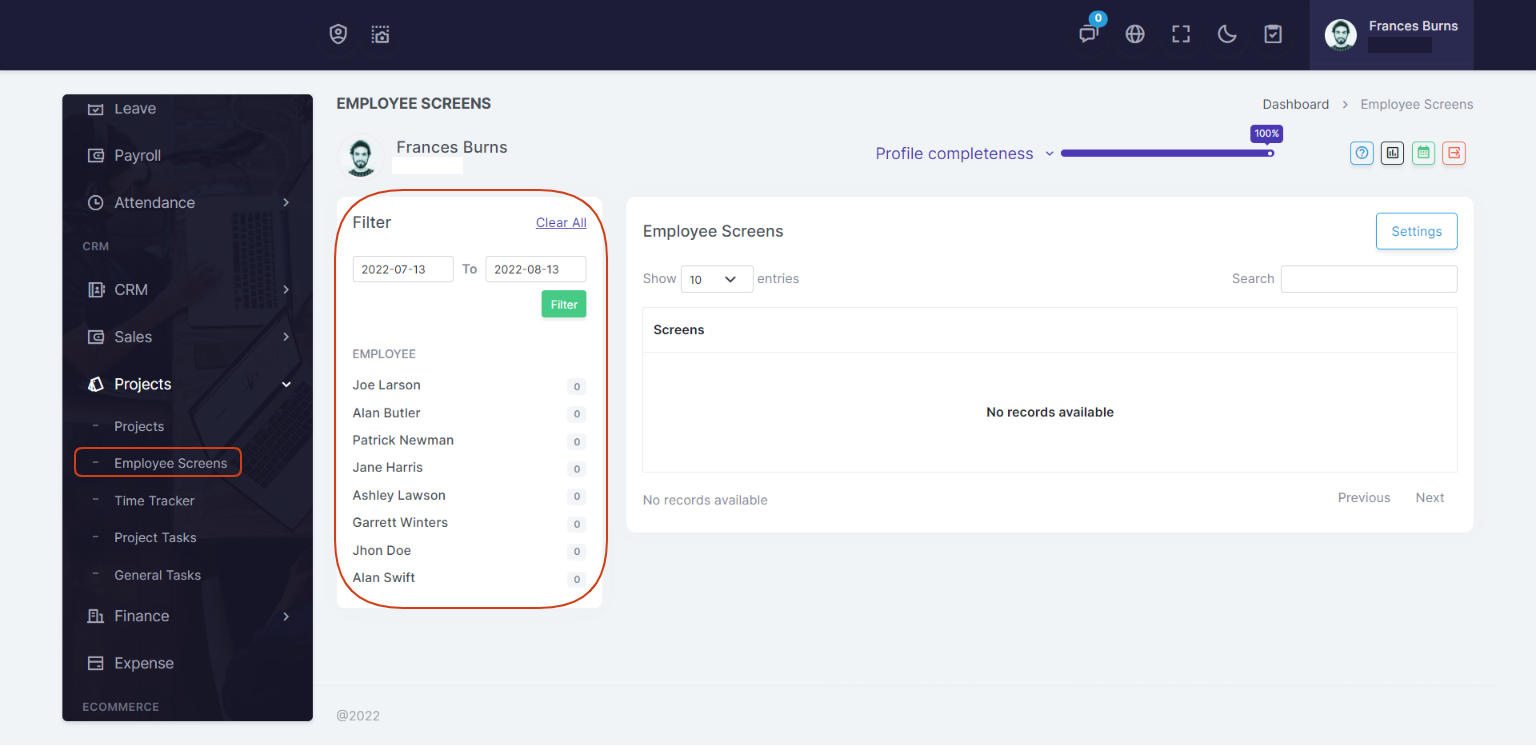
On Employee screens page you will see list of all screenshots. You can also fitler the data for each employee according to date selection.
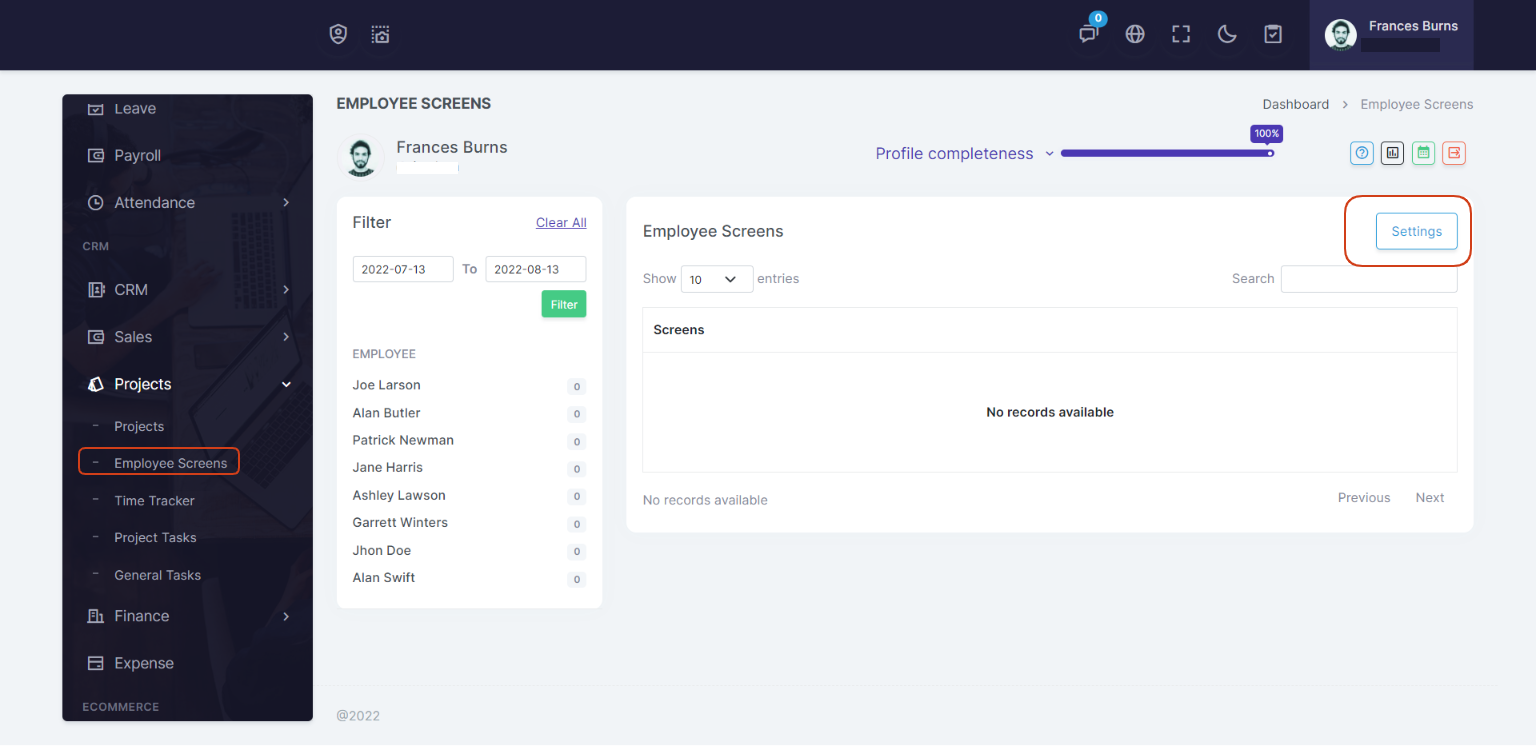
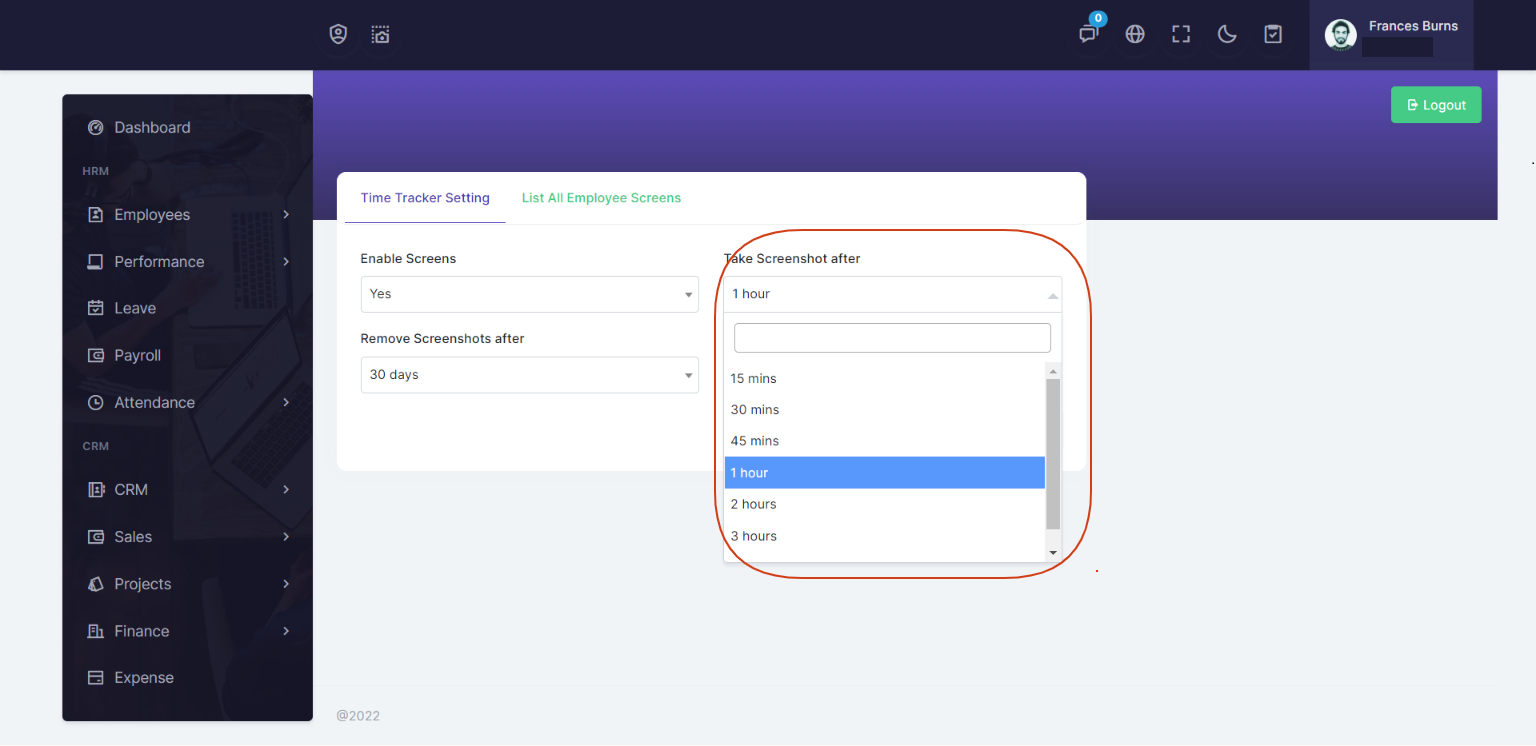
Note: The screens will capture when an employee start time for tasks and projects, the system will capture the screenshots of employees screen and store in the database. You can set the capture screenshots timing from settings page.
Note: This module will access only company admin. Employees will not know about screenshots
Time Tracker
On Time tracker page you can see all time which are recorded for projects and tasks. And can fitler the data for each employee according to date selection.
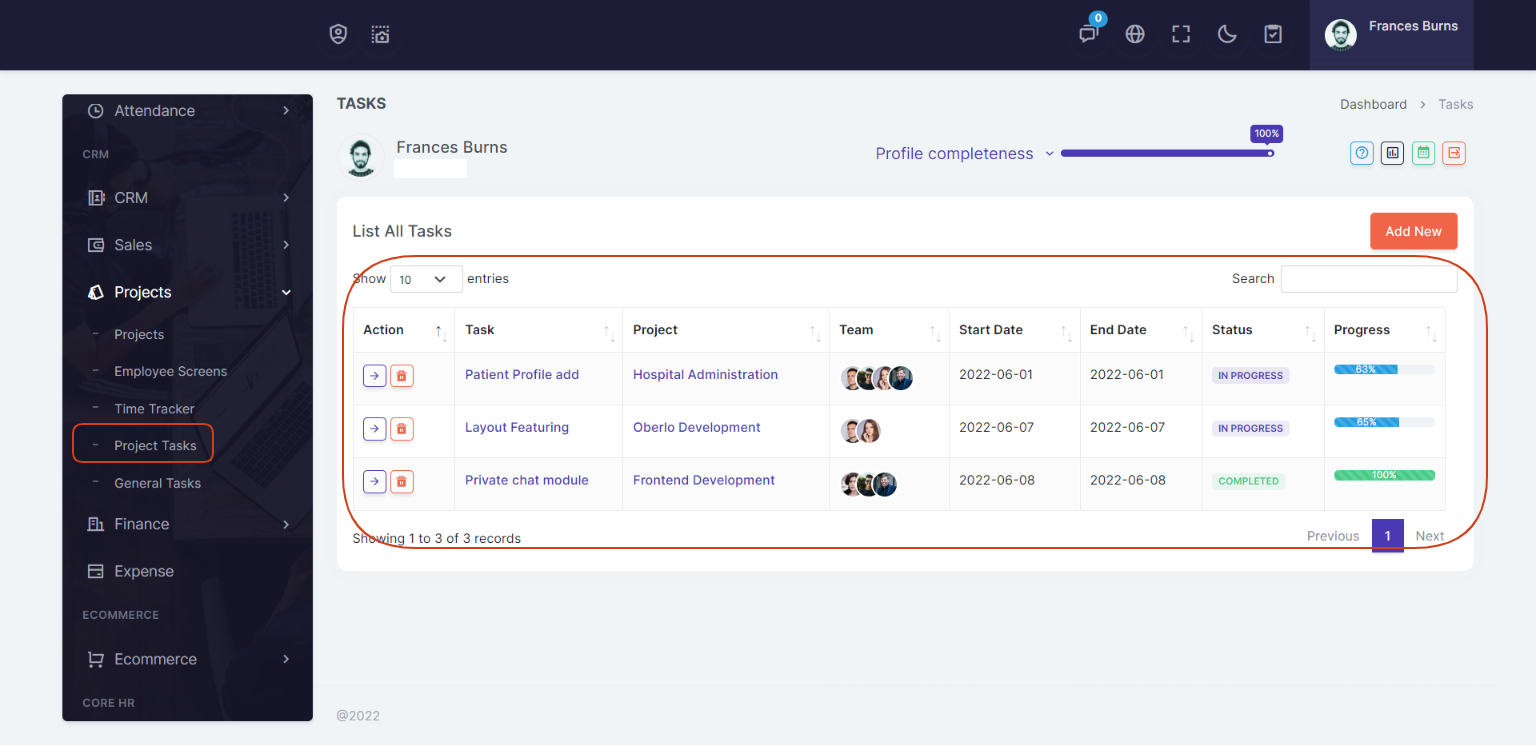
Project Tasks
Task Management is an important feature every company needs to accomplish various task. Task has been provided in MASSHRM to facilitate admins and employees to create, track, and discuss in between various tasks.
This module related to project. A project must select while you creating a new task.
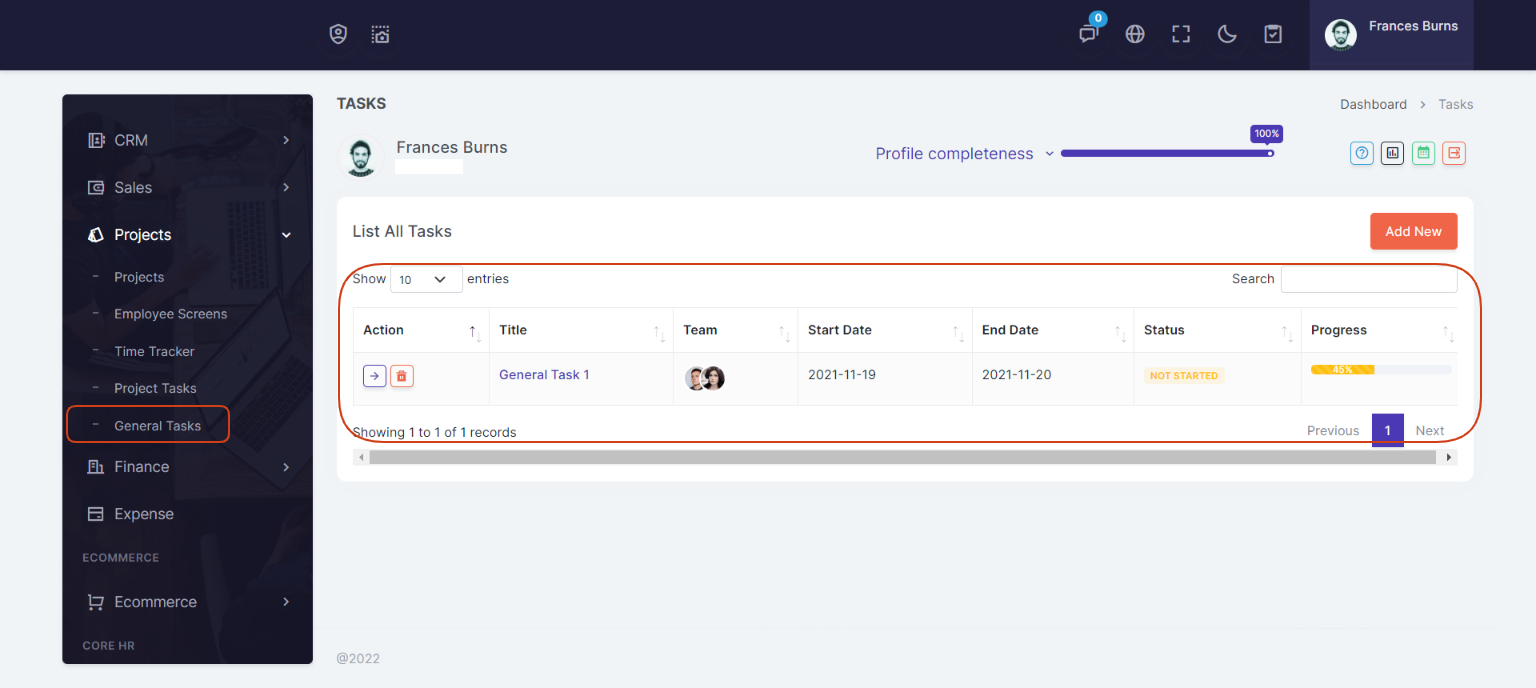
General Tasks
On General Task page you can add general tasks and assign to multi employees. This module is not related to projects, without selection of a project you can add general task.
Finance
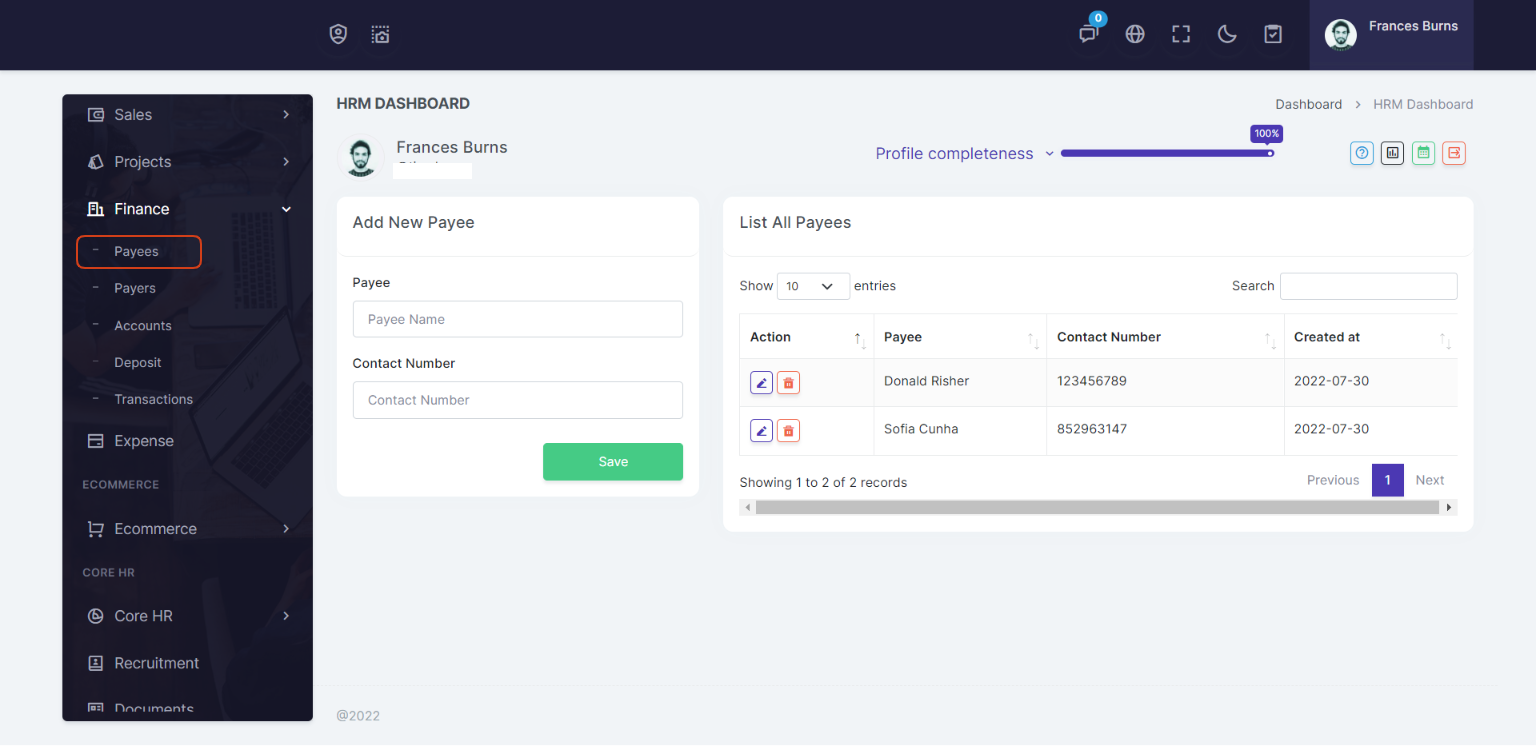
Payees
You can easily add payees in the system. Payees will use for expense module.
For Payee you can add the payee name and contact number.
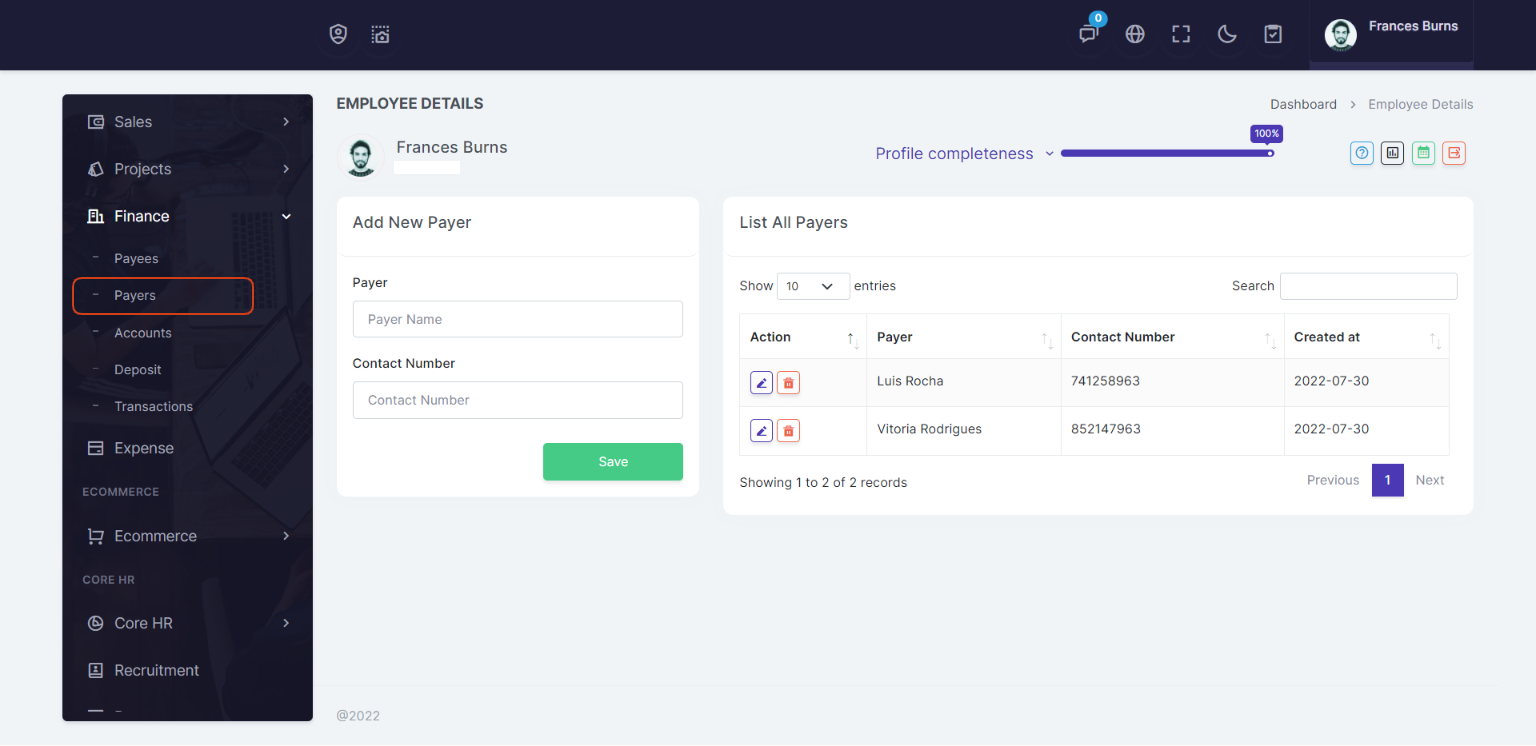
Payers
You can easily add payers in the system. Payers will use for deposit module.
For Payer you can add the payer name and contact number.
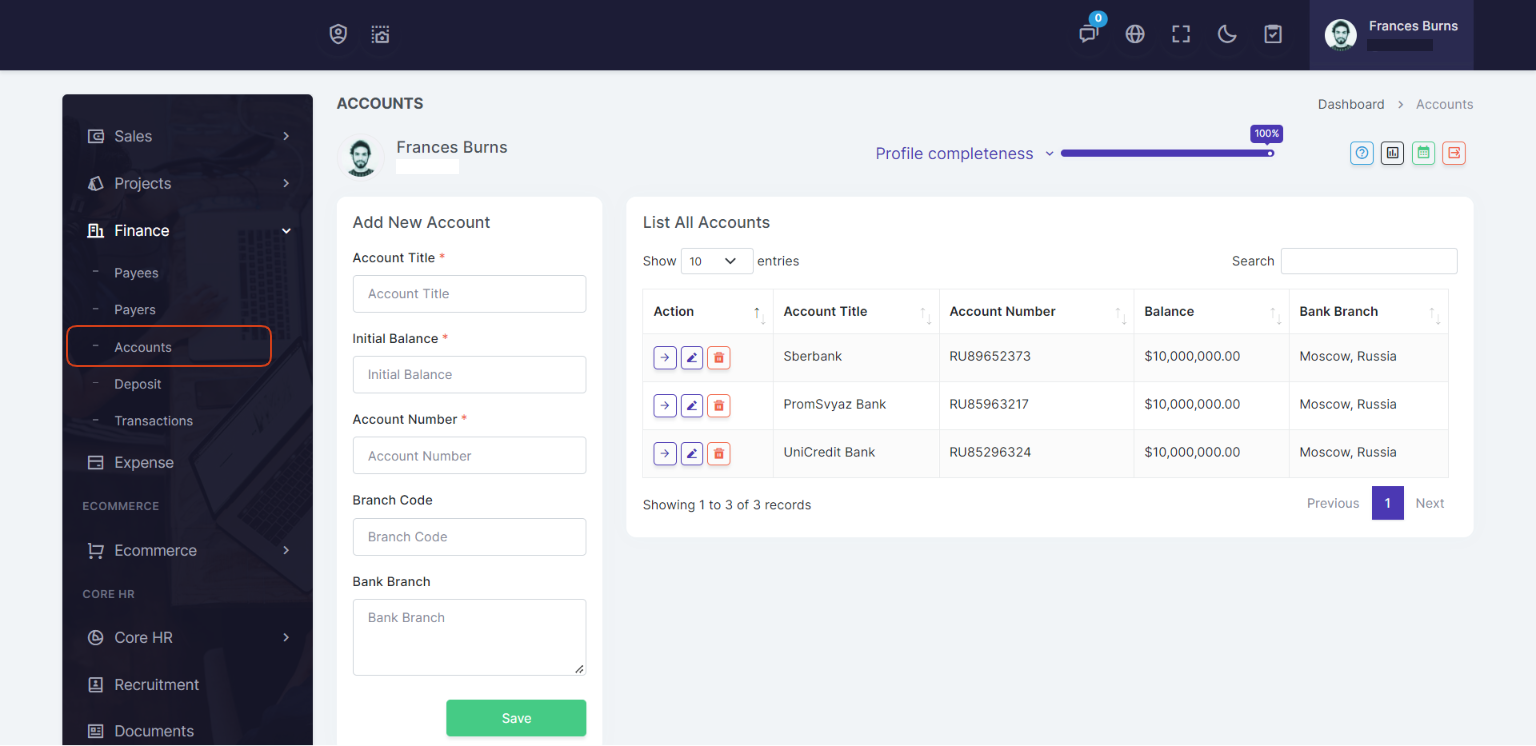
Accounts
On Accounts page you can add your bank accounts, it will use for deposit and expenses module.
You can create multi bank accounts on this page.
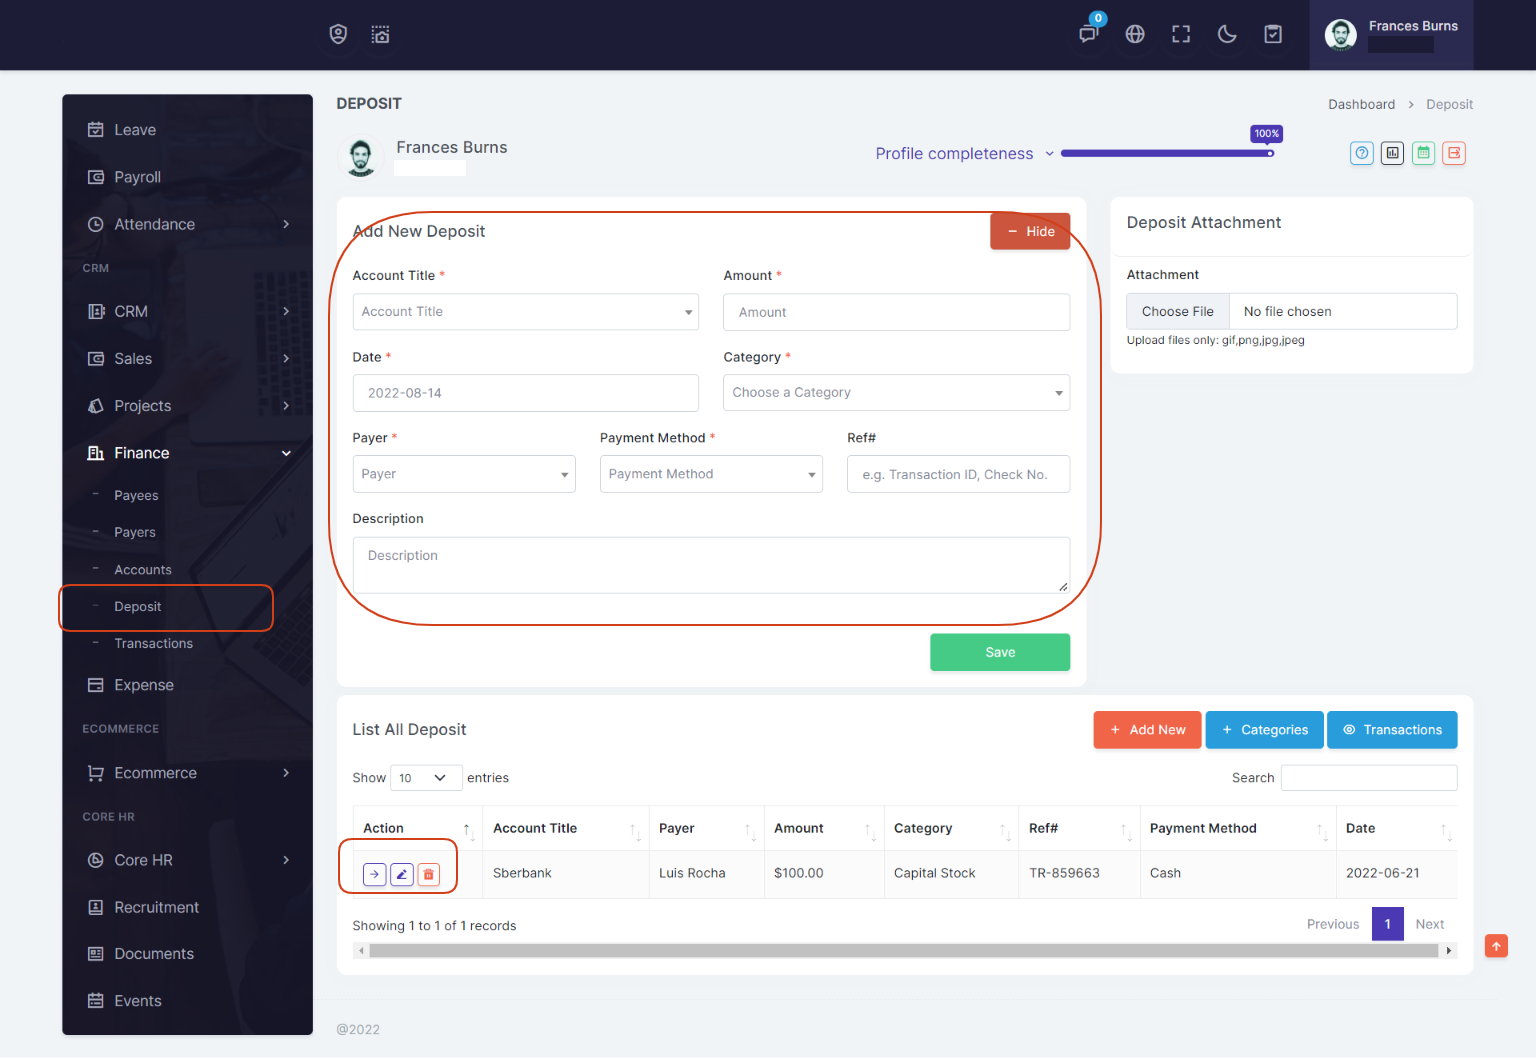
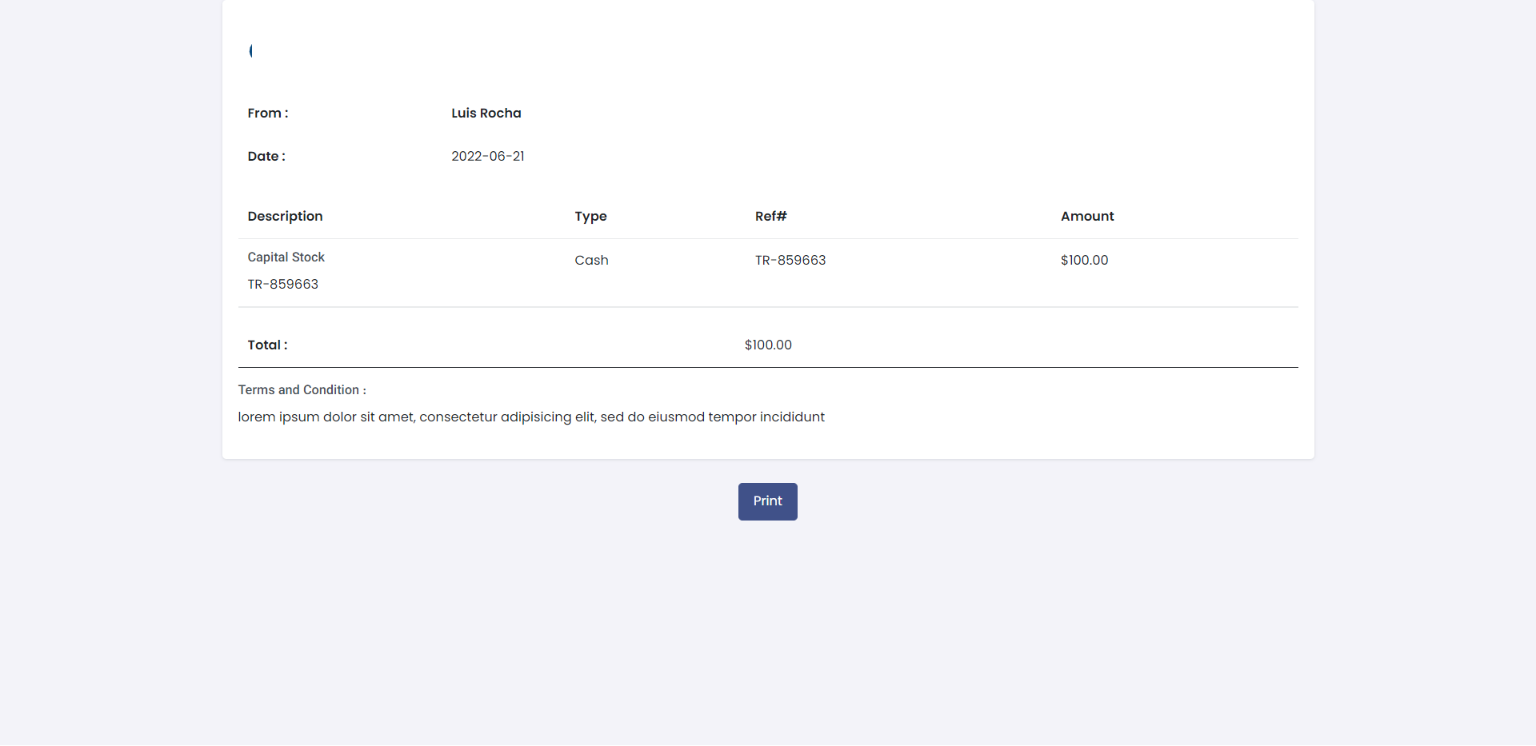
Deposit
You can easily add/edit deposit from Deposit module. During new deposit addition - you can select a Payer for deposit, input the amount, deposit category, payment method, reference number and the deposit copy provided by the payer. You can define date of the deposit.
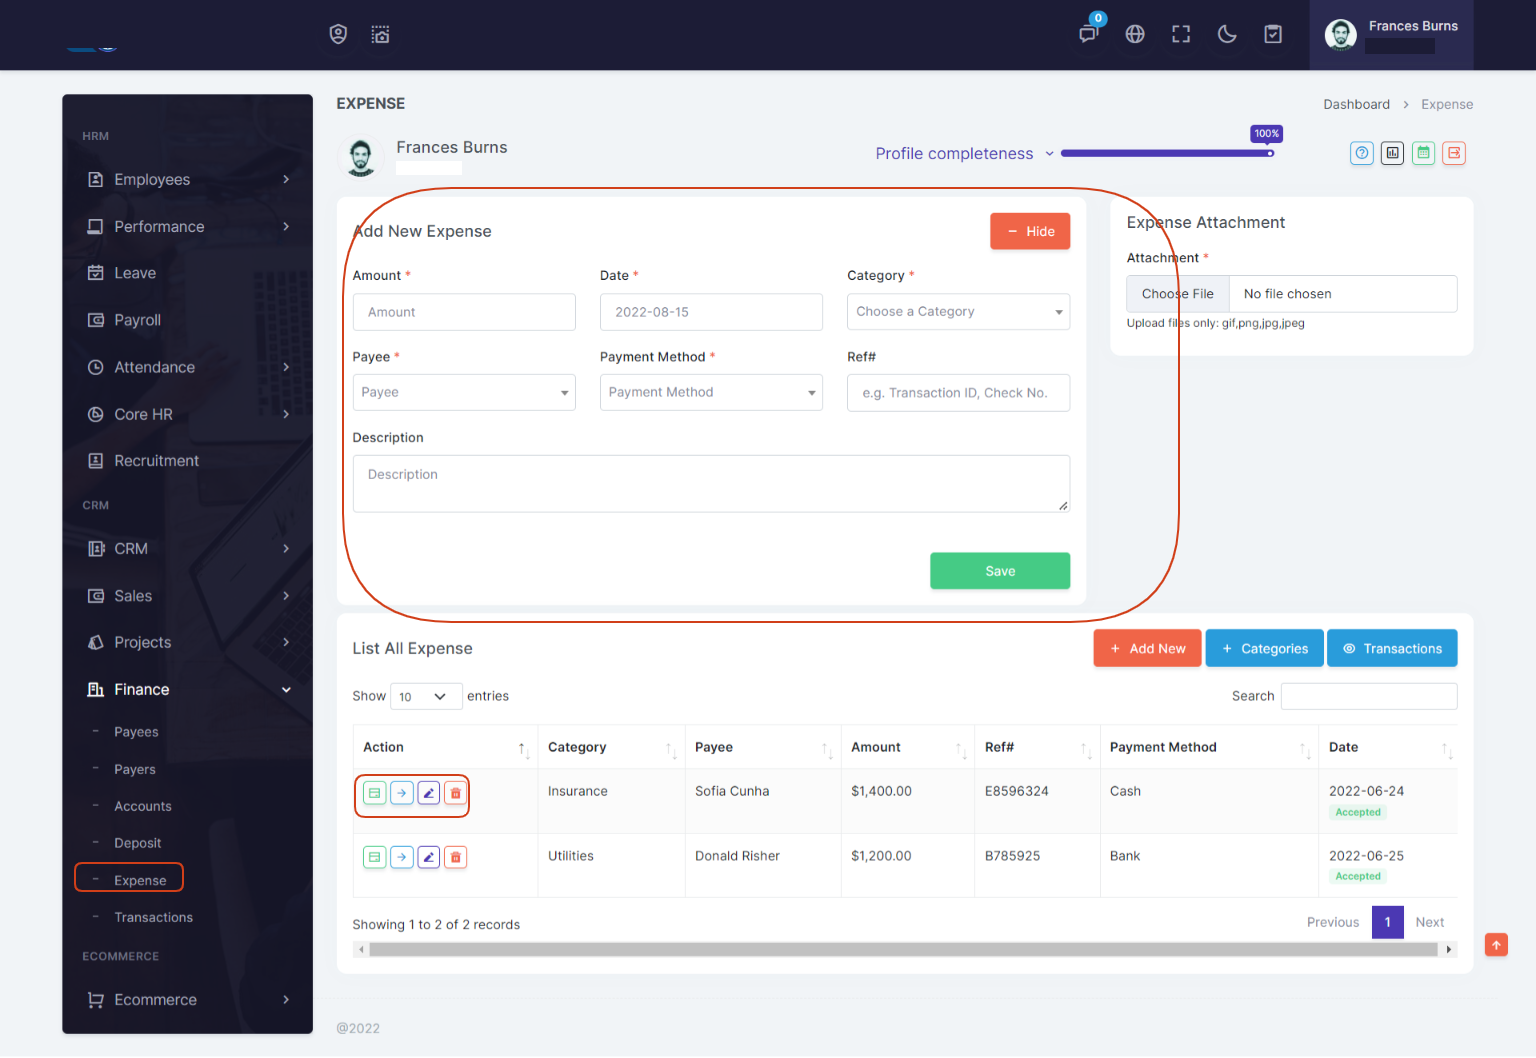
Expense
Expenses is a vital part that every human resource admin needs to track. In MassHRM a dynamic and beautiful expense management system is produced.
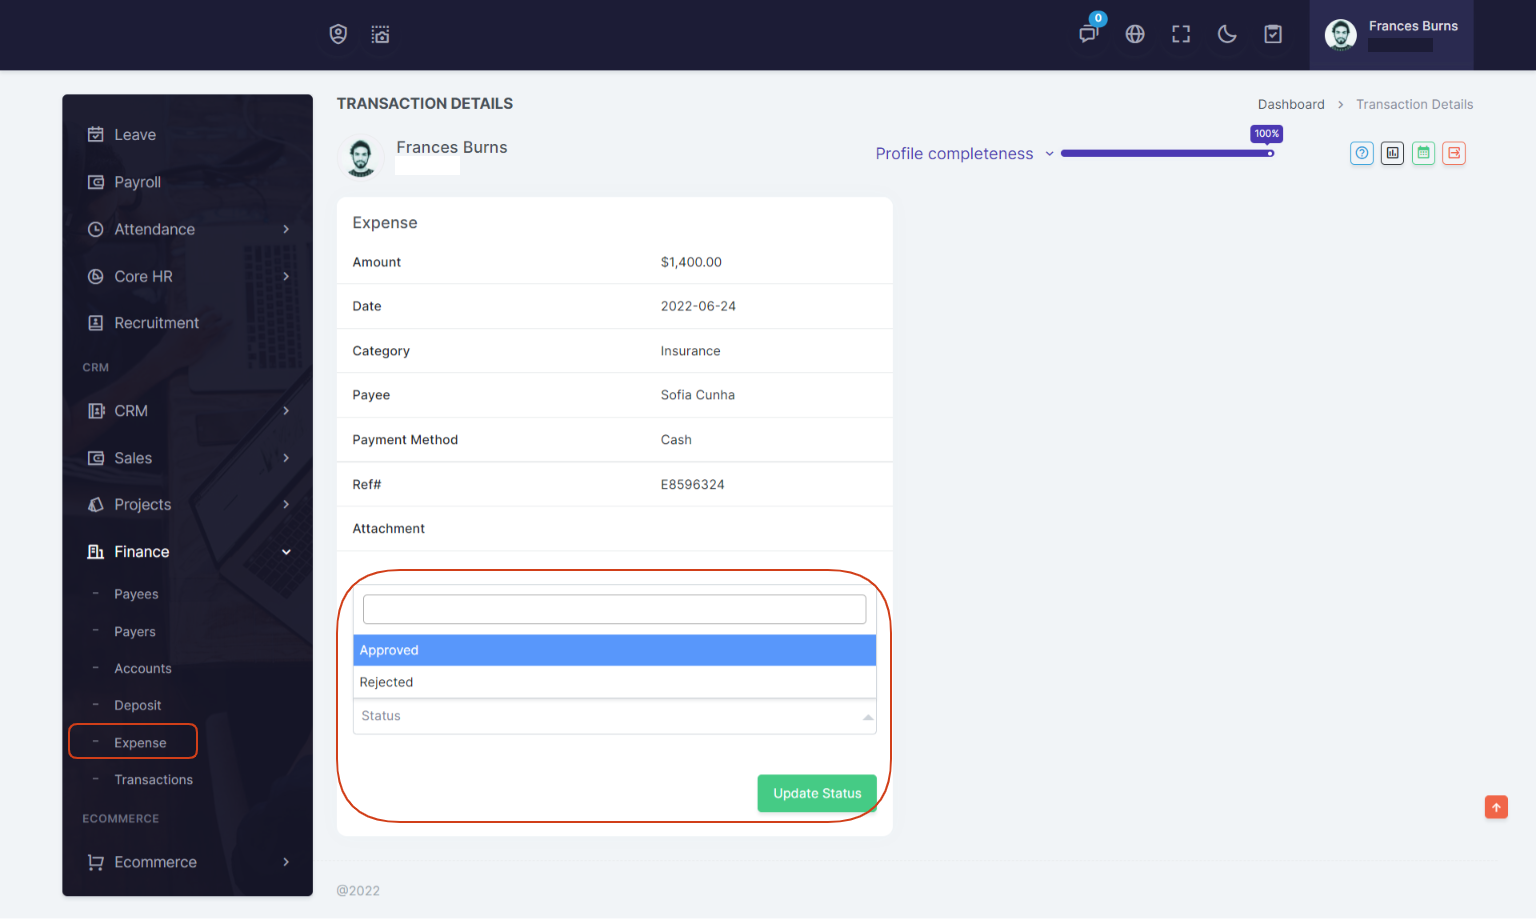
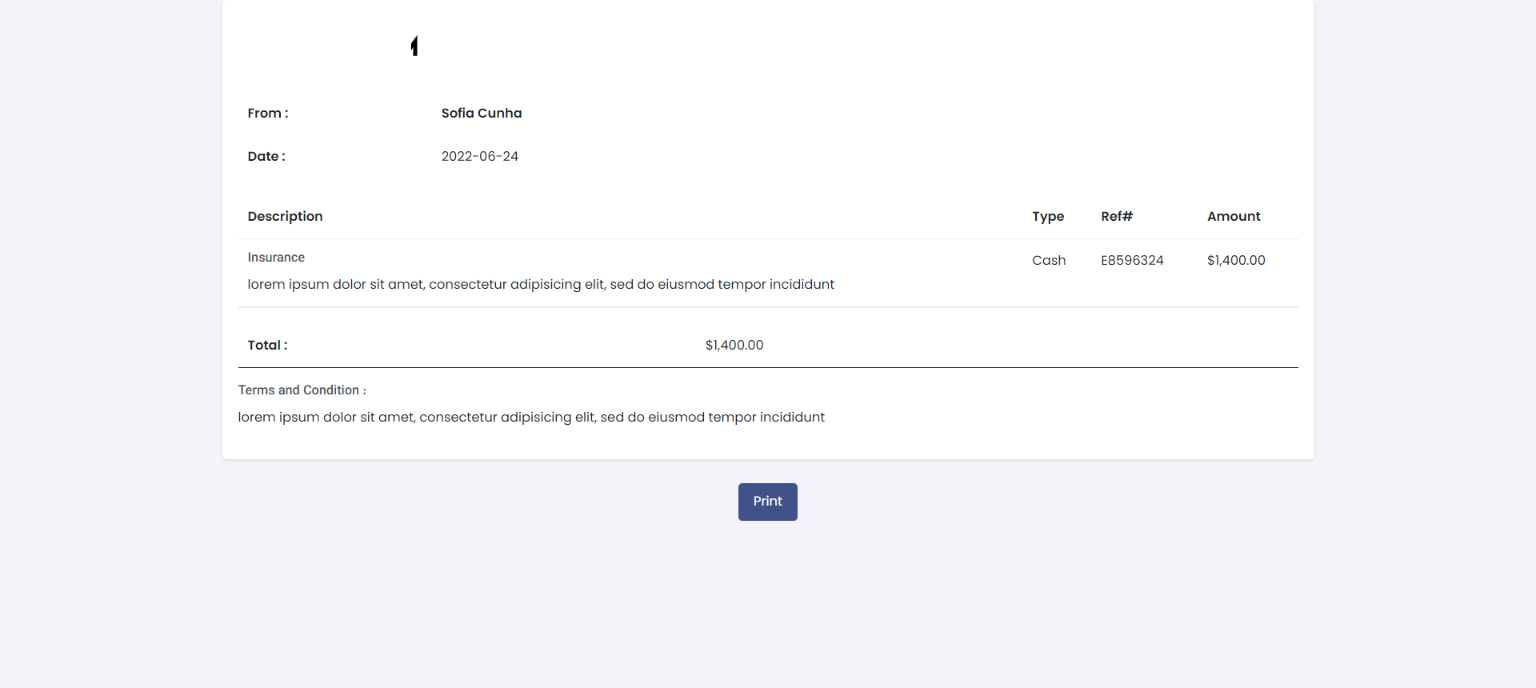
You can easily add/edit expenses from Expense Management. During new expense addition - you can select a Payee who made this expense, also you can input the amount spent, expense category and the bill copy provided by the payee. You can define date of the expense.
Transaction
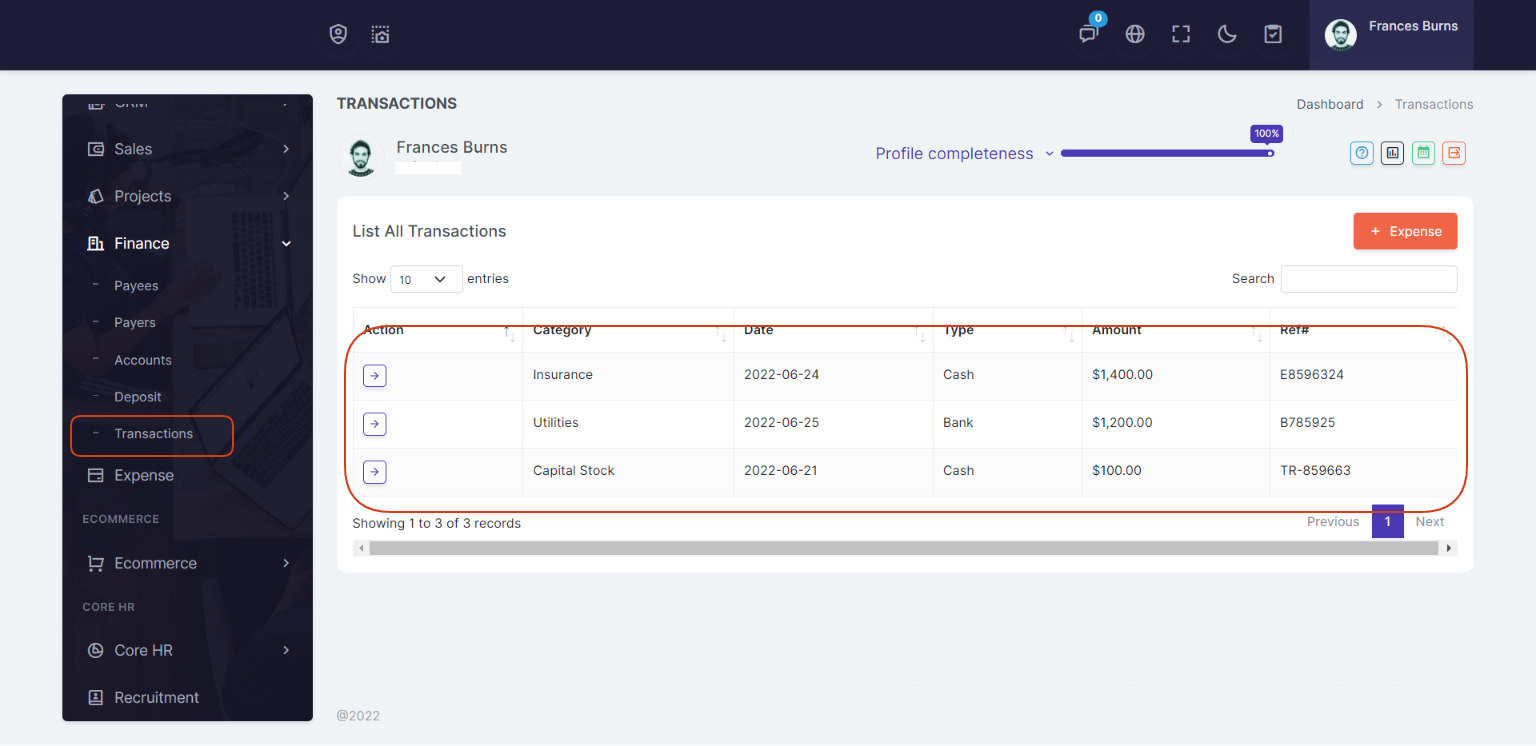
On Transaction page you can view all transactions of expense and deposit which are added in the system.
Ecommerce
Ecommerce Dashboard
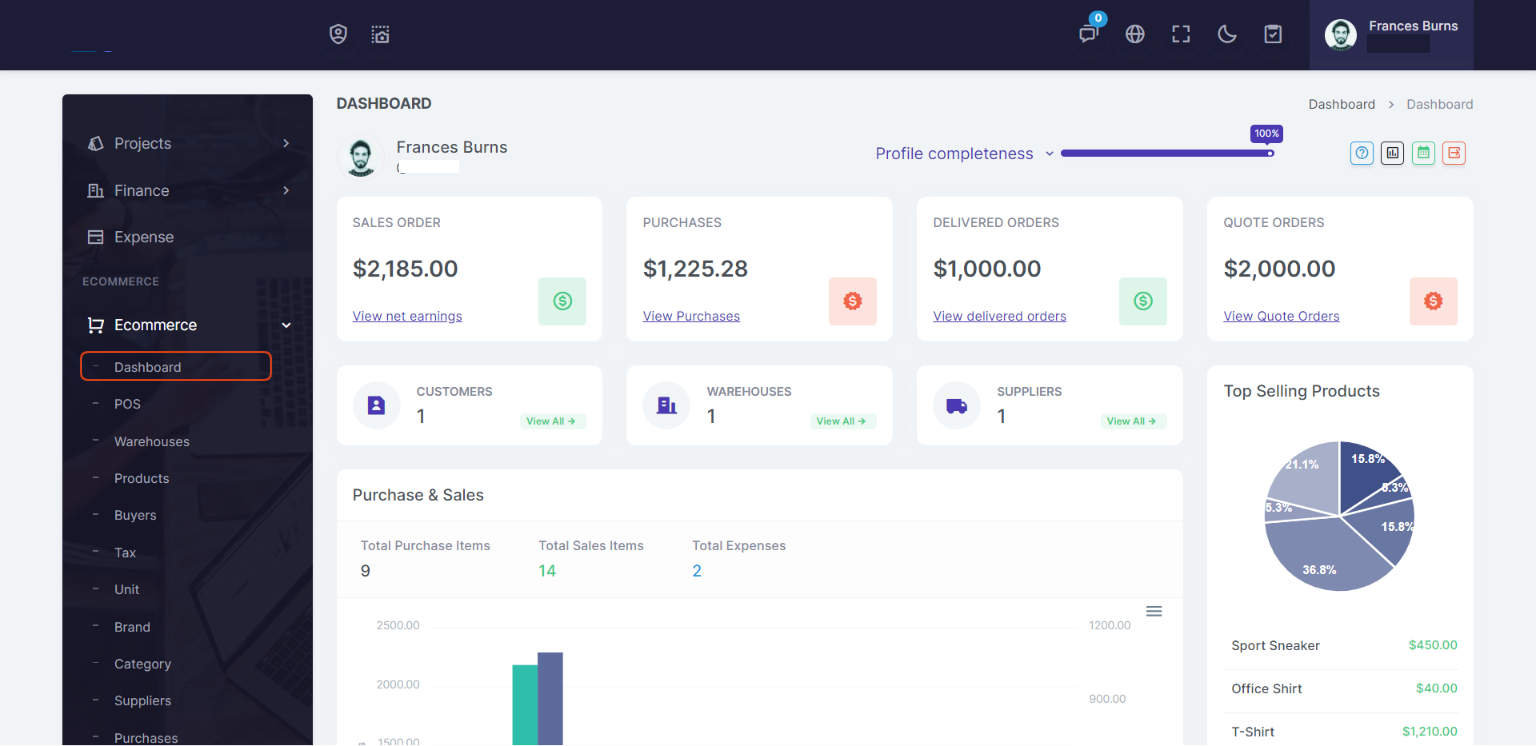
On Ecommerce dashboard you can view the summary of:
- Sales Order
- Purchases
- Delivered Orders
- Quote Orders
- Total Customers, warehouses and suppliers
- Top Selling Products
- Purchases & Sales
POS
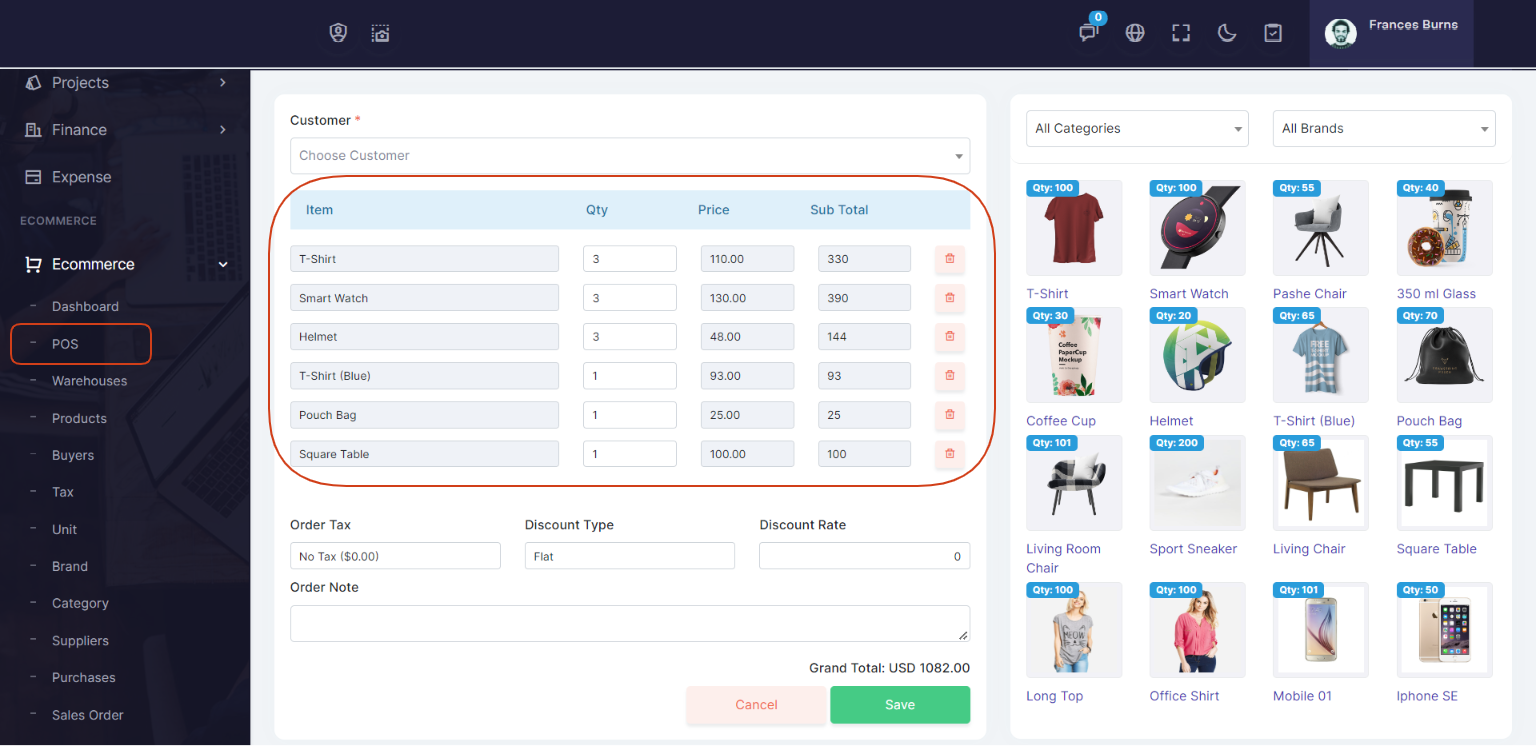
Easy version sales entry. Here you can sell to specific or Walk-in Customer. Also given category and brand wise search. From items list you can increase or decrease item quantities. On Total amount you can provide discount on overall sales.
Warehouses
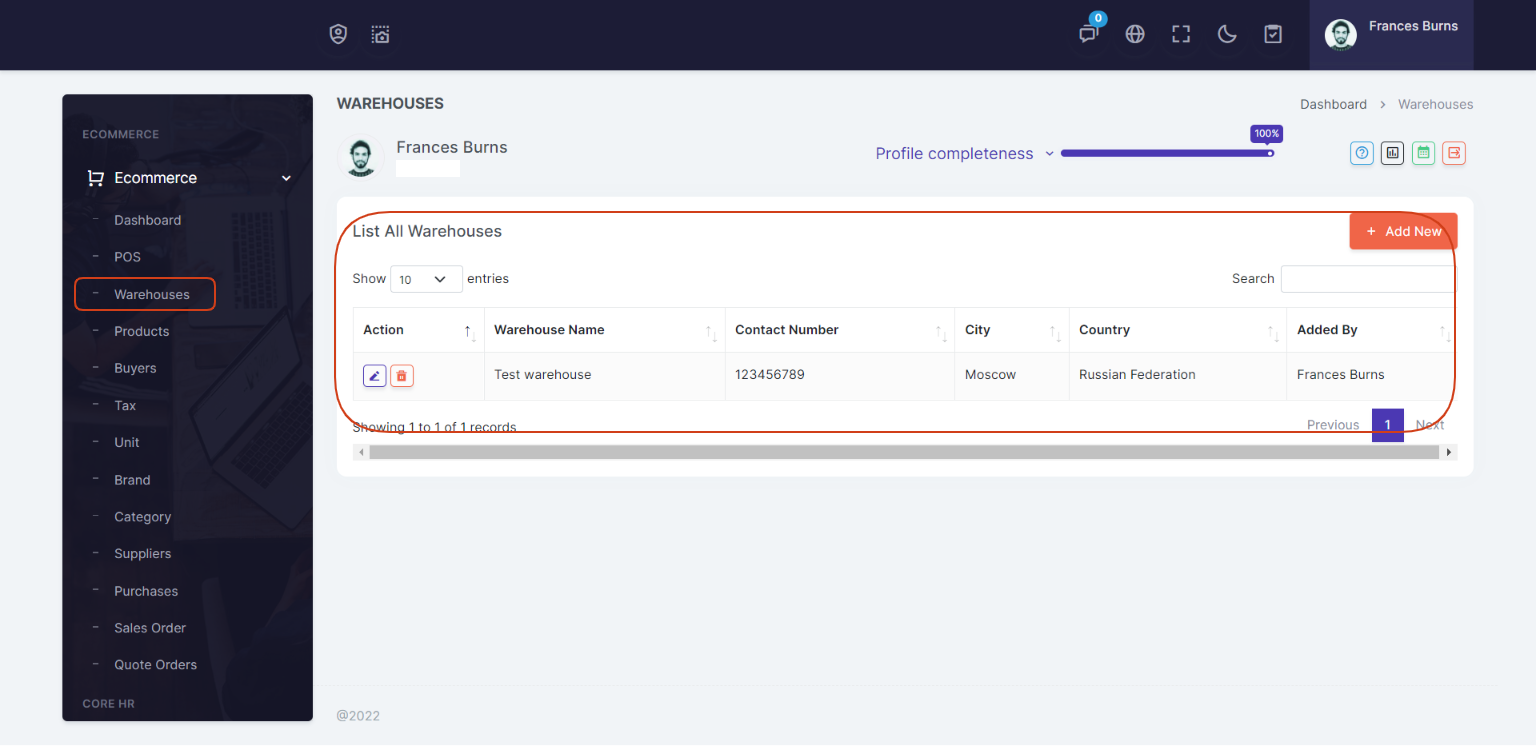
You can view the all the added Warehouses list and you can manage Warehouses list by delete & edit actions.
Products
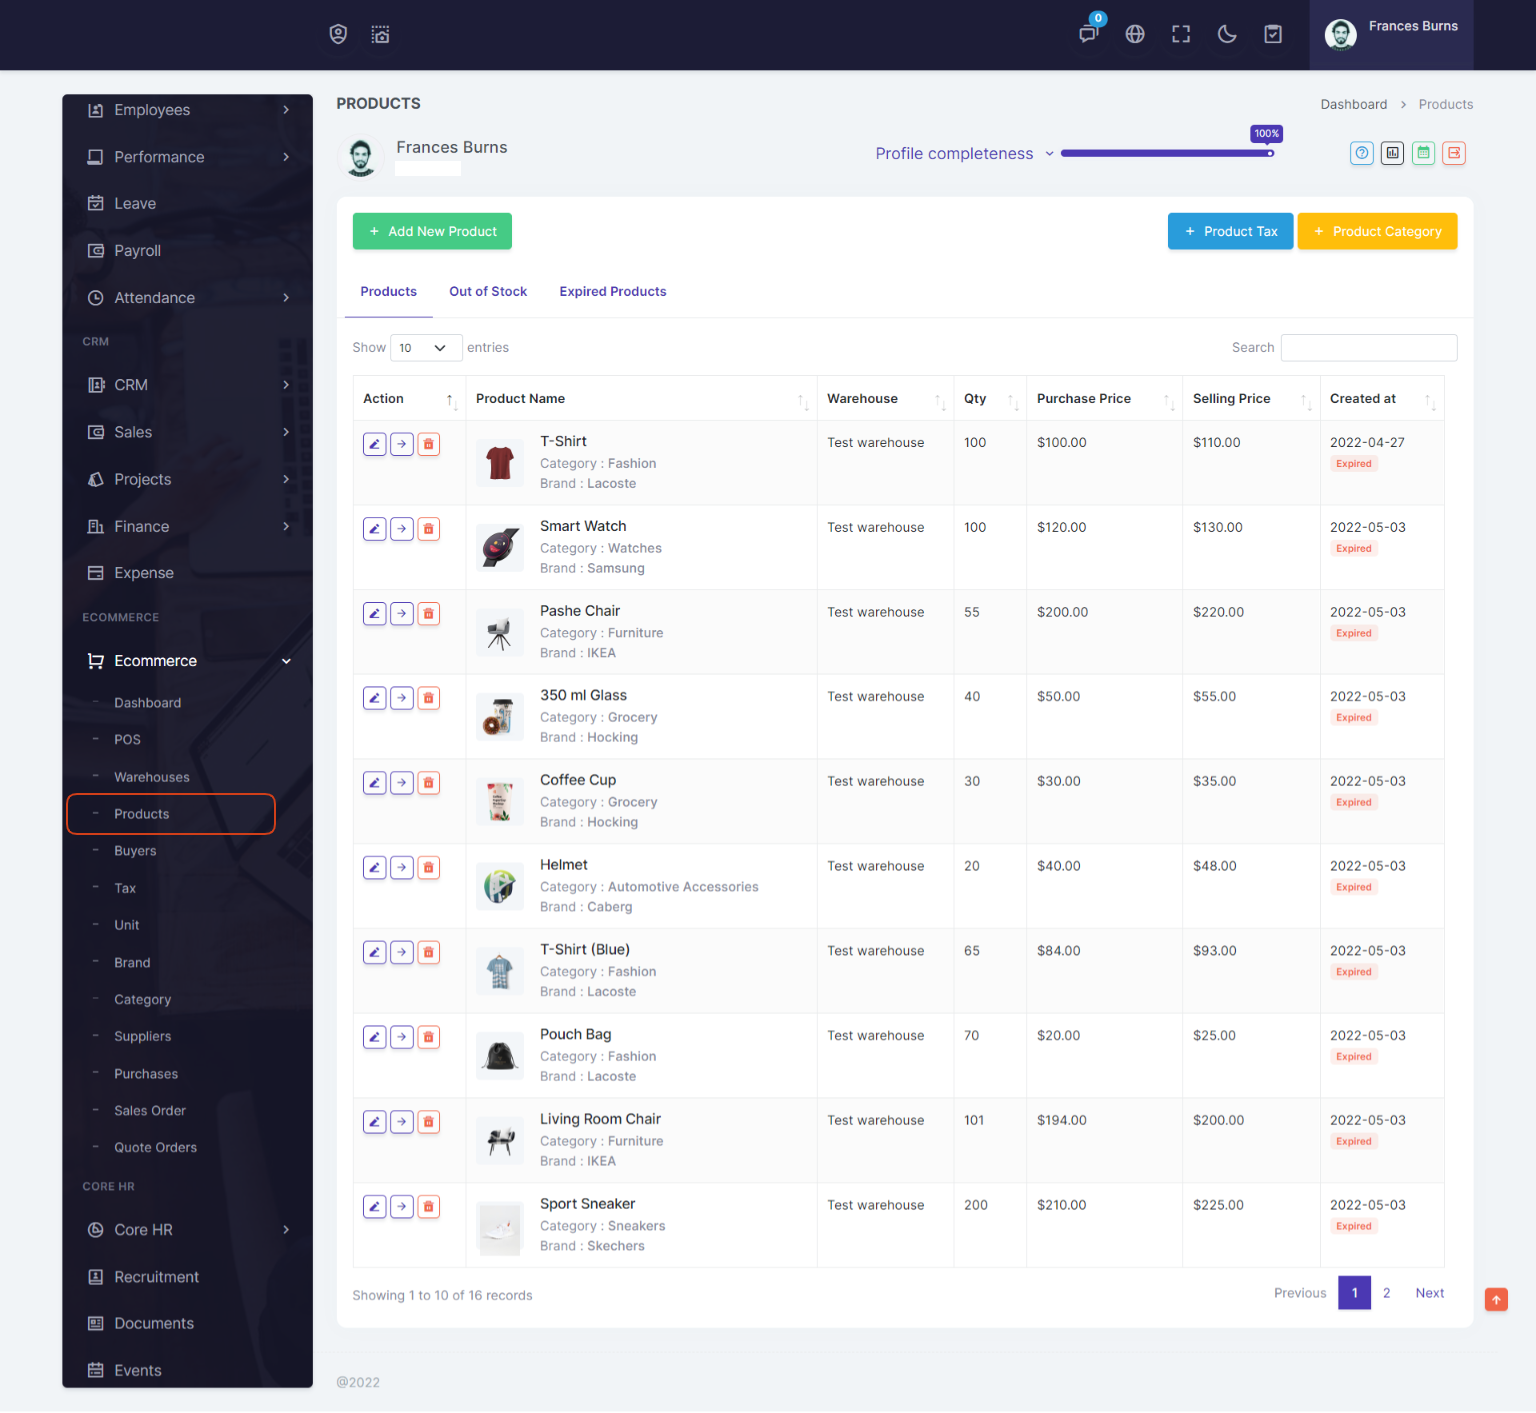
You can view the all the added Products list and you can manage Products list by delete & edit actions.
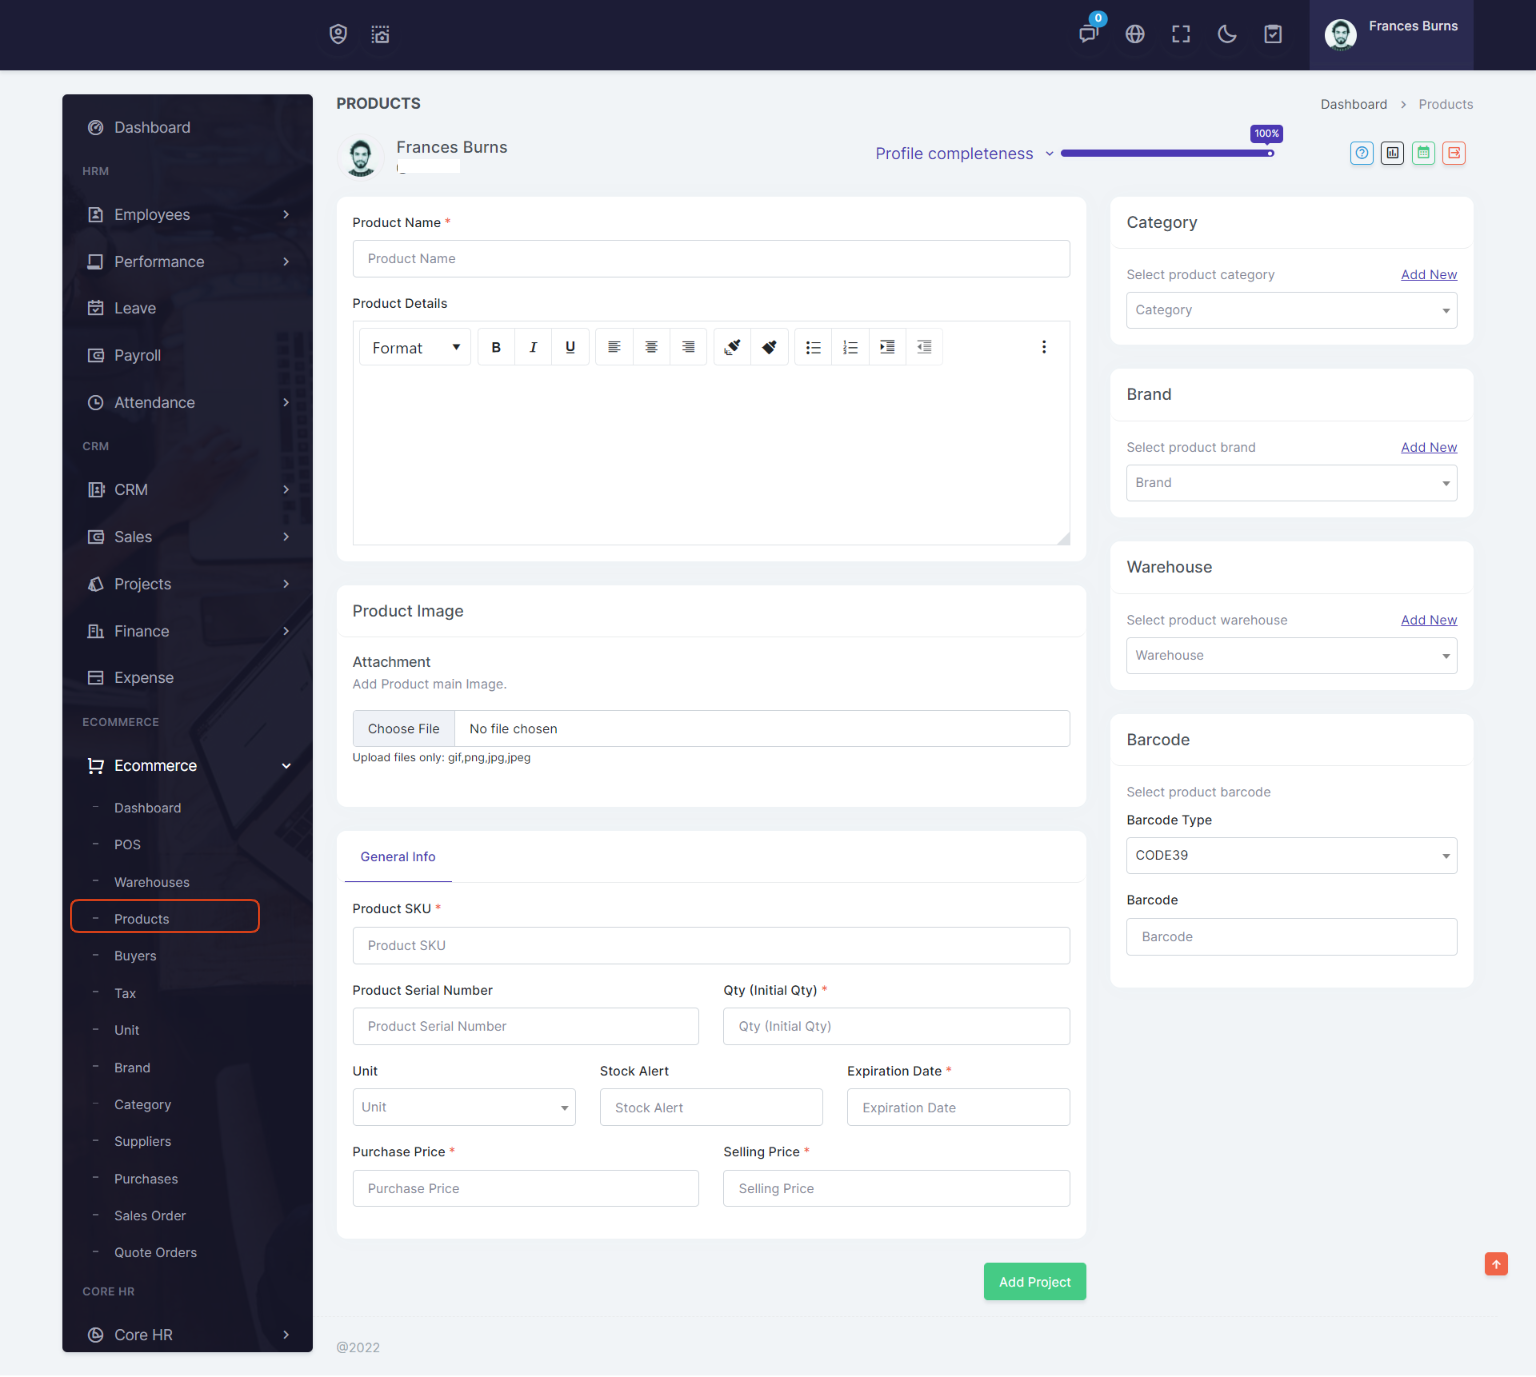
Add New Product
Adding a Products it's a very easy task. Enter product name, select category, Unit, SKU, Stock Alert, Select Image(Optional field), Purchase Price(Without Tax), Selling Price (Without Tax), Qty (Initial Qty)(+/-) & more basic information for a product.
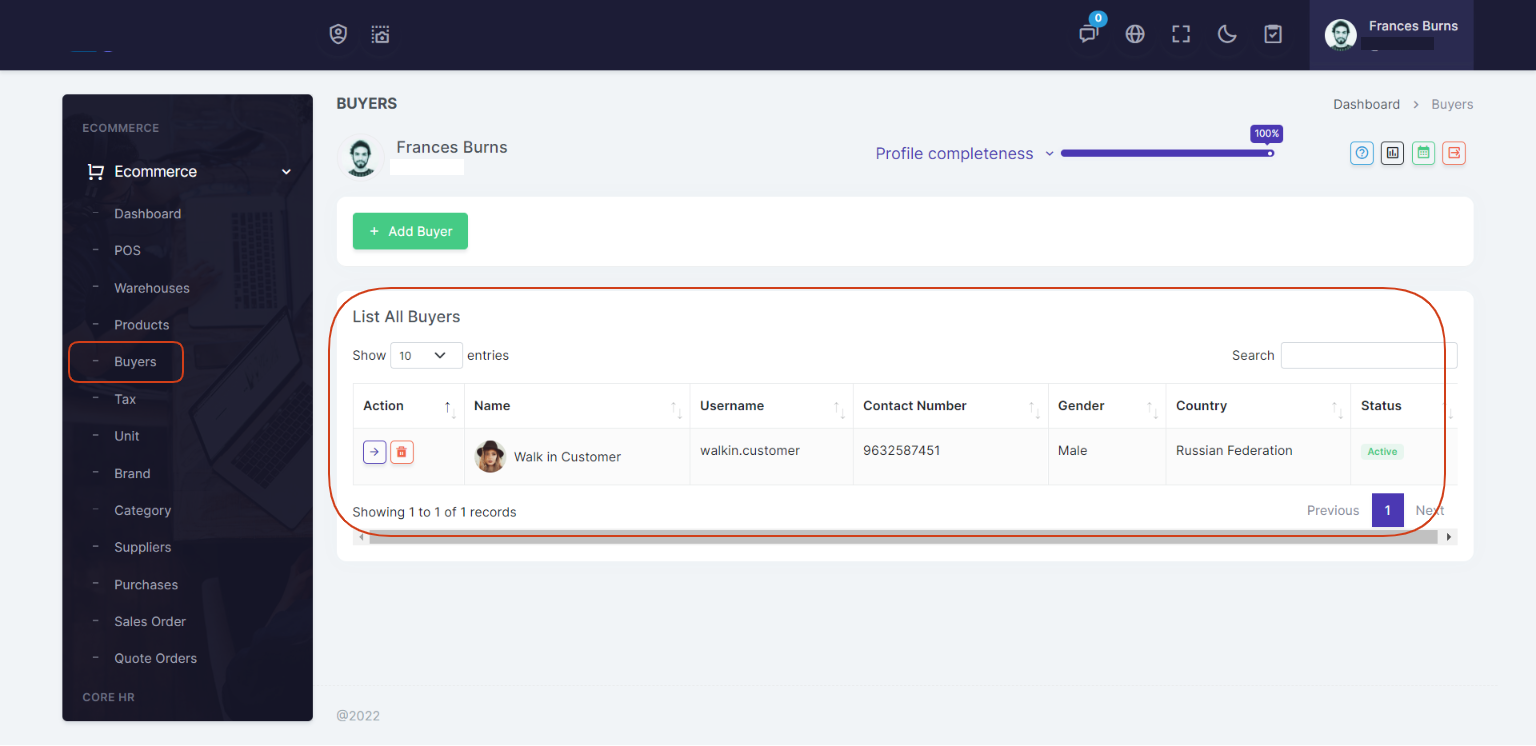
Buyers
Ecommerce -> New Buyers
You can view the all the added Buyers list and you can manage Buyers list by Delete & Edit actions.
Tax
You can use the same tax types which are already used for invoice/estimates. When you add tax type it will show for invoices/estimates/sales order/purchases/POS .Check here
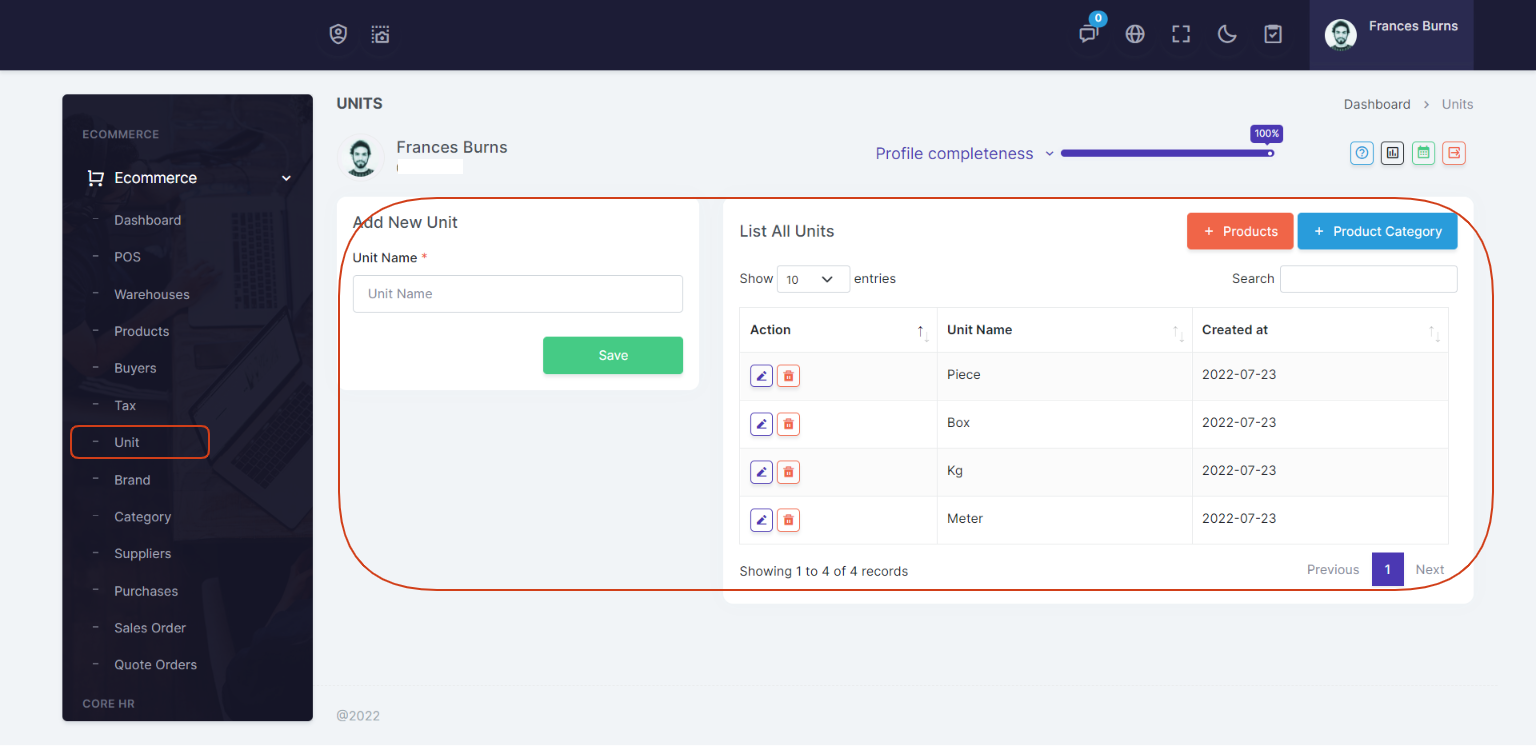
Unit
Ecommerce -> Unit
You can view the all the added Unit list and you can manage Unit list by Delete & Edit actions.
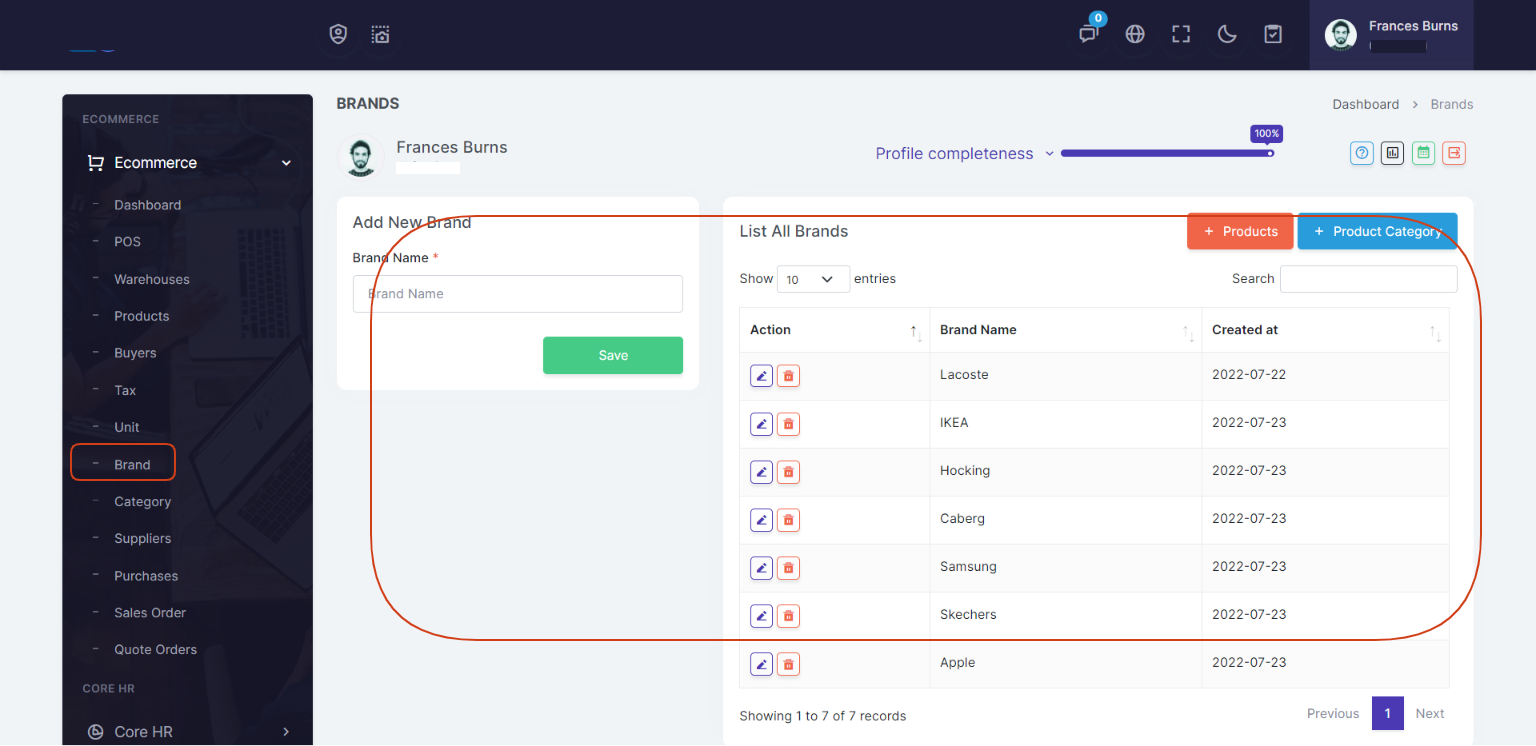
Brand
Ecommerce -> Brand
You can view the all the added Brand list and you can manage Brand list by Delete & Edit actions.
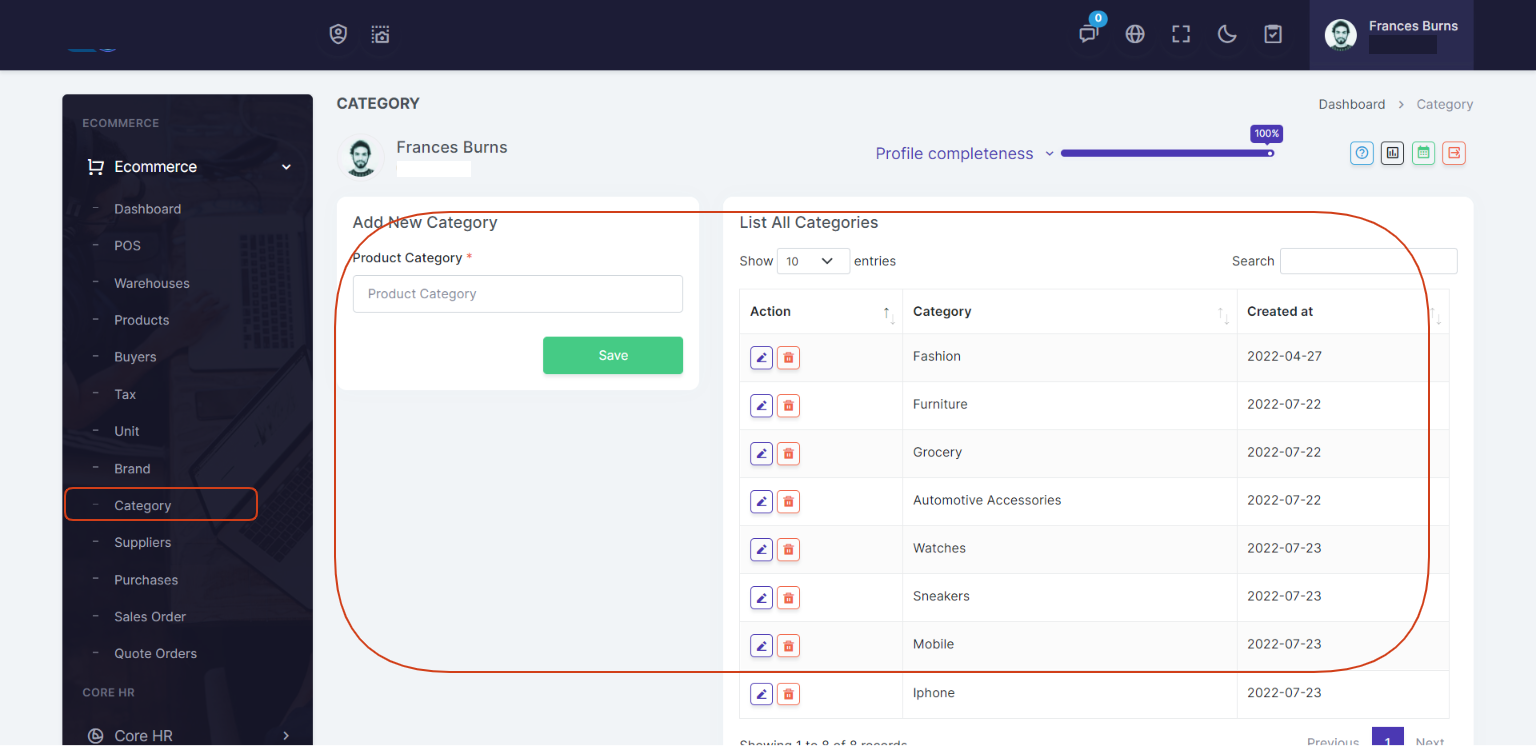
Category
Ecommerce -> Category
You can view the all the added Category list and you can manage Category list by Delete & Edit actions.
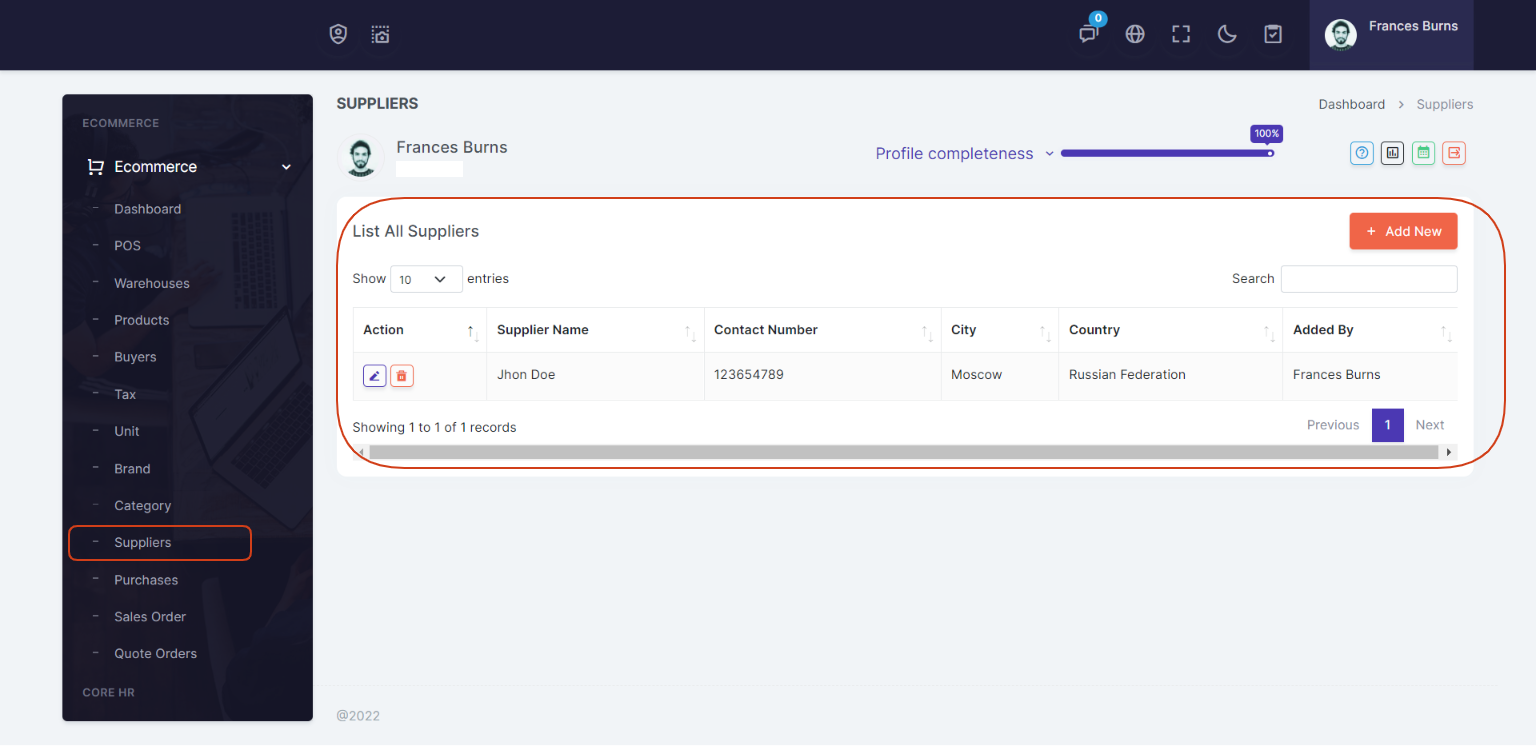
Suppliers
Ecommerce -> Suppliers
You can view the all the added Suppliers list and you can manage Suppliers list by Delete & Edit actions.
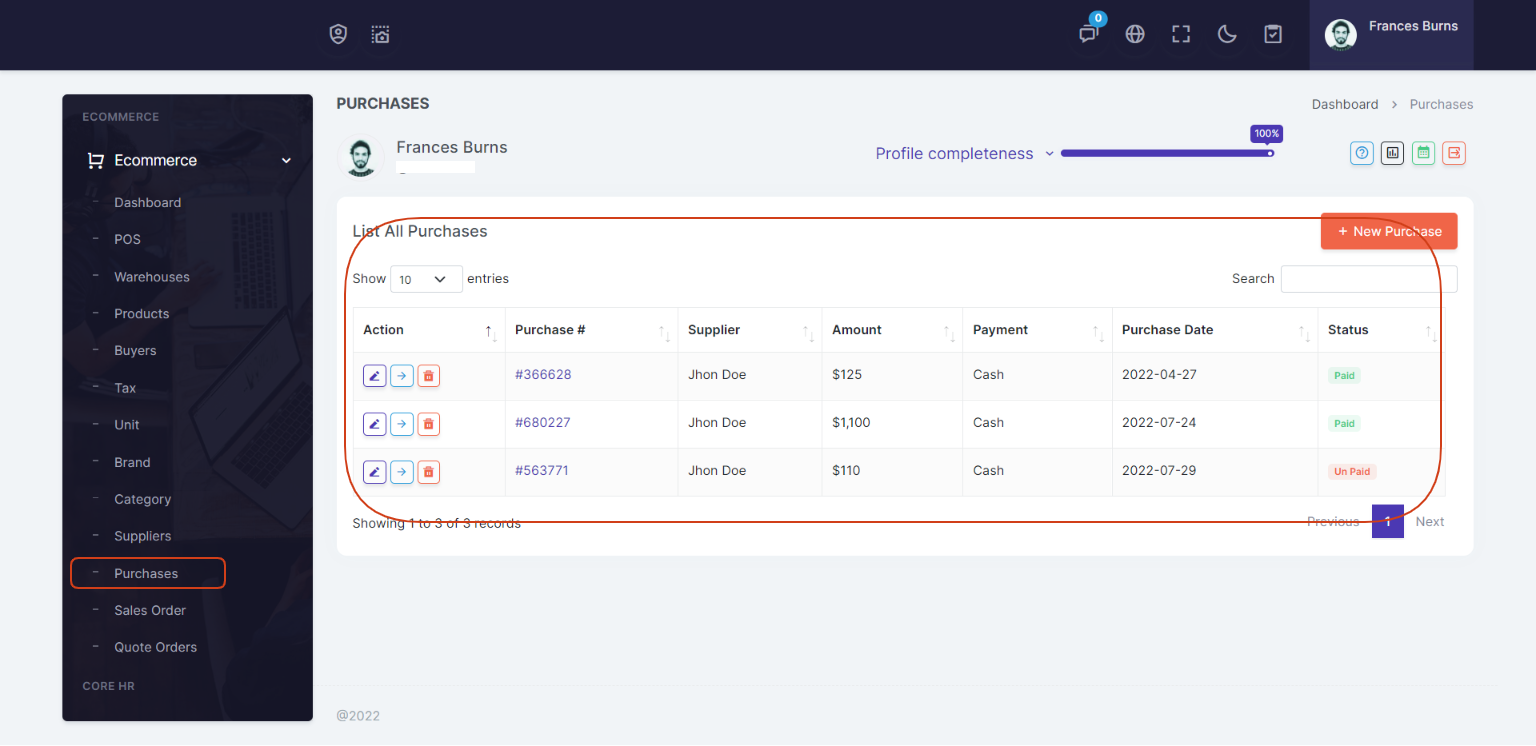
Purchases
Ecommerce -> Purchases
You can view the all the added Purchases list and you can manage Purchases list by Delete & Edit actions.
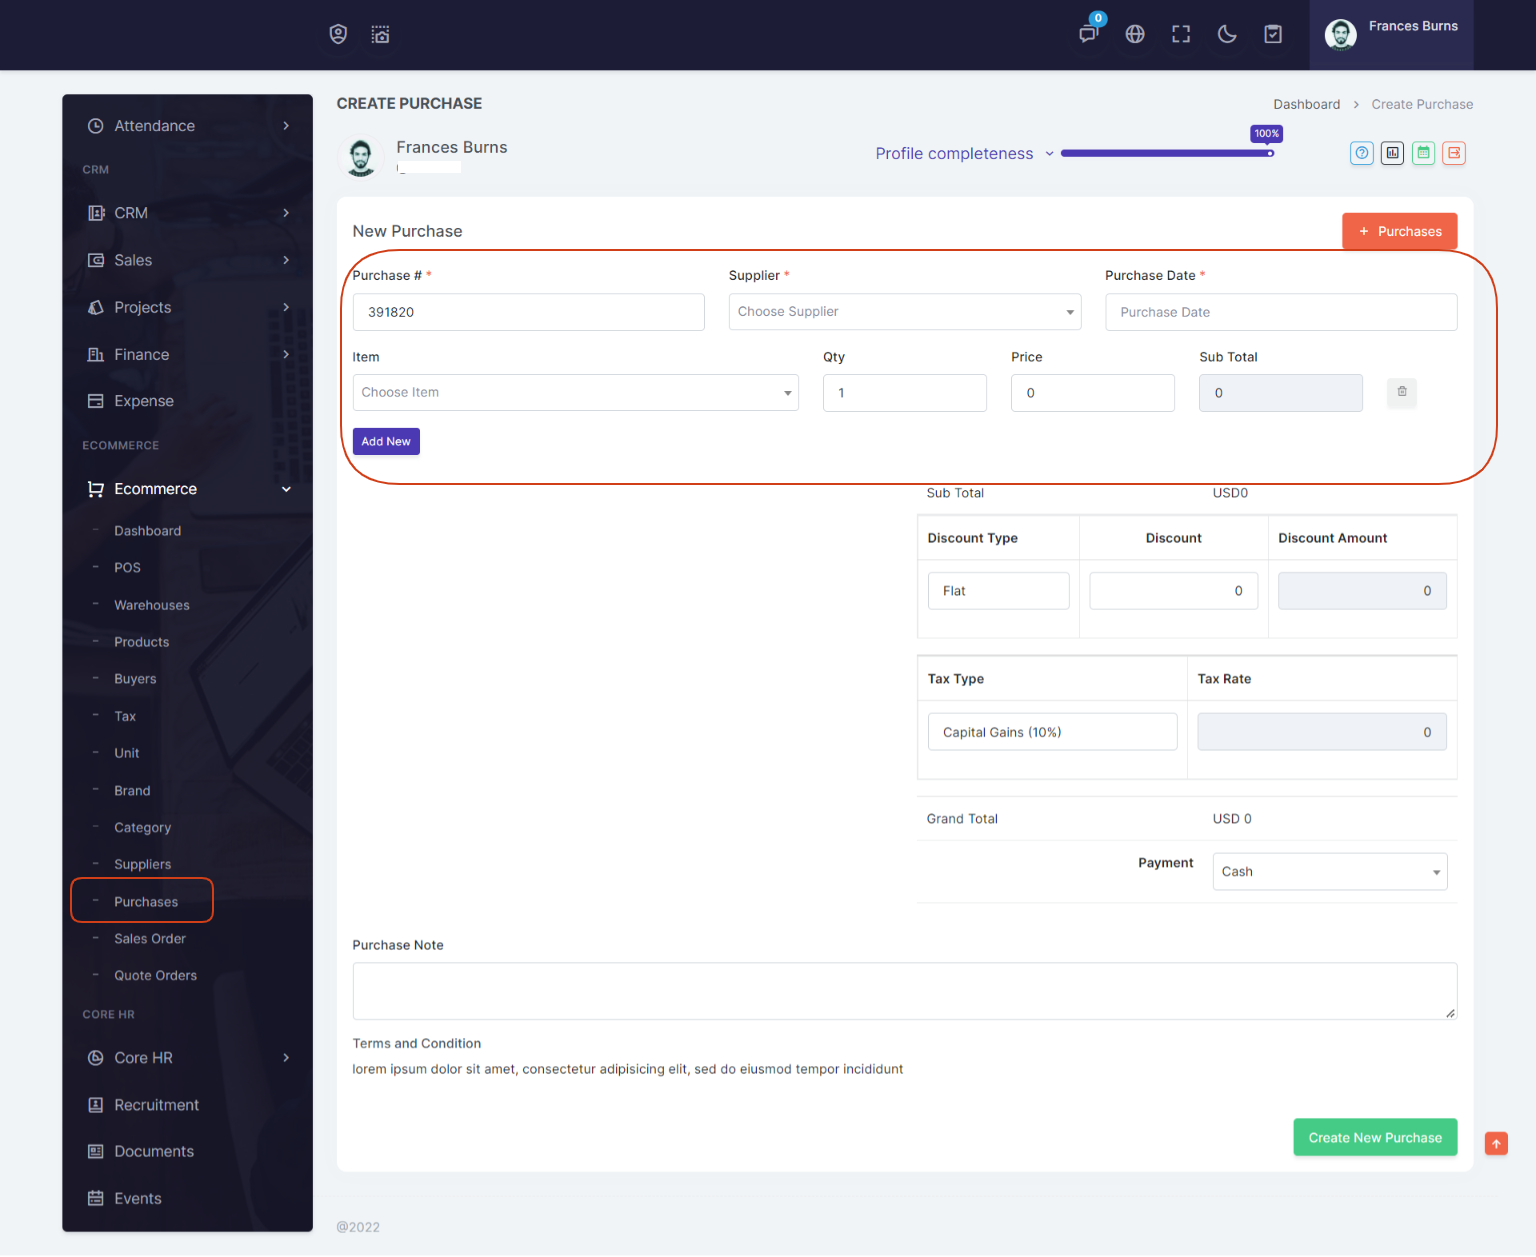
New Purchases
Creating or entering a Purchase information in inventory is a very easy task. You need to select purchase date, suppliers name from selection box (Also user can add more suppliers), and you need select the items from the selection box, after selecting item from search box, all other information will be shown in the same row, it includes item name, purchase quantity, purchase price and total amount and you select any number of items in purchase table. You also enter Other charges, Discount and tax on All Items and purchase note.
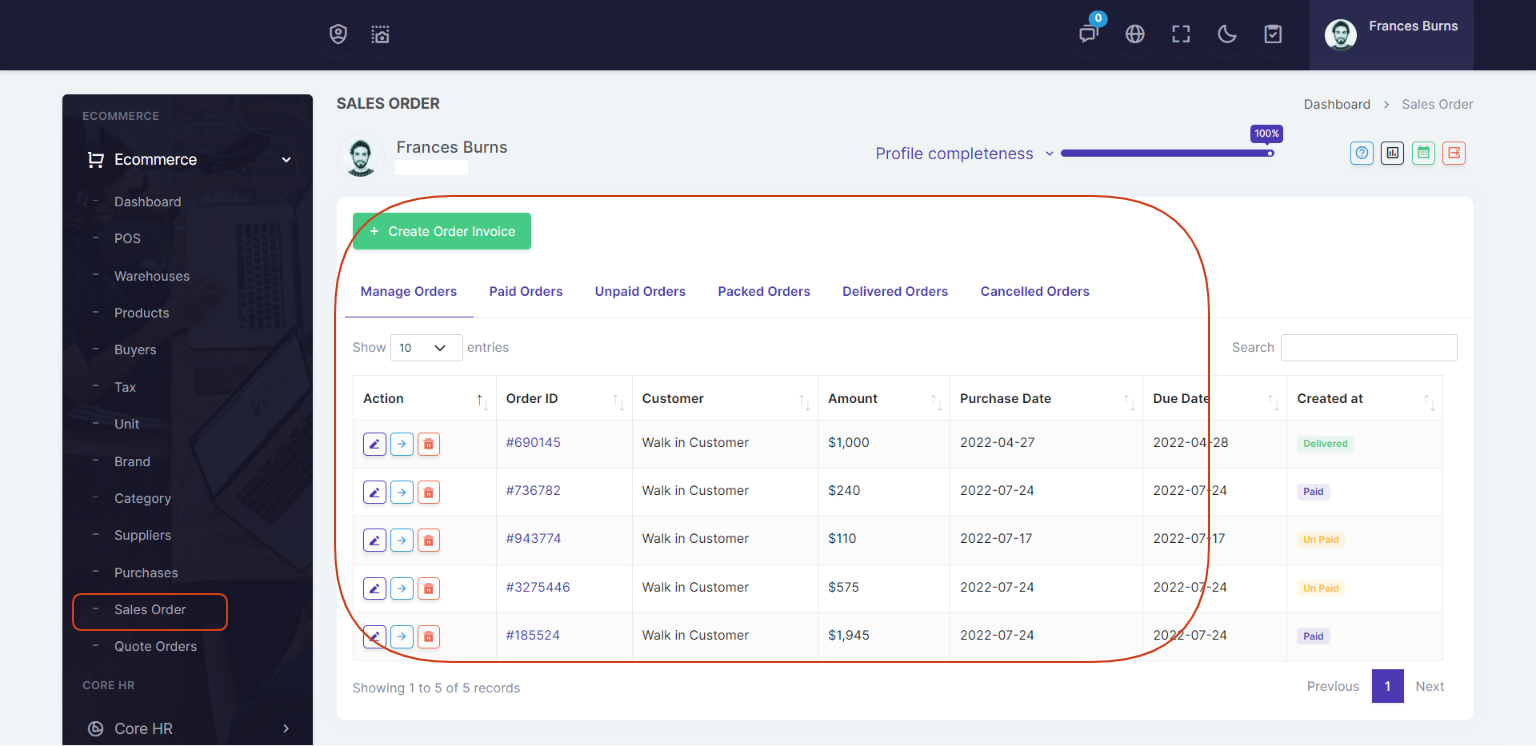
Sales Order
Ecommerce -> Sales Order
You can view the all the added Sales Order list and you can manage Sales Order list by Delete & Edit actions.
You can view All orders, paid orders, unpaid orders, packed orders, delivered orders, cancelled orders.
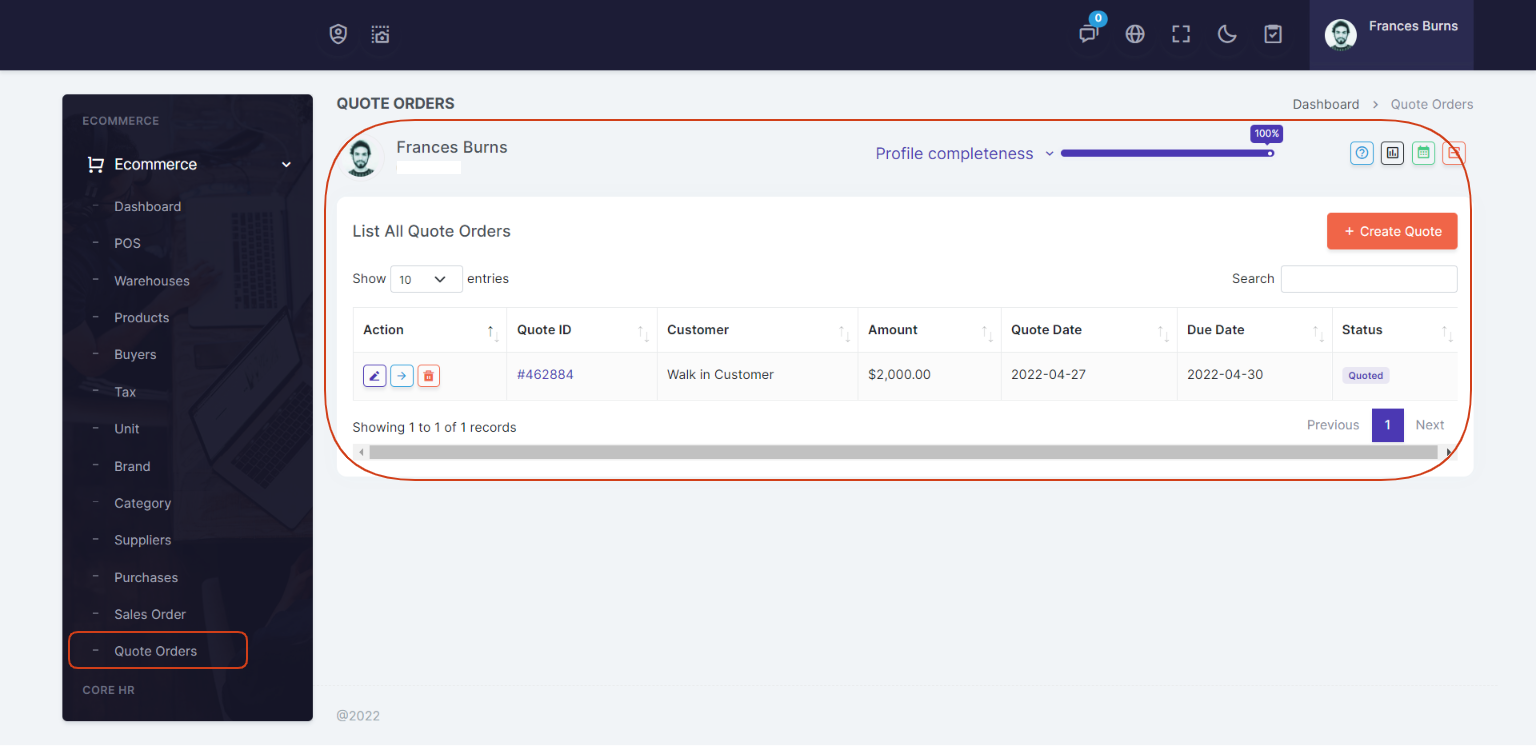
Quote Orders
Ecommerce -> Quote Orders
You can view the all the added Quote Orders list and you can manage Quote Orders list by Delete & Edit actions.
CoreHR
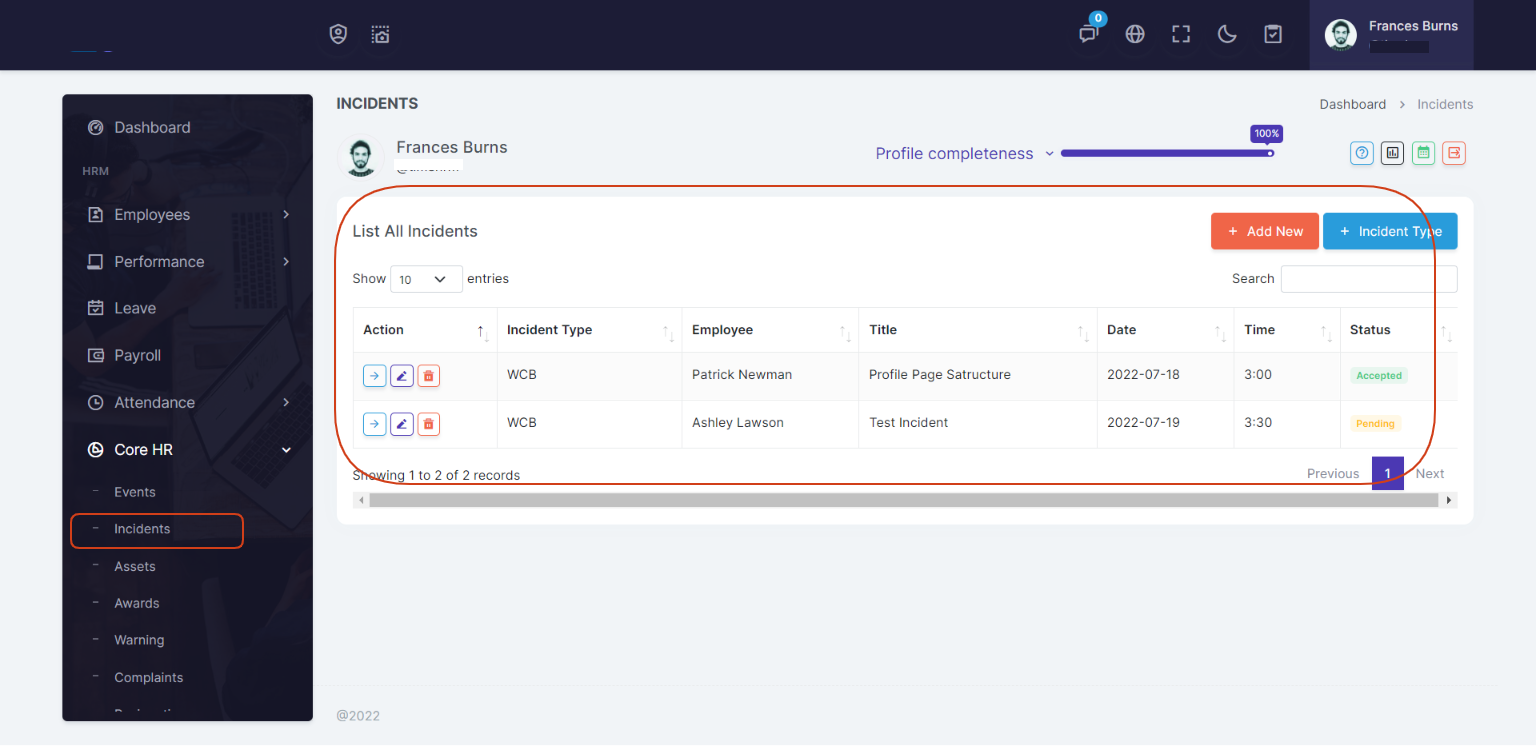
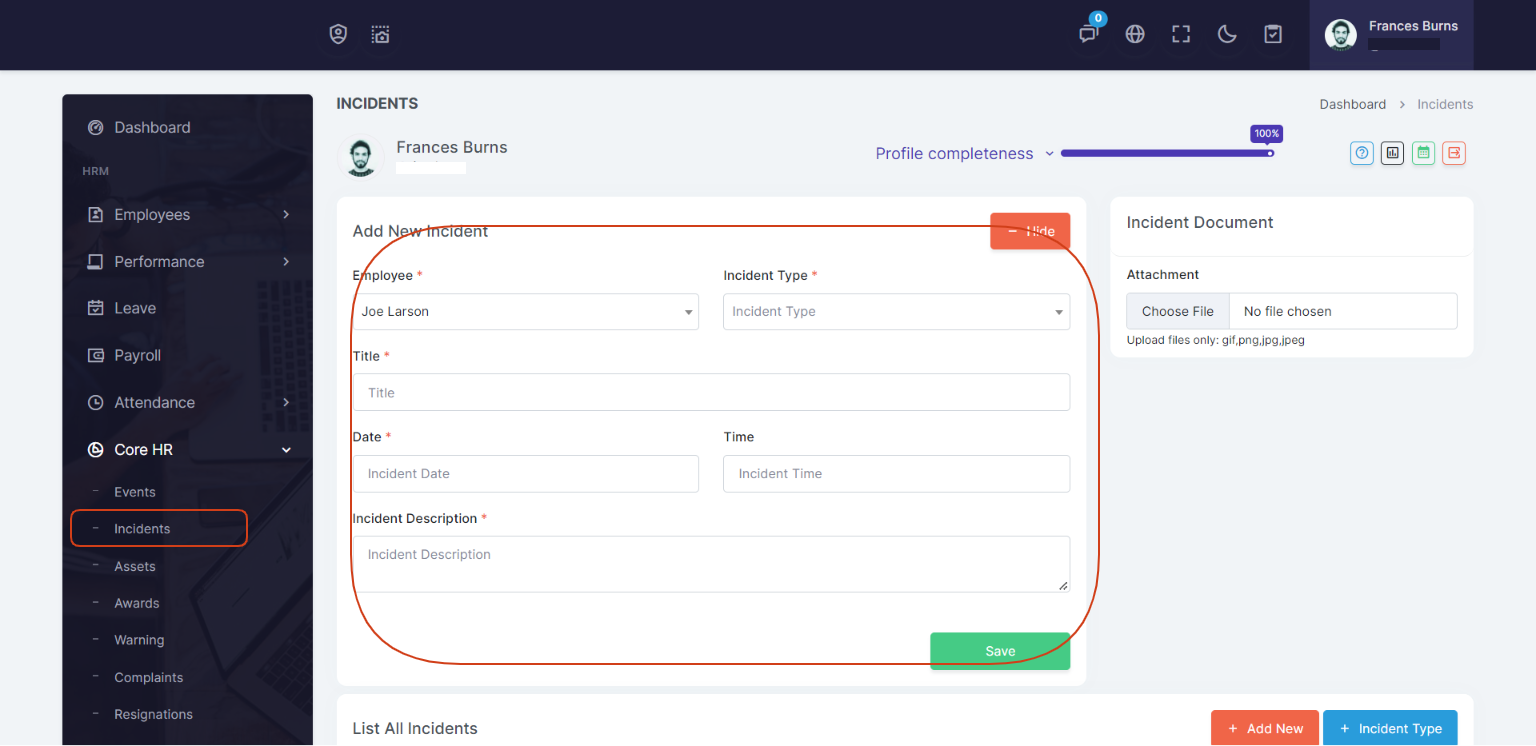
Incidents
You can view the all the added Incidents list and you can manage Incidents list by Delete & Edit actions.
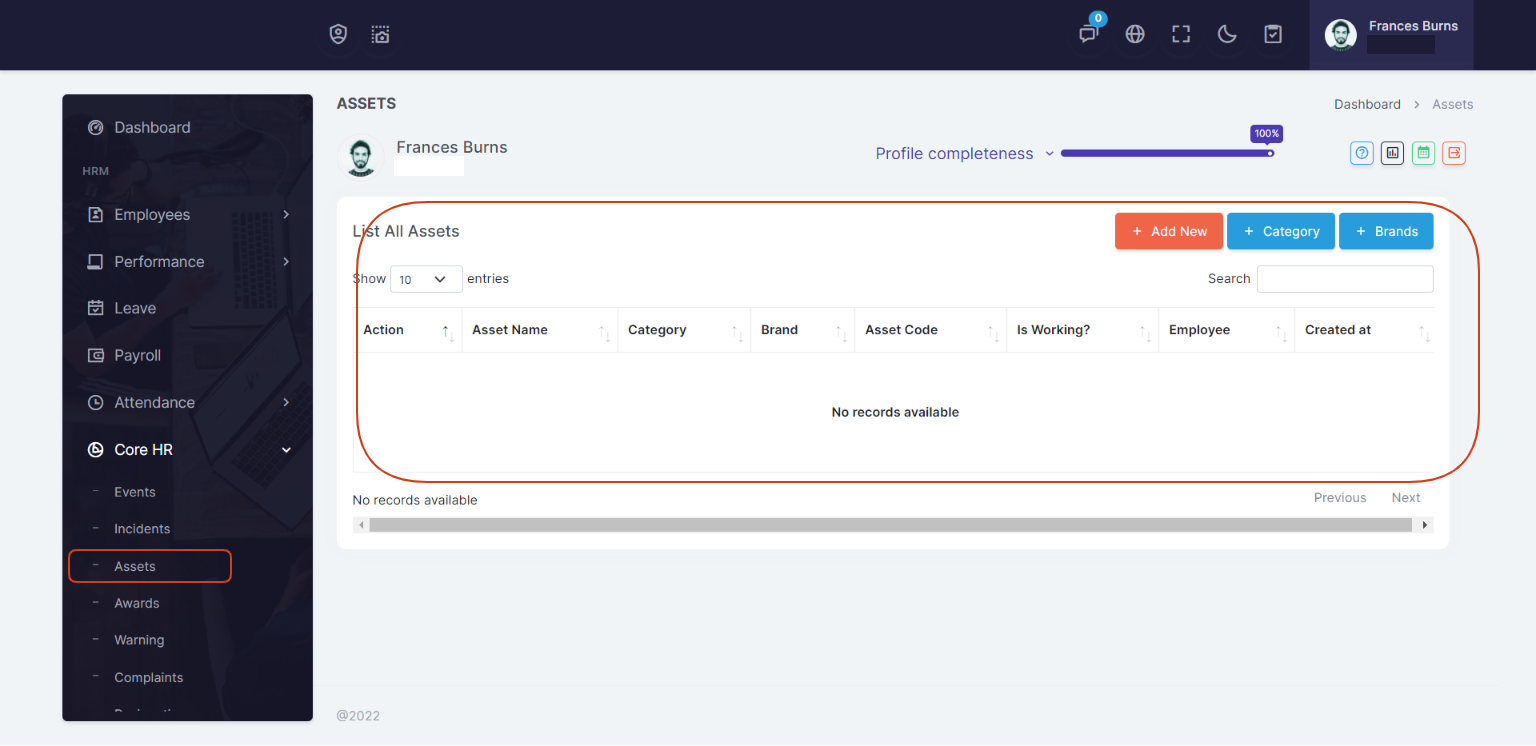
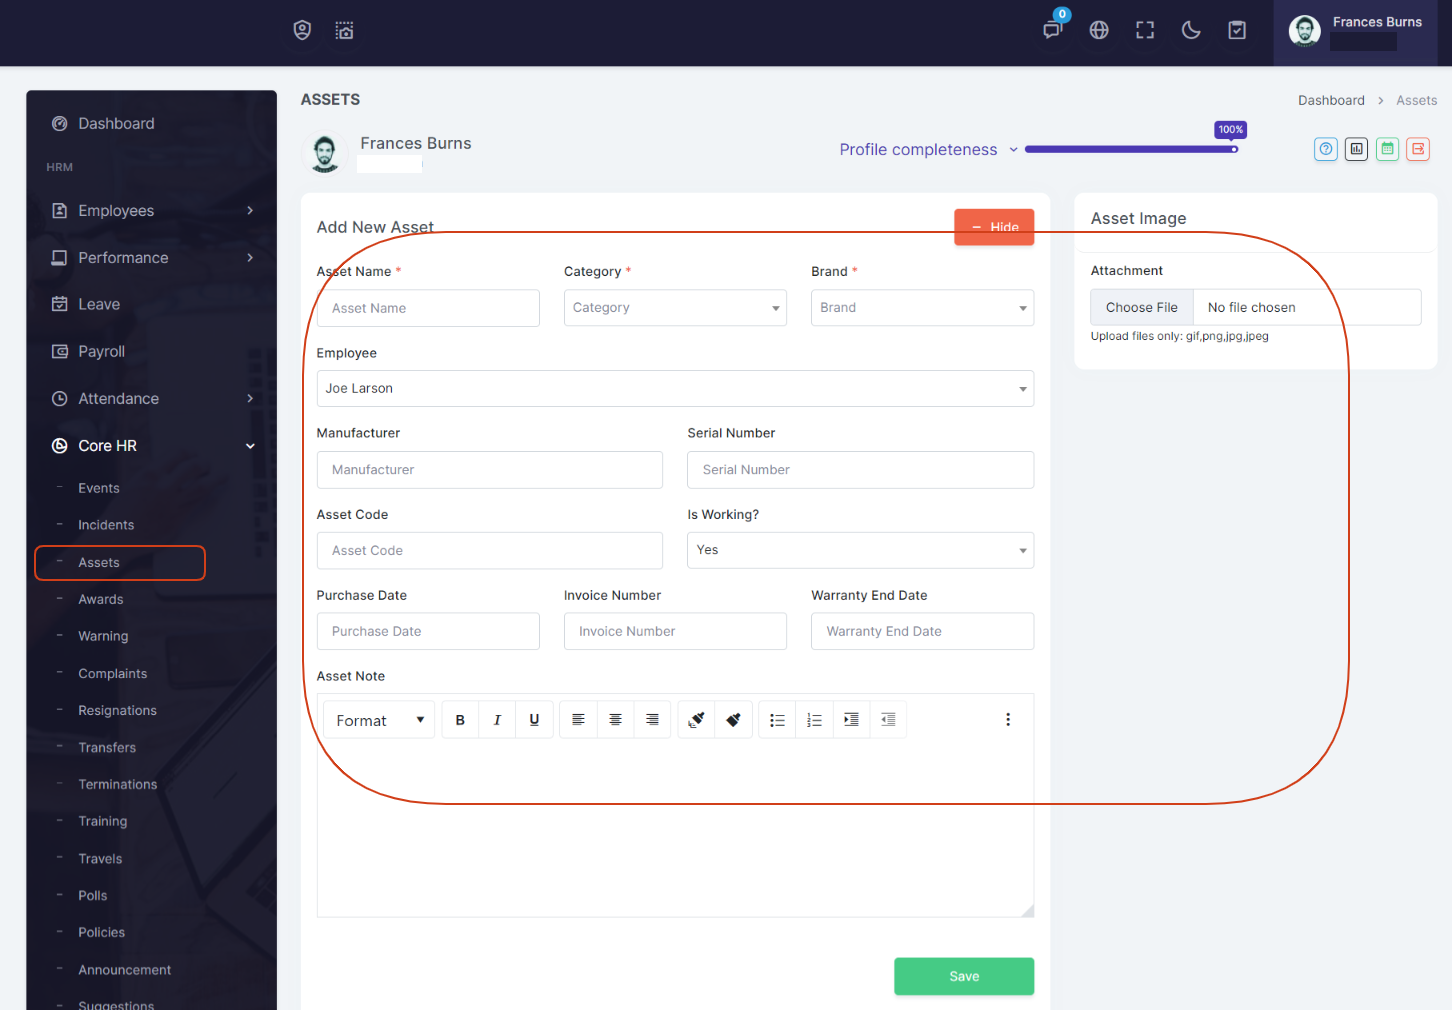
Assets
MassHRM has created a way for your team to track any and every asset your staff has. This could include computers, office furniture, and even stocks. This is just another way to help free you from all of that paperwork.
Keep a track of your organization's assets and assign them to employees. Store and maintain comprehensive asset information and employees can raise requests to replace or repair assets which have stopped working.
Awards
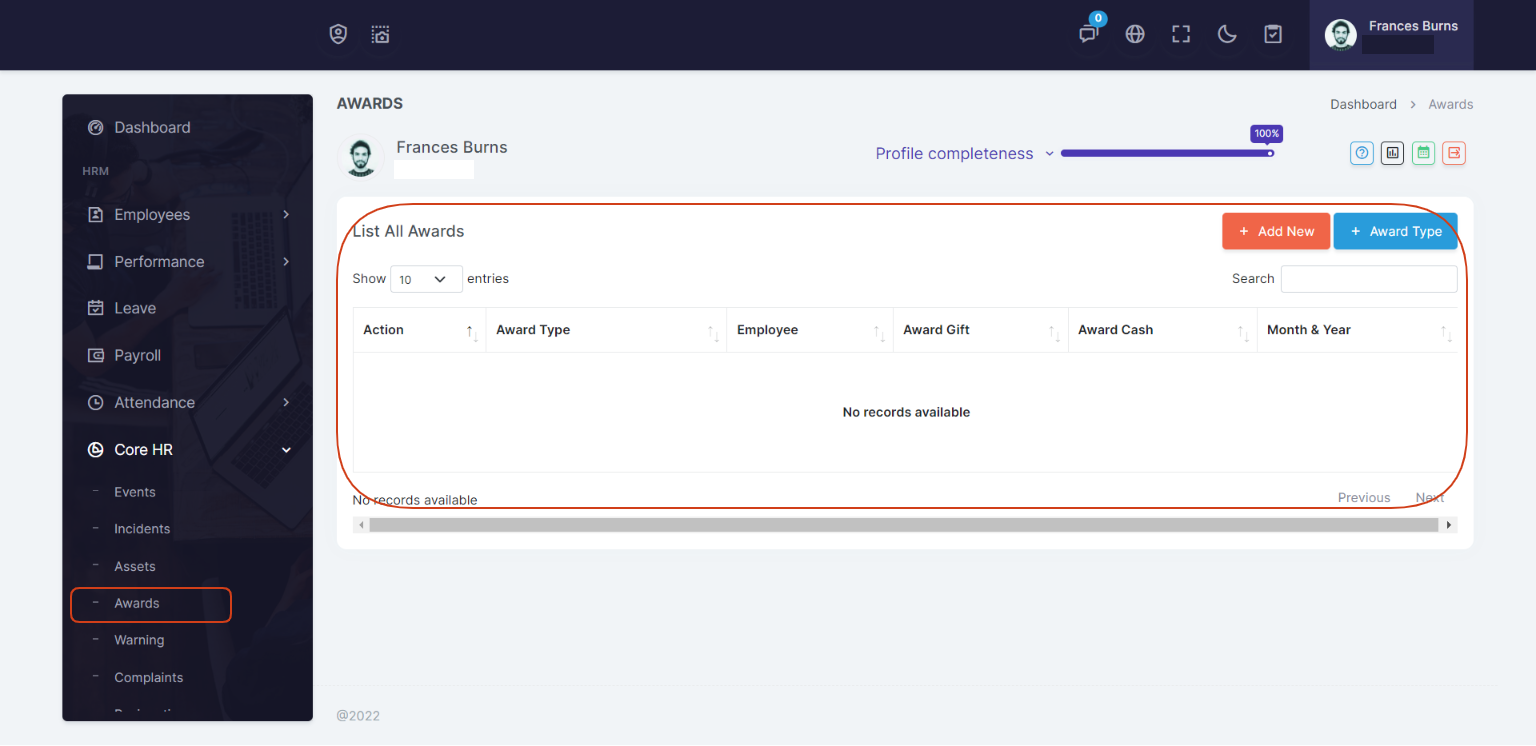
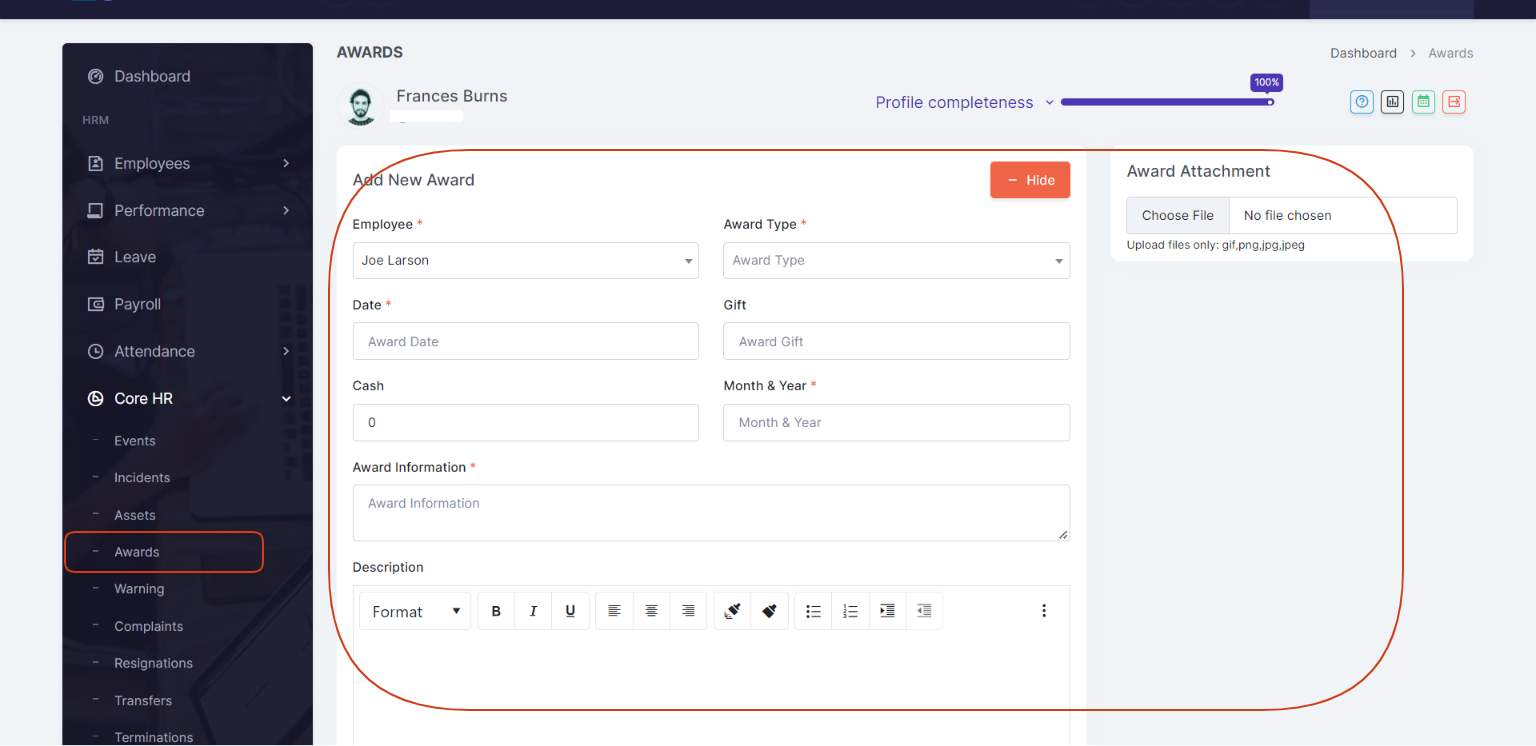
You can give your employees different awards in different times as you organization see fit. Giving an employee award is very easy.
You can easily give award to any employee if you need. For every month you can give award. The employee that receive award - if he / she receives any money amount - that amount will be added to his / her payroll and will be paid accordingly.
Warning
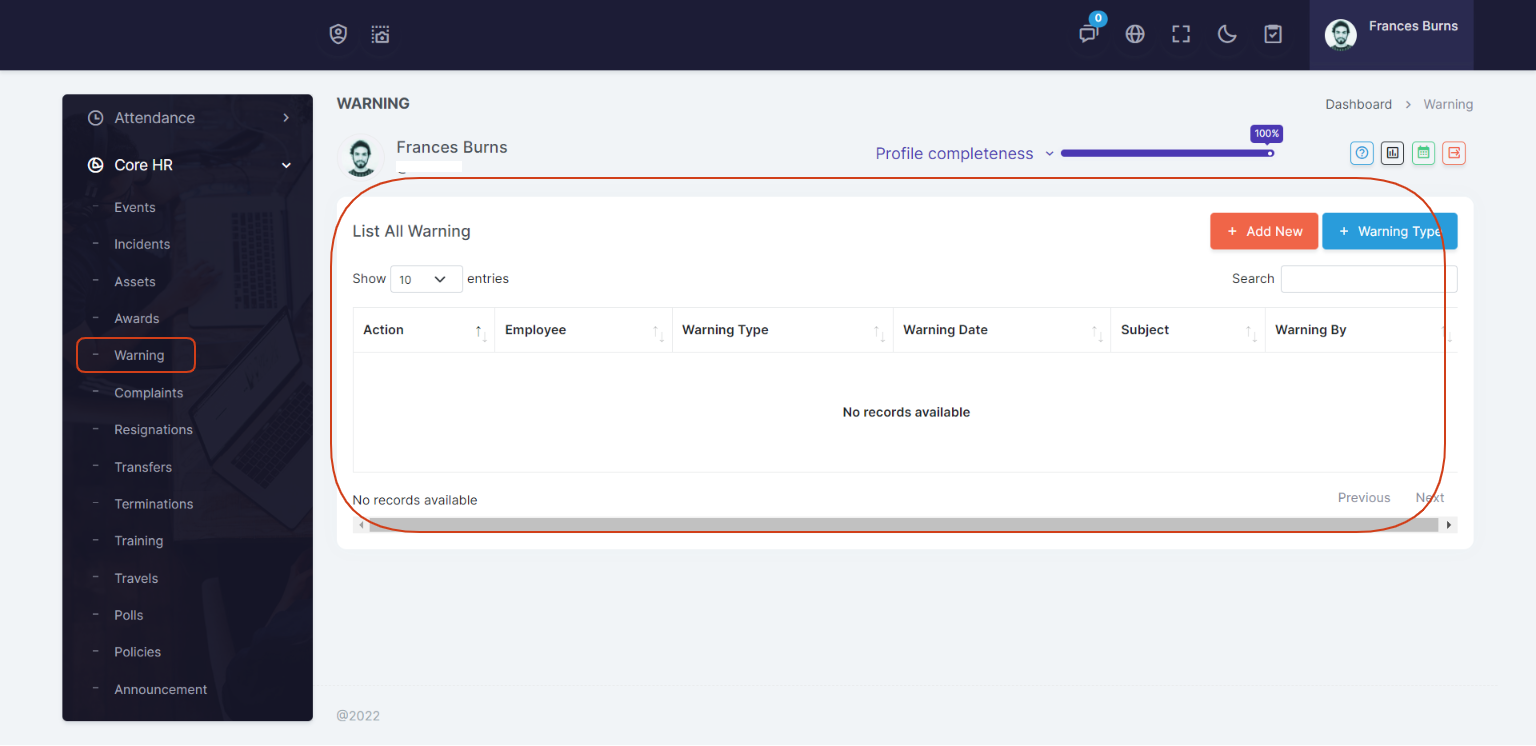
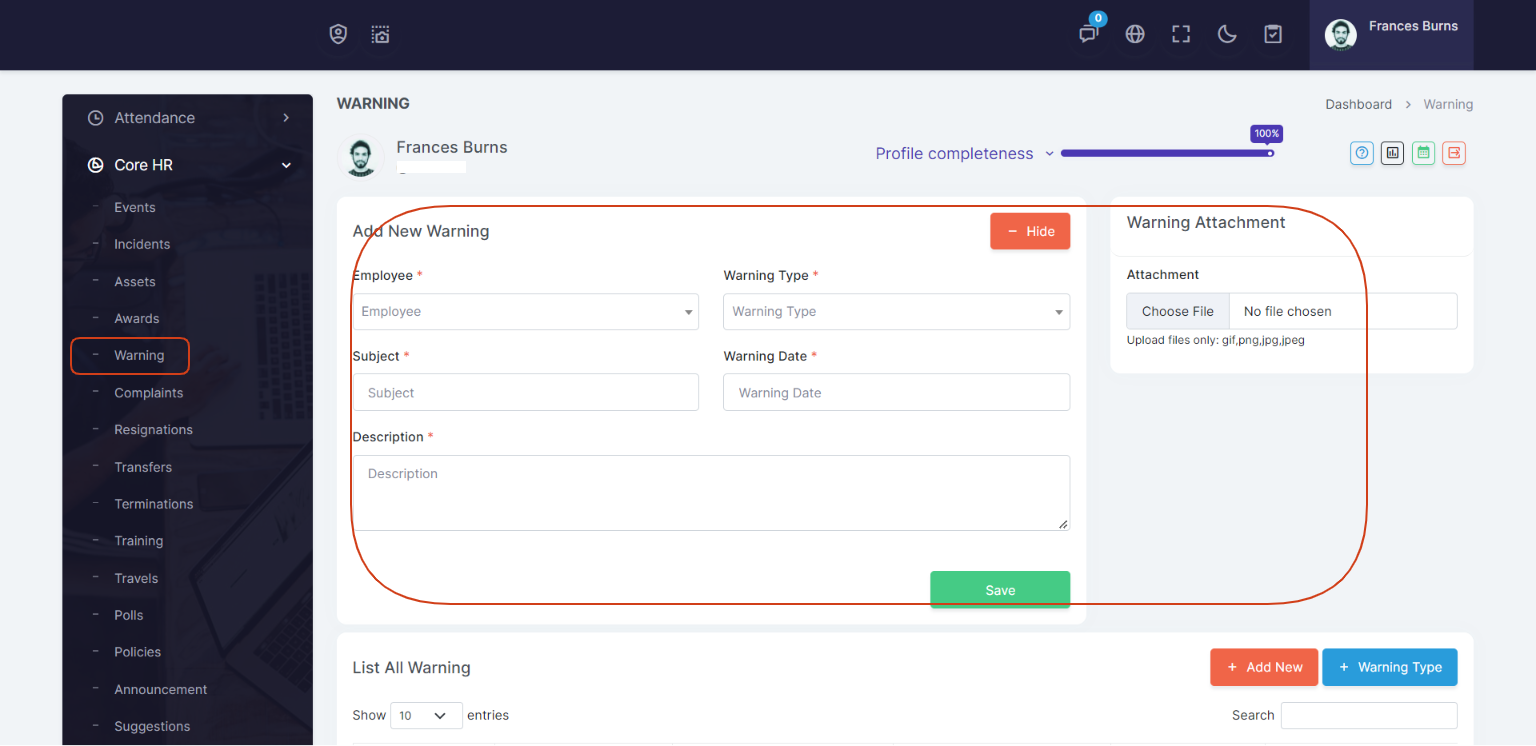
You can send warnings to any employee in the company.
For warning you can select employee from the option, then add warning type, warning subject, warning date.
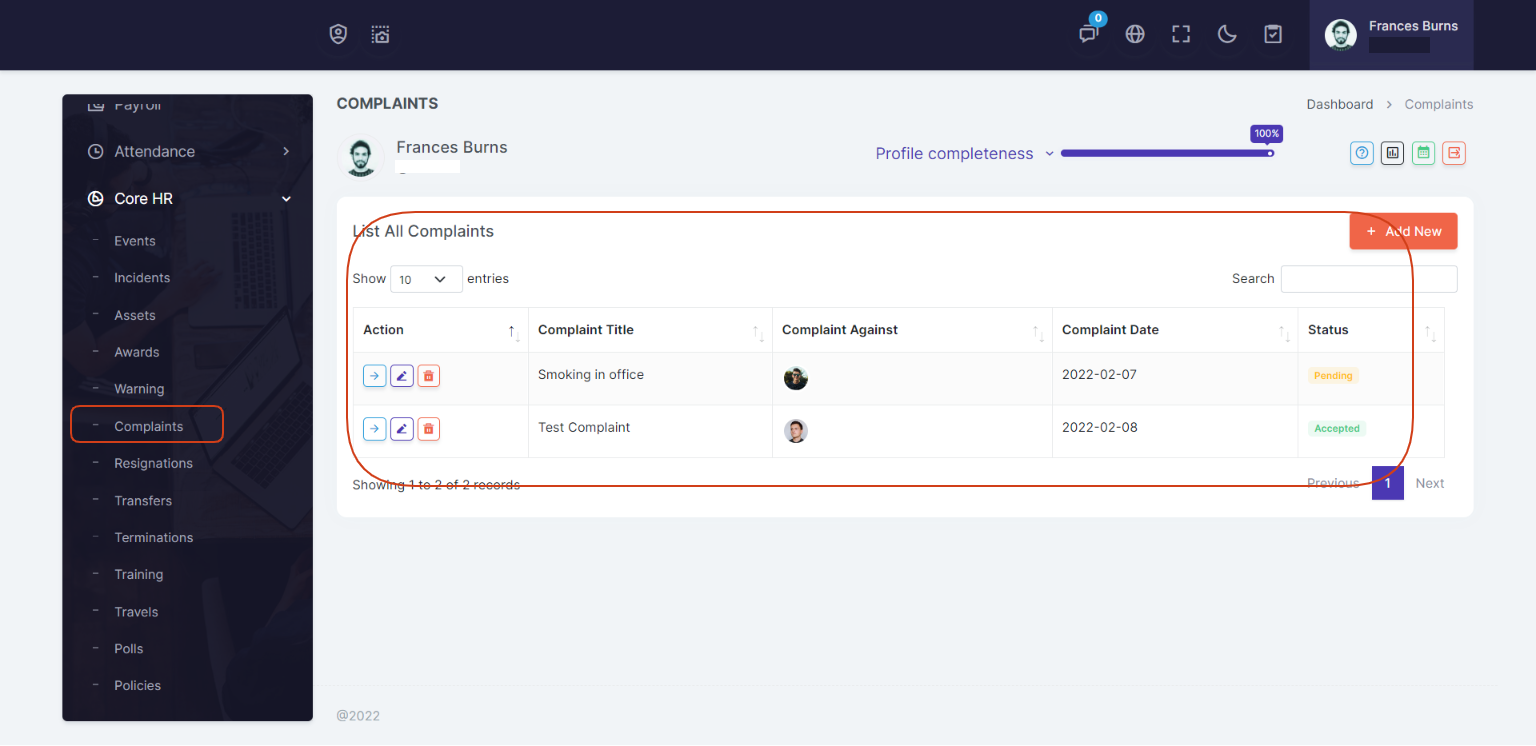
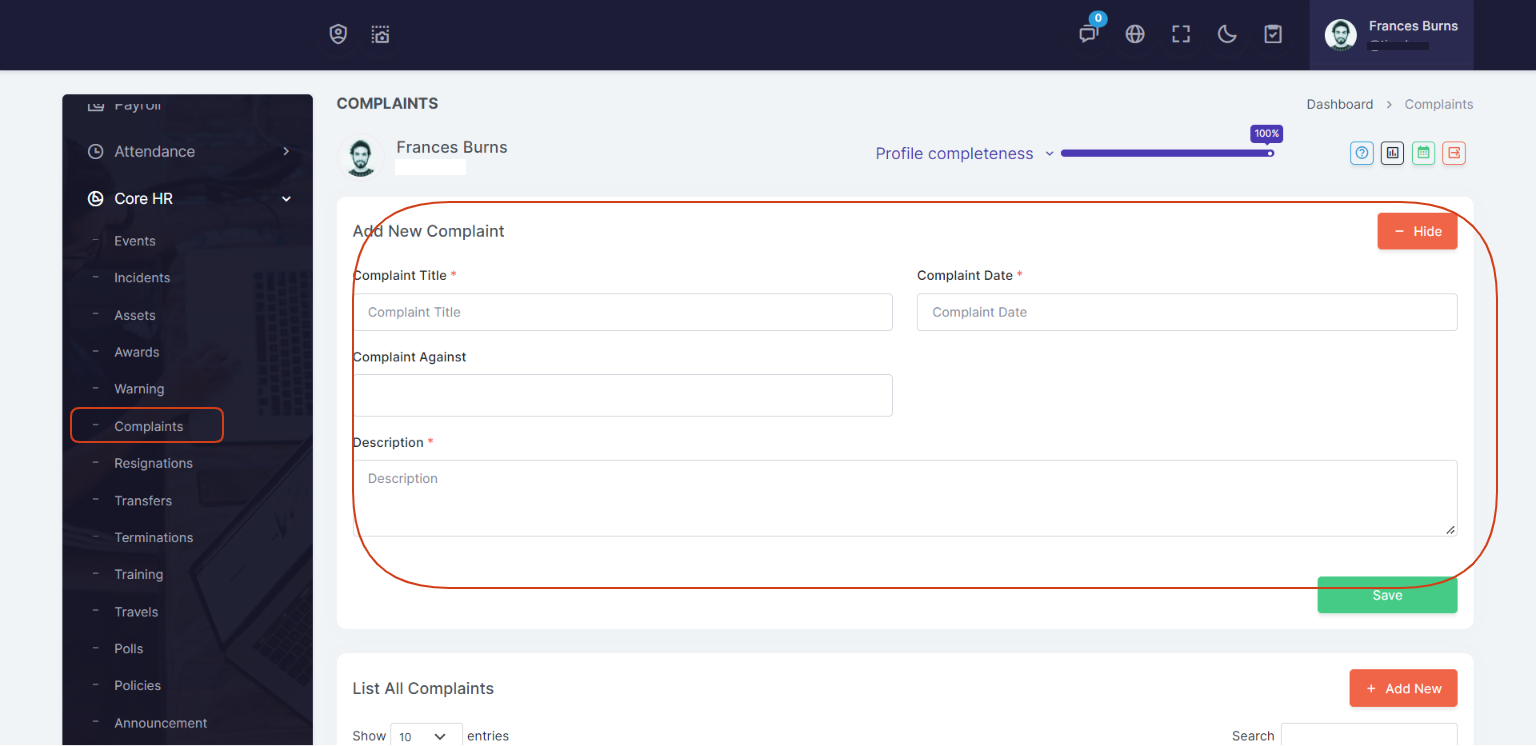
Complaints
You can add complaint for any employee and can add complaint against any employee in the system.
For Complaint you can select employee from the option, then add the complaint date, and the title for complaint.
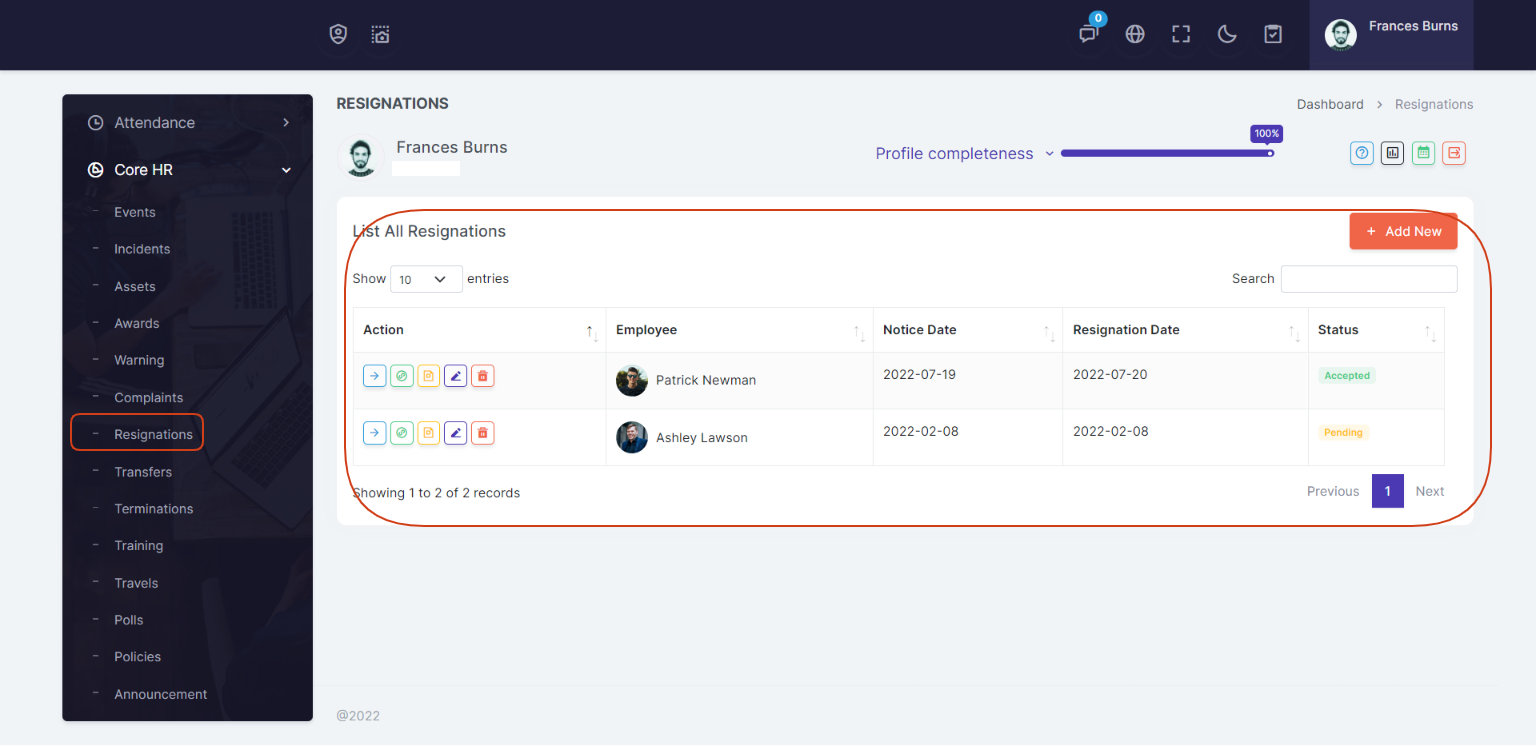
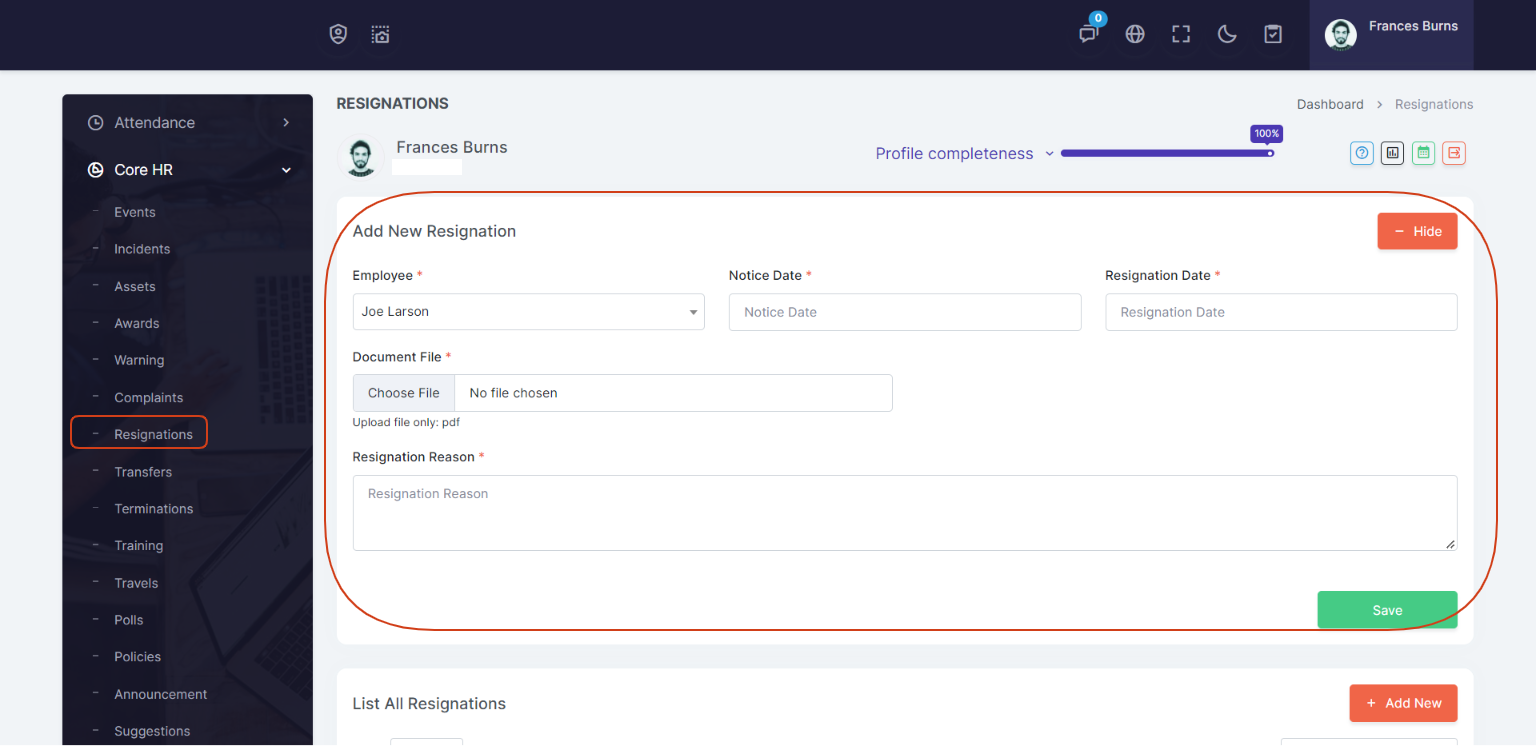
Resignations
Any employee of the company can easily sent a request of resignation, or administrator can add resignation for the employee.
When an employee send request for resignation then administrator will receive an email that one of your employee sent a request of resignation.
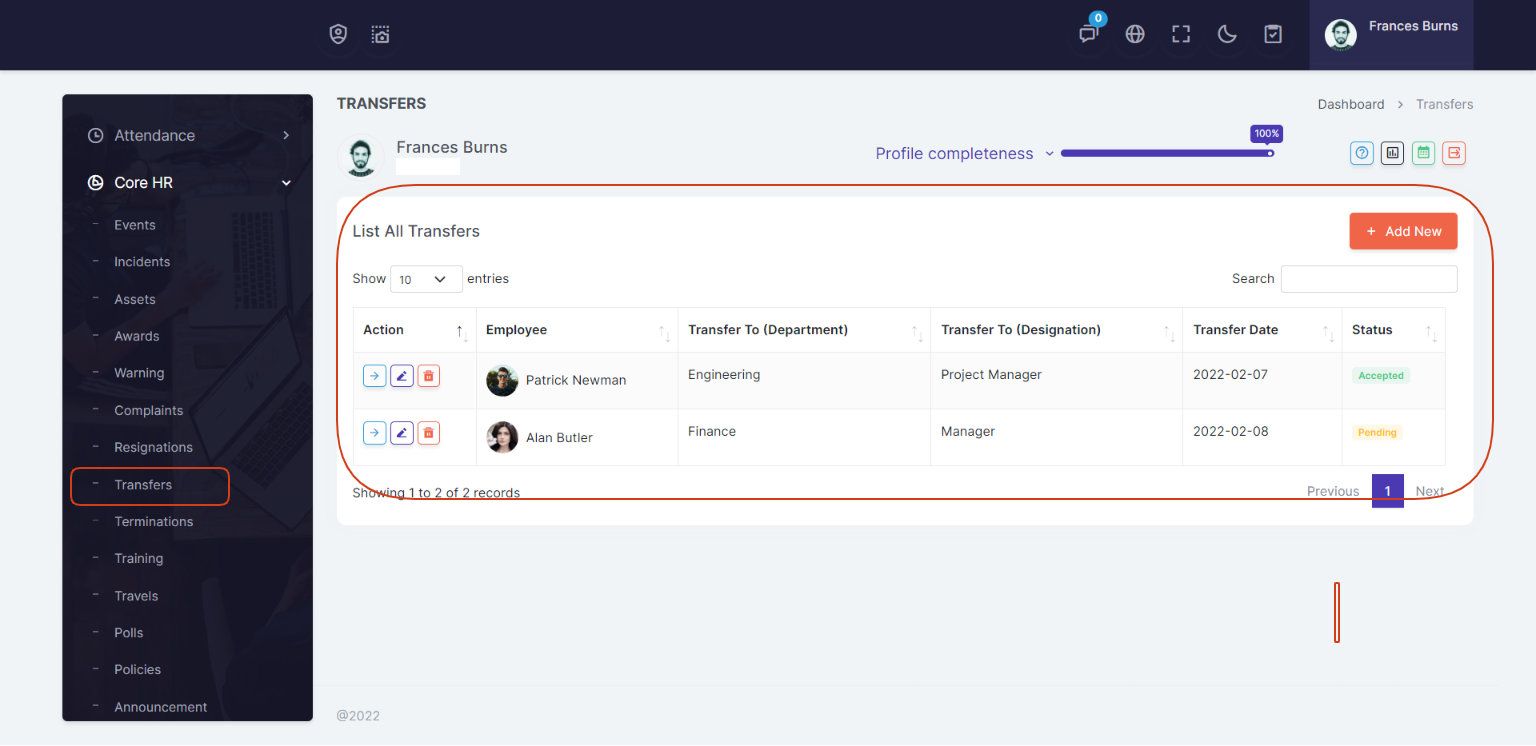
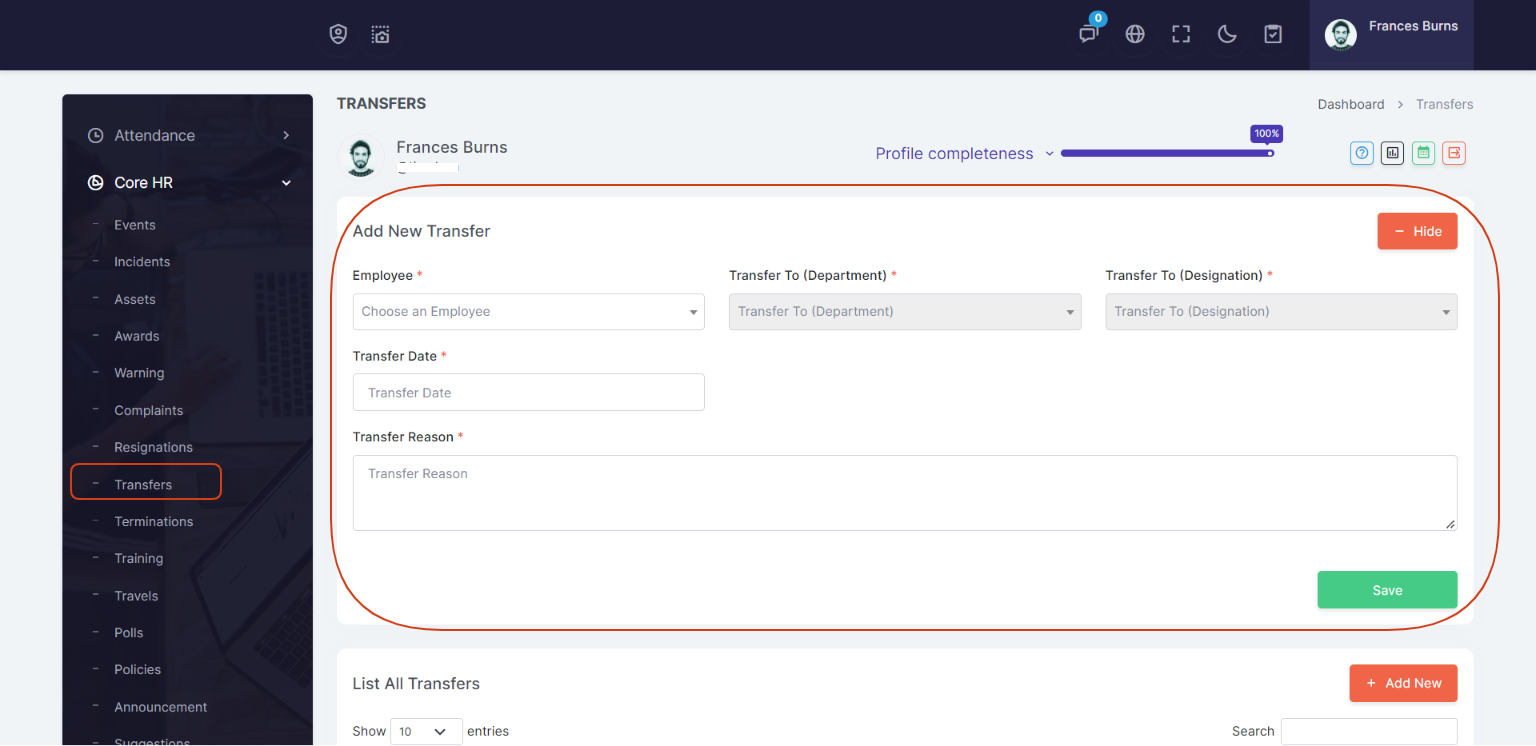
Transfers
You can easily transfer any employee to any department and any location.
For Transfer you can select employee from the option, then add the transfer date, then select the department and designation from the drop down menus.
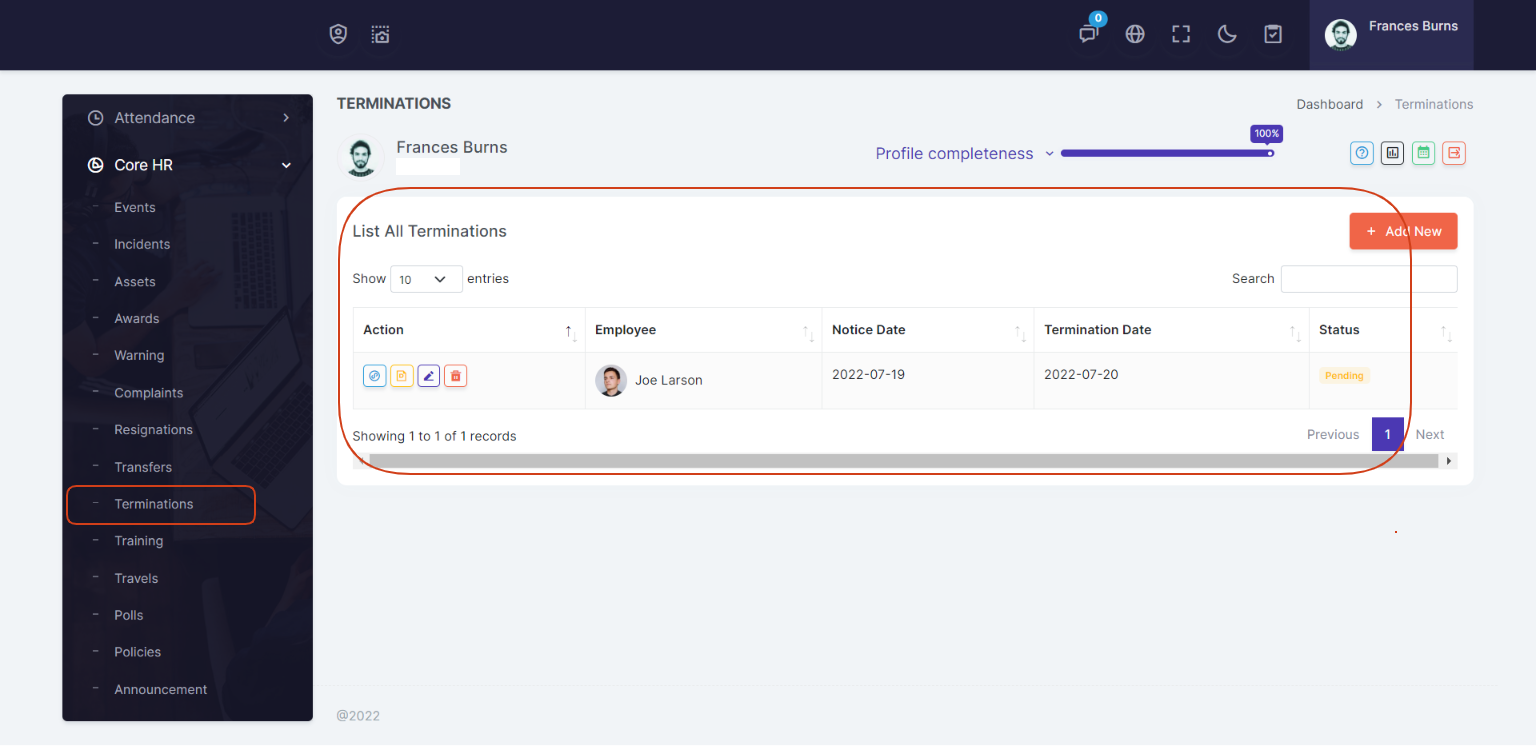
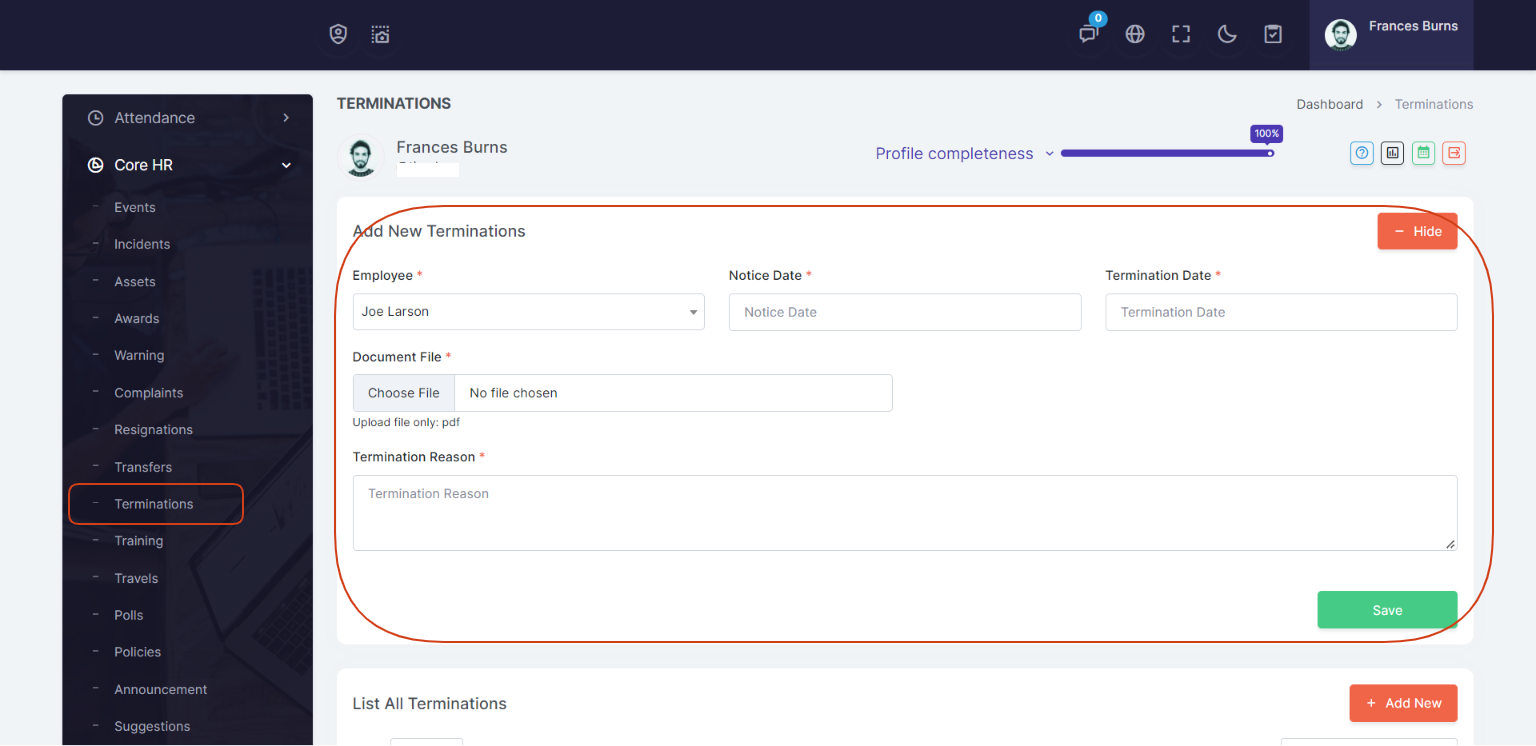
Terminations
You can send termination notice to any employee in the company.
For termination you can select employee from the option, then notice date, termination date, termination type and termination description.
Training
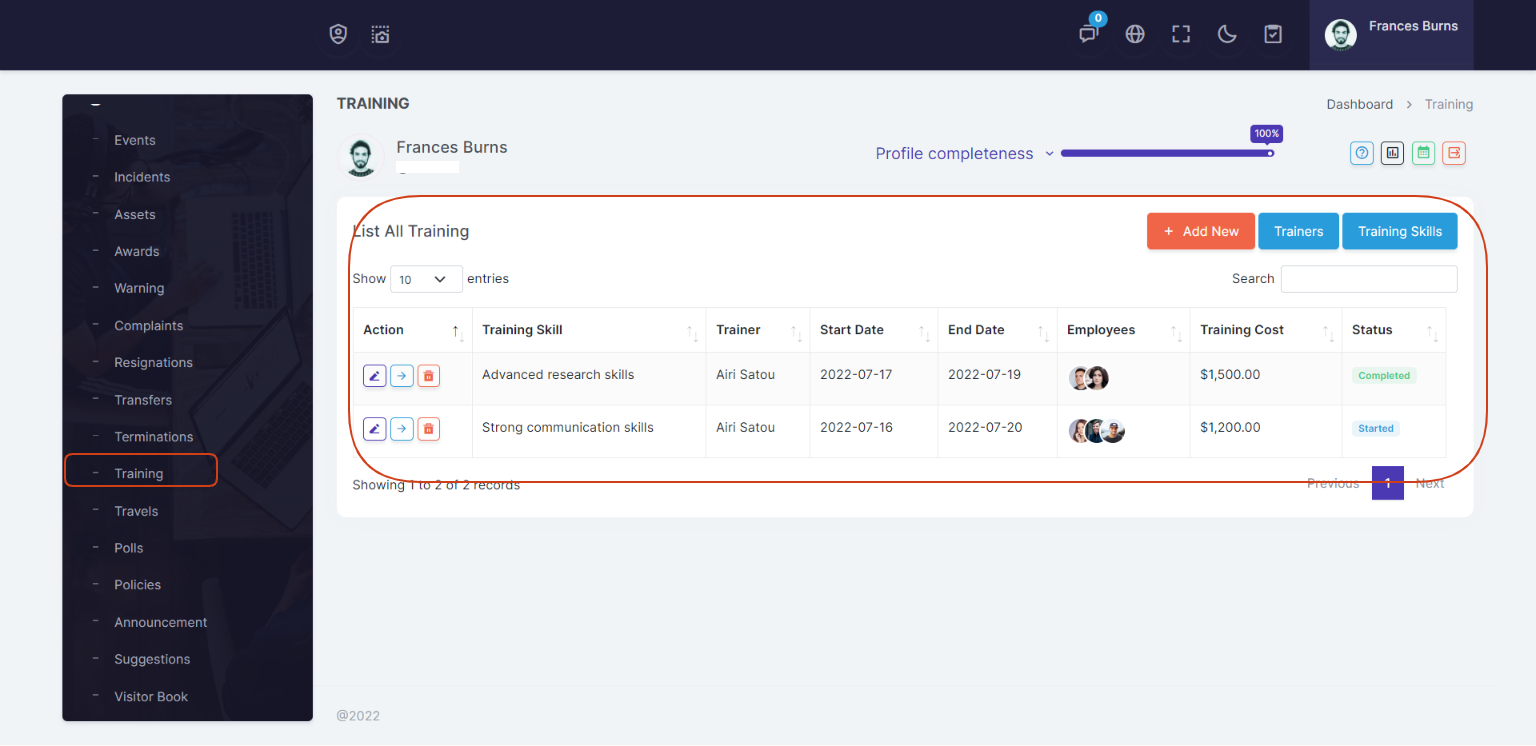
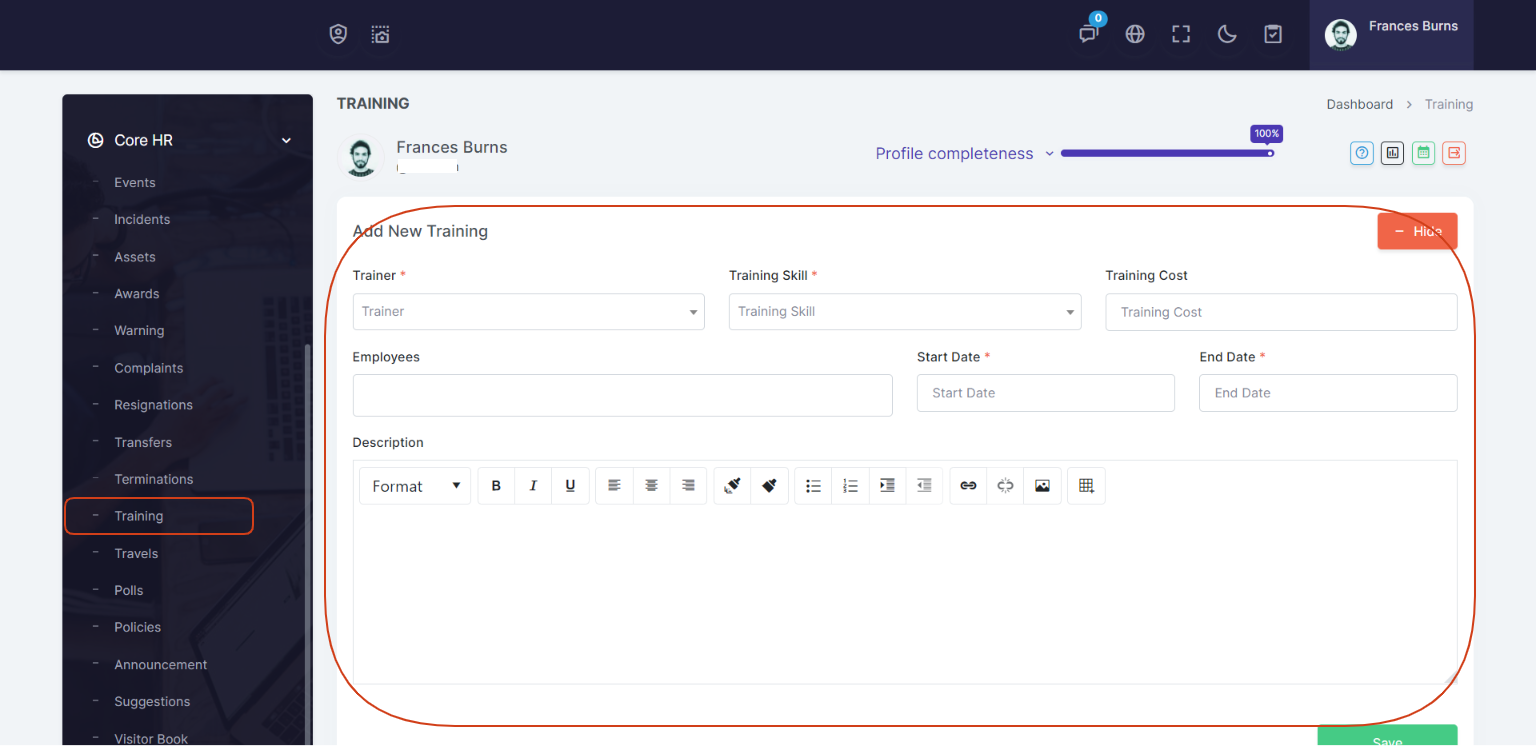
Training is a common aspect of all organization. Therefore to track and update training and related operations - MASSHRM facilitates with Training Modules. You can create training and assign your employees for training
Set training name, description of the training and the vendor name. Specify training start and end dates. You can also specify the cost of the training.
You can set training status - whether the training has started, pending, completed or rejected - thus afterwards when you track back to that training you can easily understand the state / status of the training.
Afterwards when you update the training OR when employee has completed the training - you can update performance of the training. You can set whether the employee did good, satisfactory, excellent, poor or not concluded from the performance drop down option.
Travels
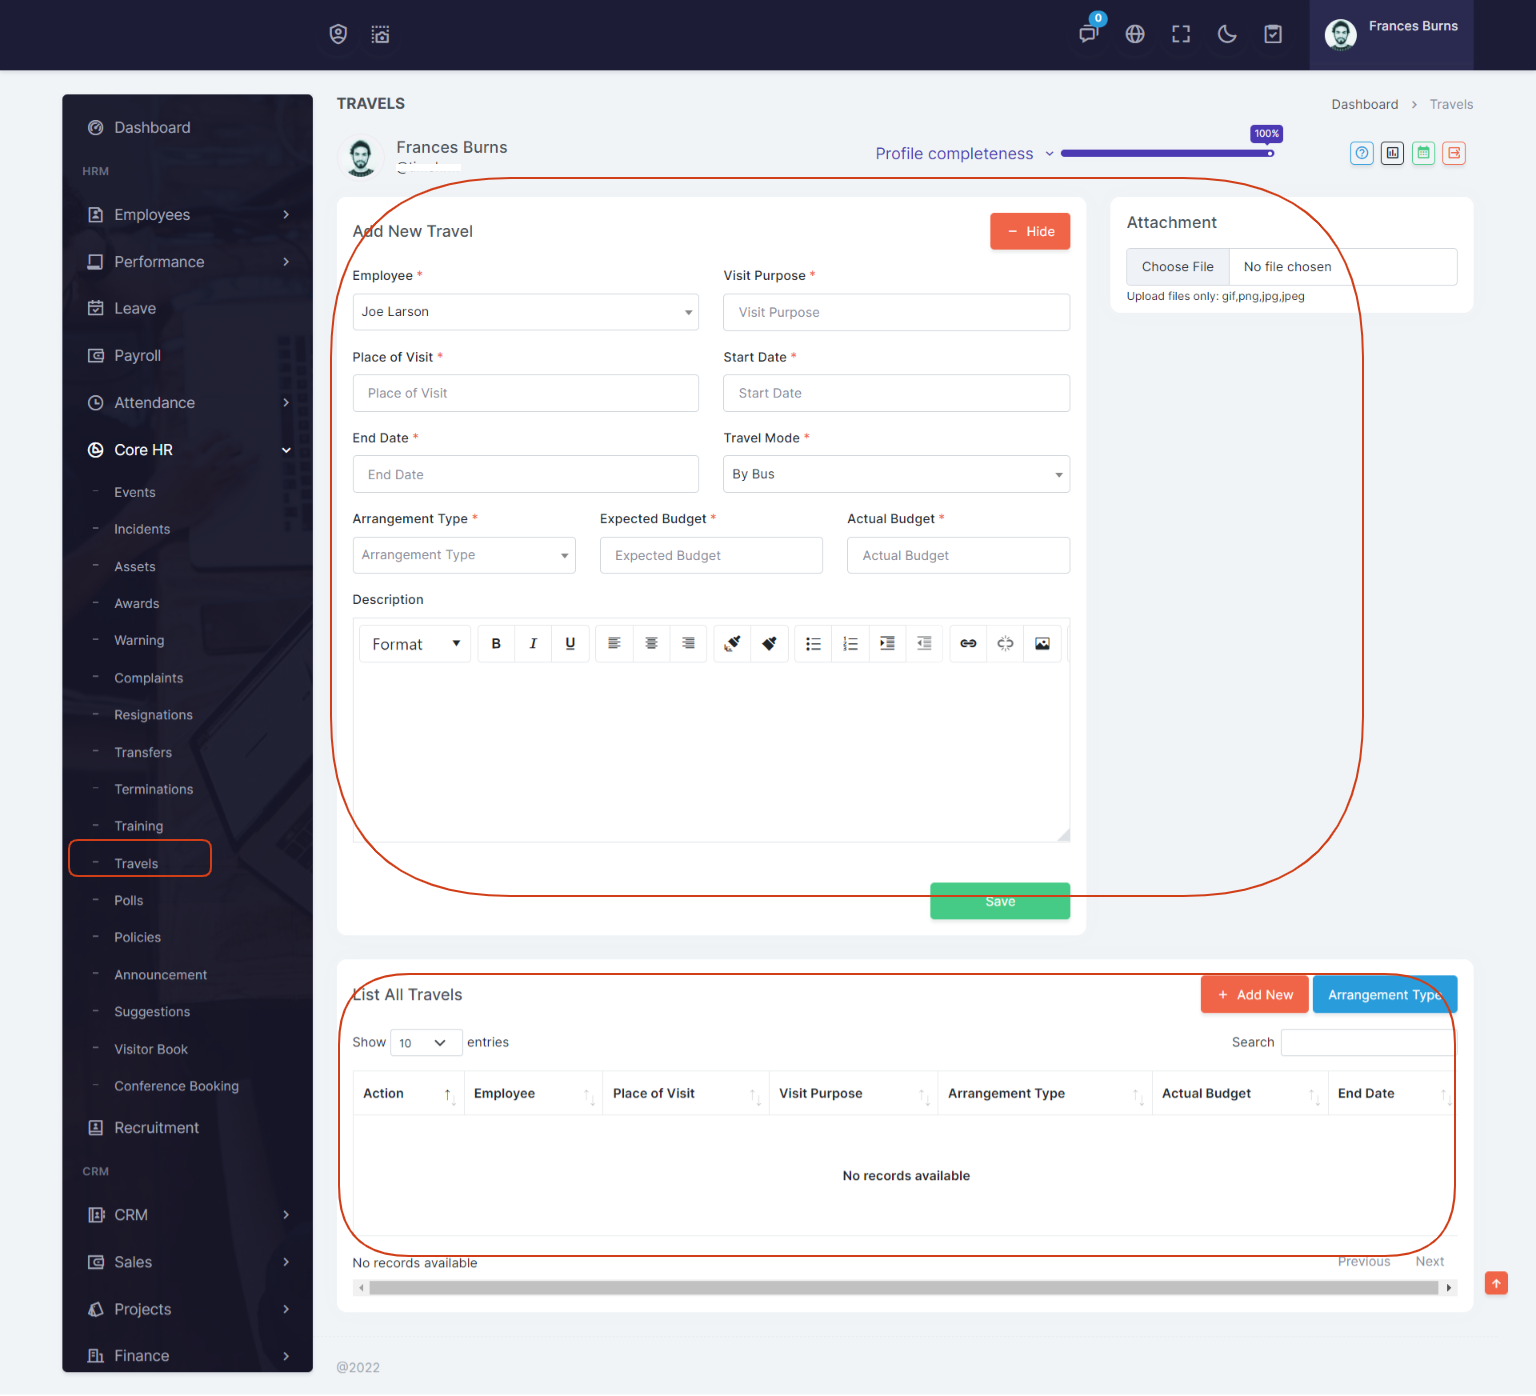
You can easily add new Travel in the system. The form is elaborate with all possible information you might need to add for a new Travel.
You can see list of all travels at a glance.
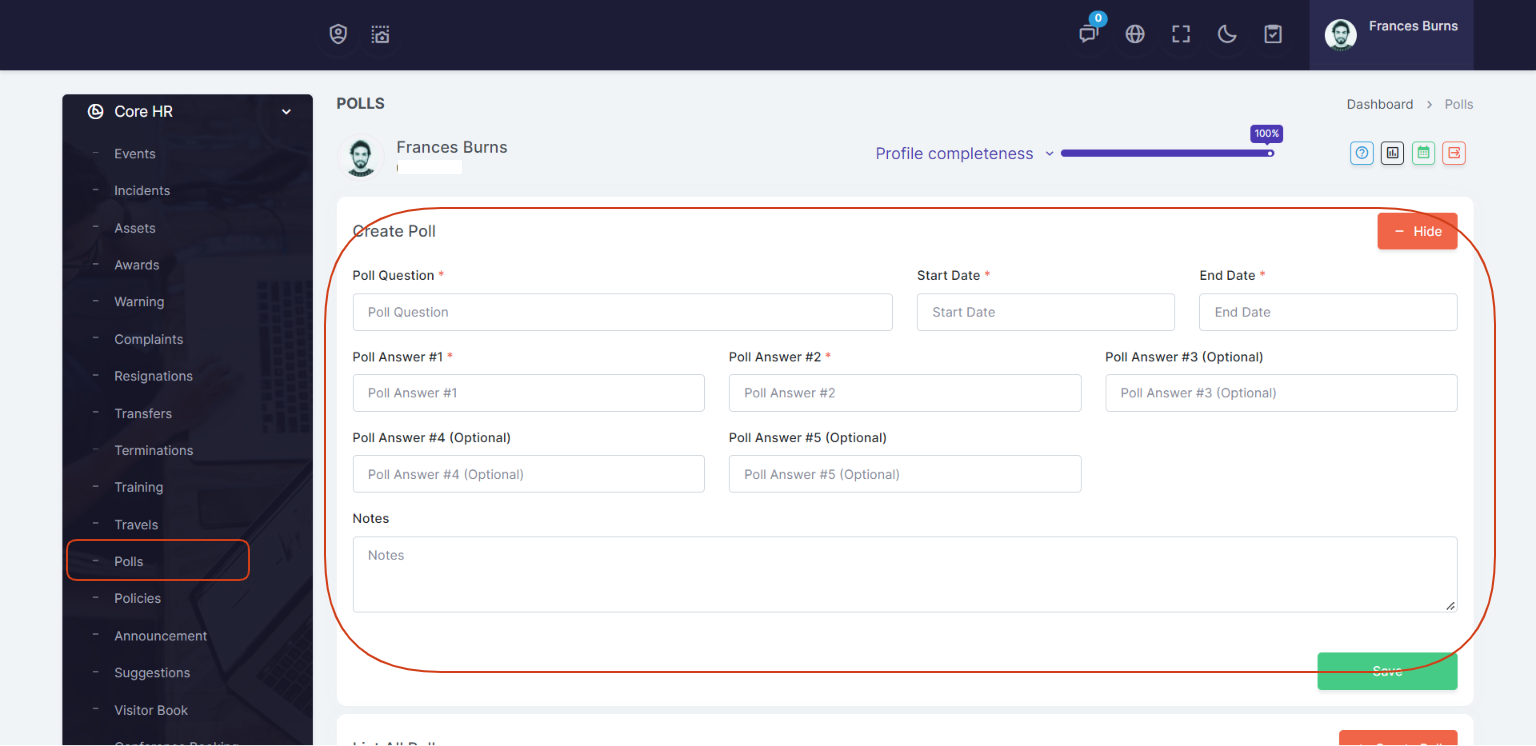
Polls
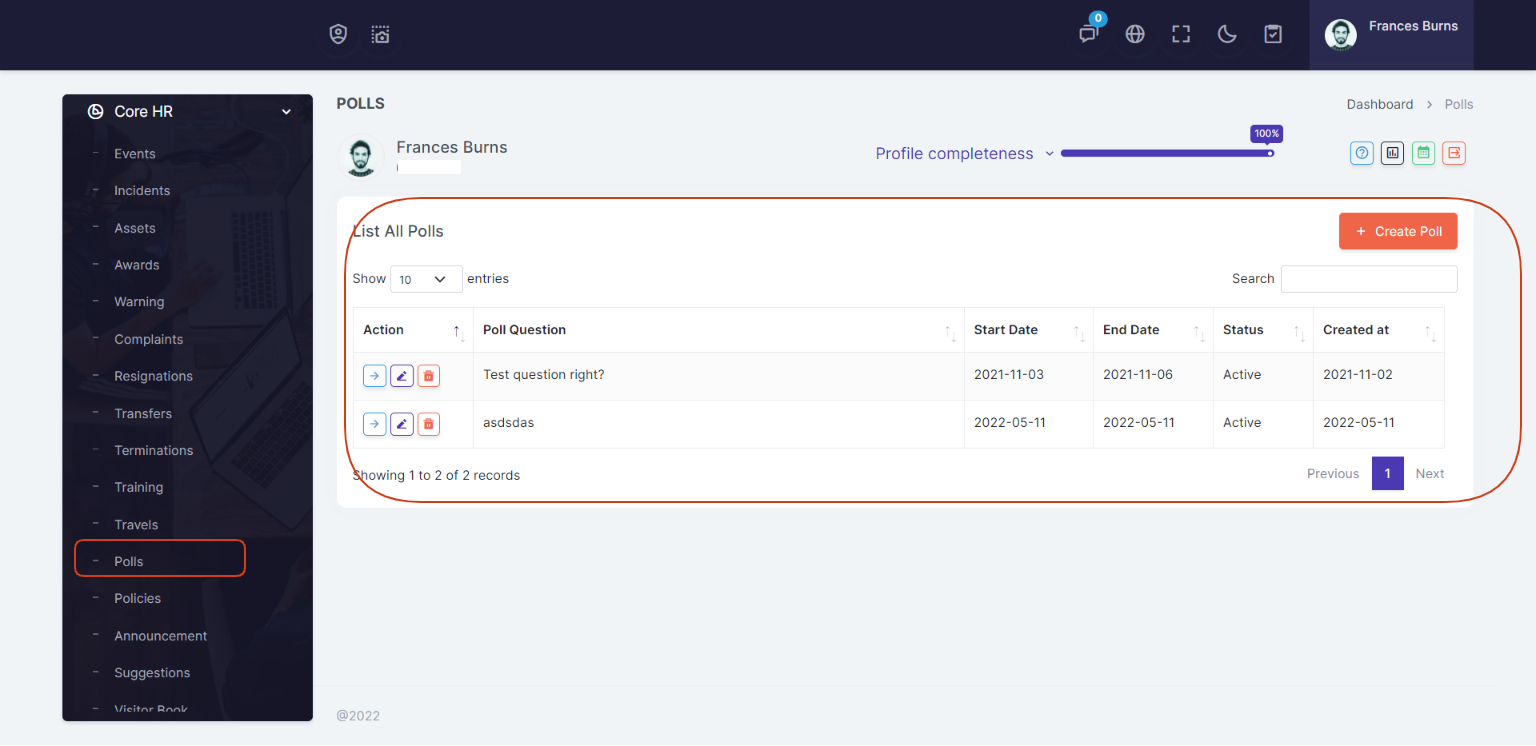
Poll manager for MASSHRM enables you to create friendly voting system inside the system.
Poll create a new opportunity for management to gain a holistic picture of employees feelings on such areas as working conditions, supervisory impact, and motivation that regular channels of communication may not.
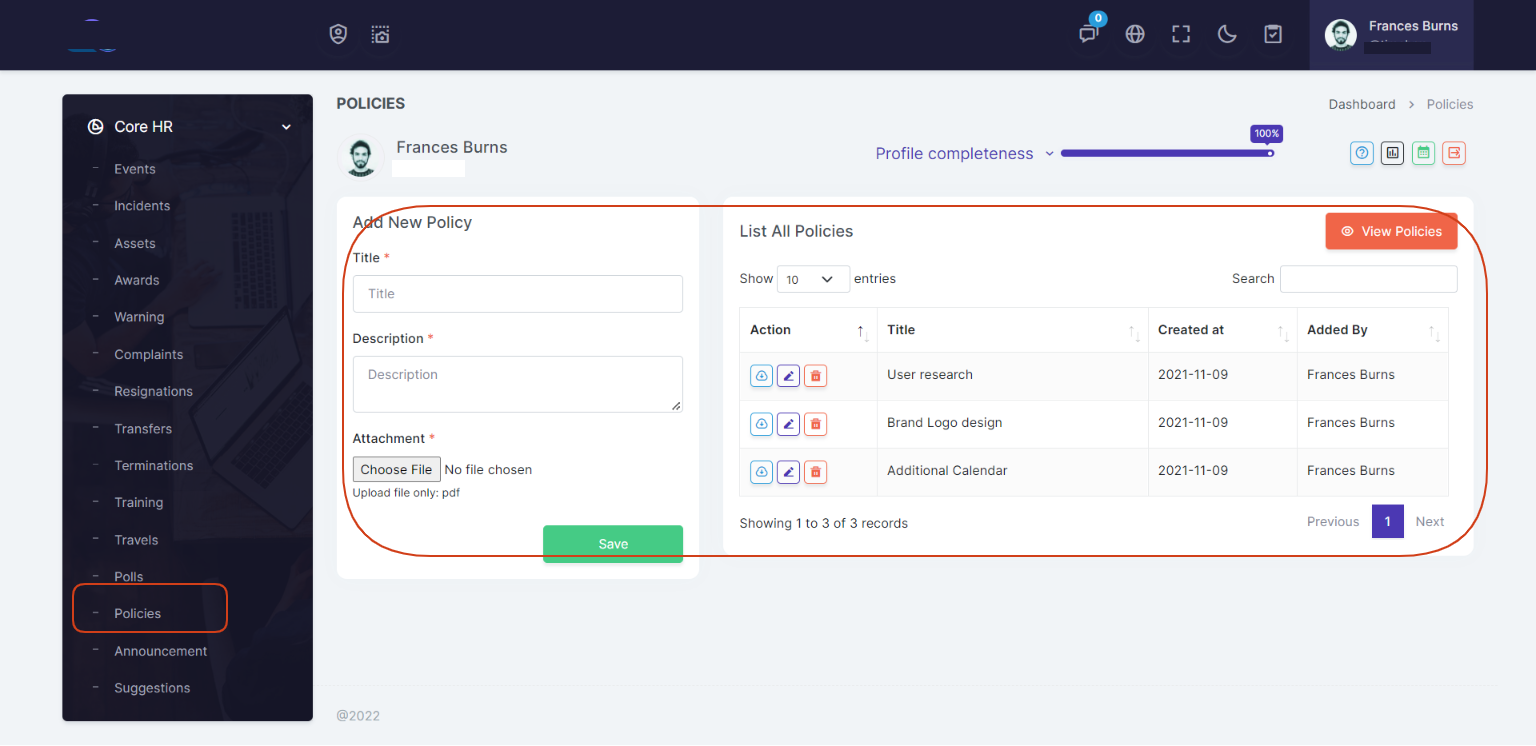
Policies
Policies is also an important feature every company needs. MASSHRM provides policies facilitate for employees for selected companies/company. Admin can add many policies for any company.
Ever wanted a way to communicate with your employees about an upcoming training or have the HR handbook live in a place where all can see? Well now you can with the HR Policy Publisher. This feature allows you to attach the most important things and have it live on the dashboard.
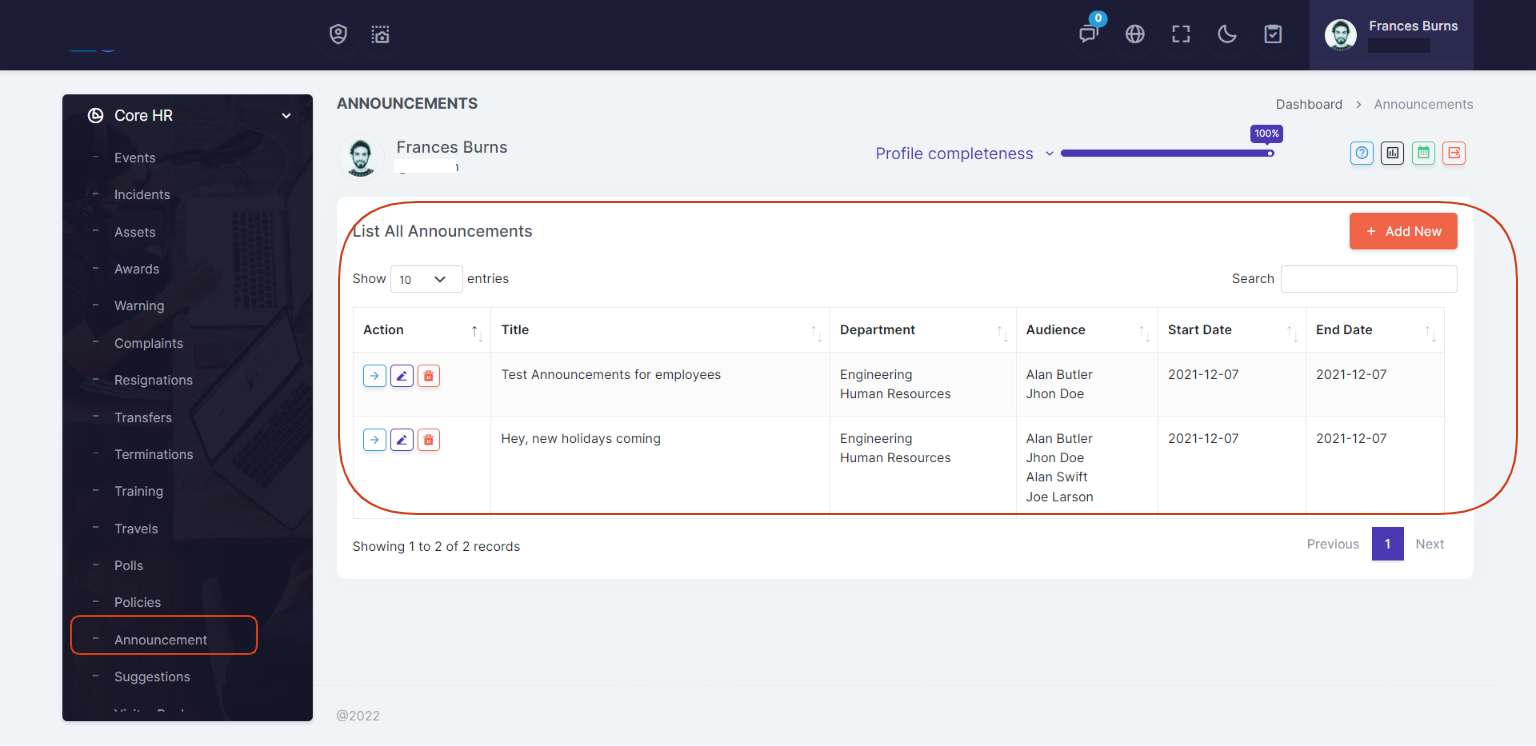
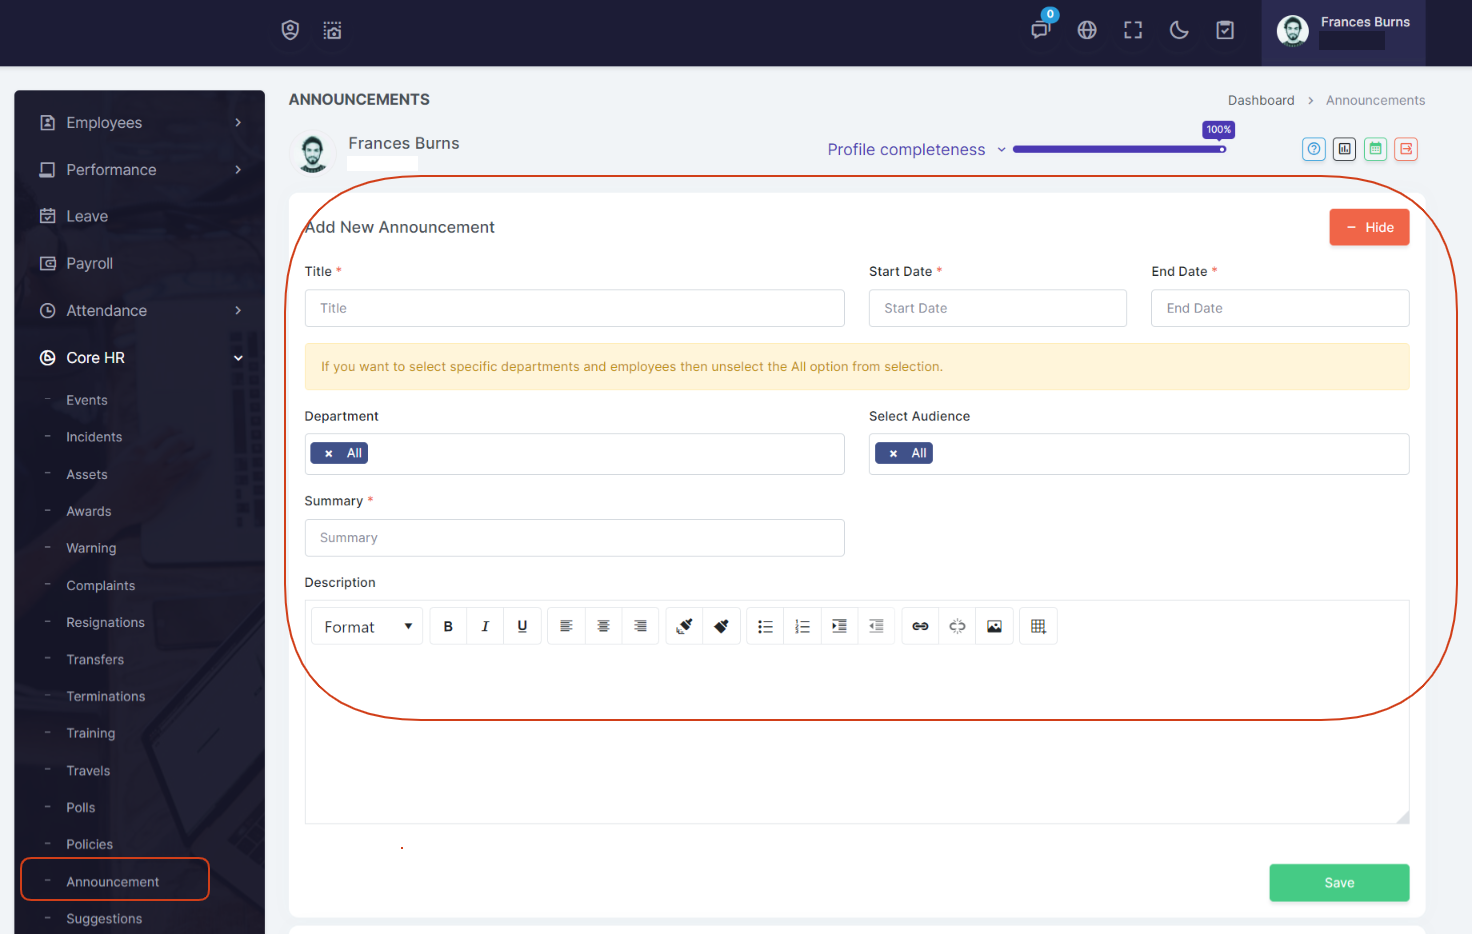
Announcement
In an Office - Announcement plays an important role to let everyone know about any update / event or changes that is required or decided. You can publish the Announcement for any Department and Audience(Employees), employees will view the Announcements on their dashboard.
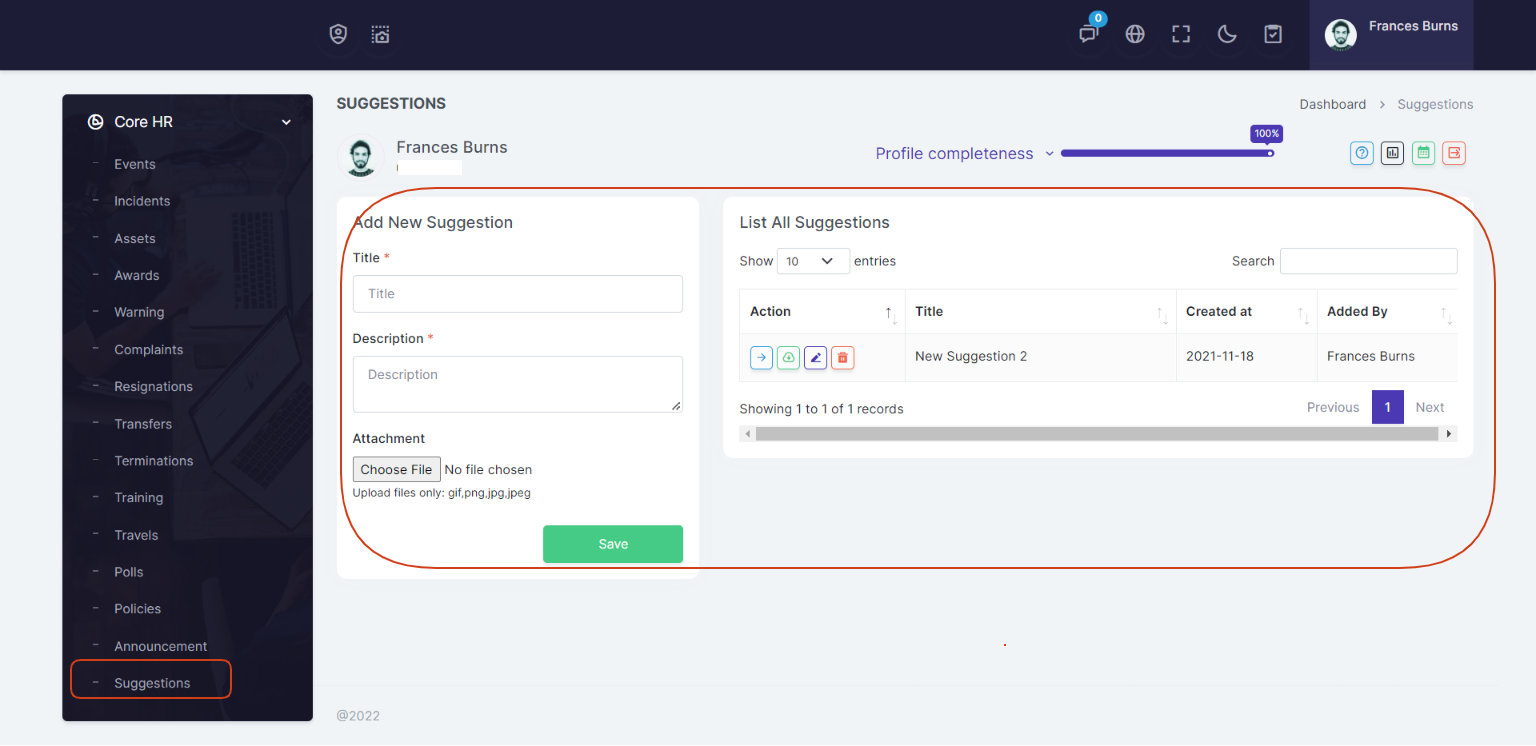
Suggestions
Suggestions module enables you to post suggestions in the system, it will show on the dashboard of employees.
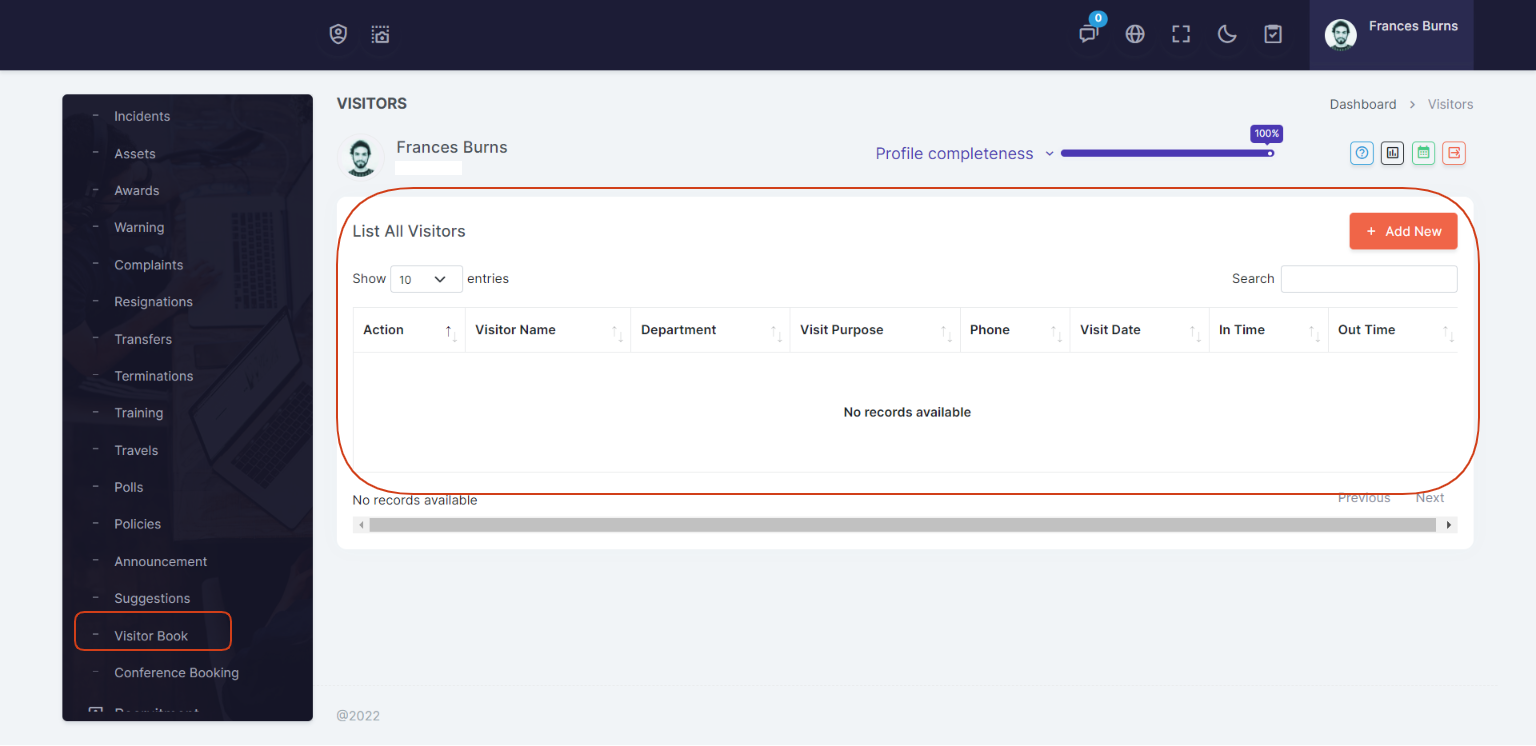
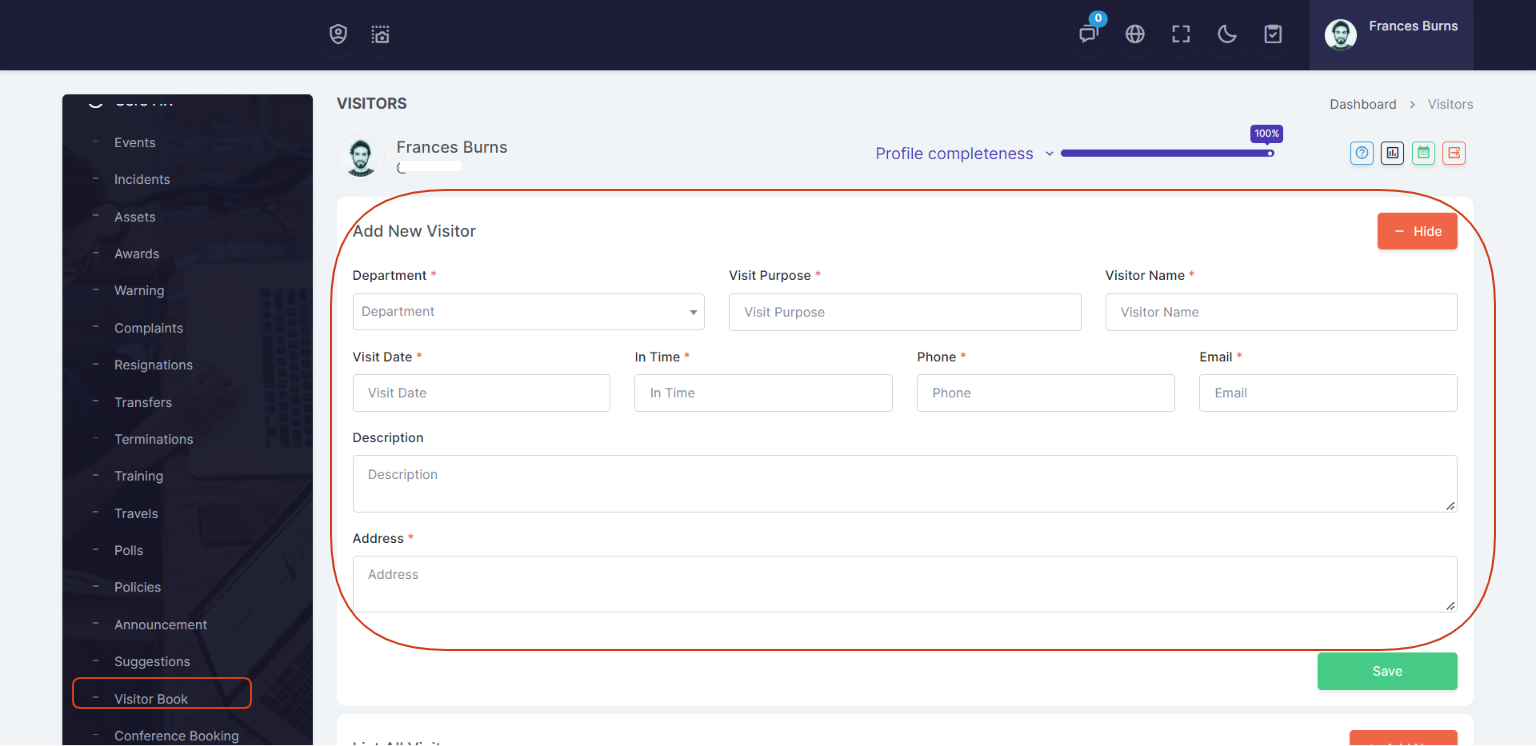
Visitor Book
A visitors book is an essential tool that helps capture who is coming in and going out at your office facility. It is a record book that keeps track of the visitors on site, their identity, the company they represent, who they came to visit, the purpose of coming in, contact details, time in and time out.
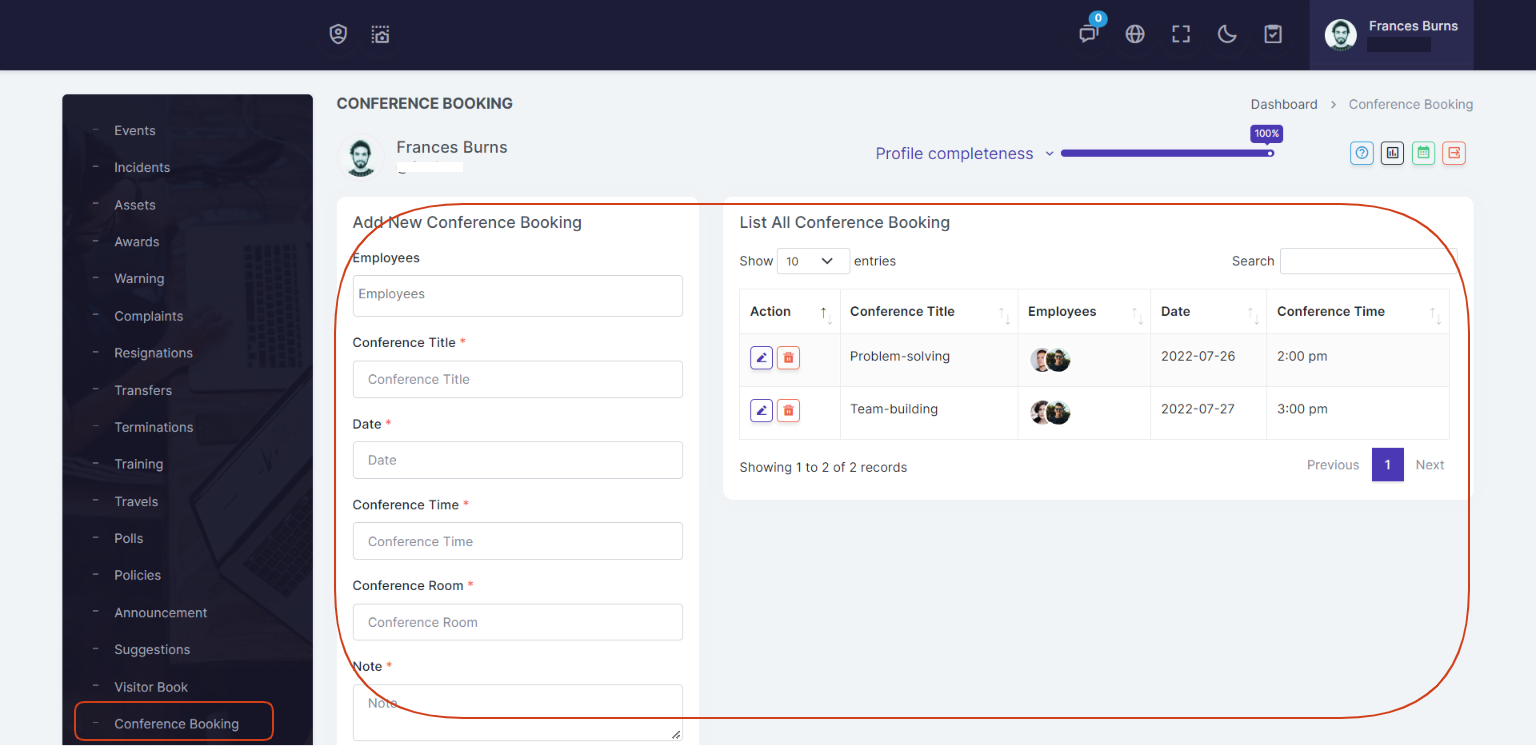
Conference
You can easily manage your events and meetings so they can be added, updated and deleted in an easy way. All events and meetings will show in system calendar with time.
Recruitment
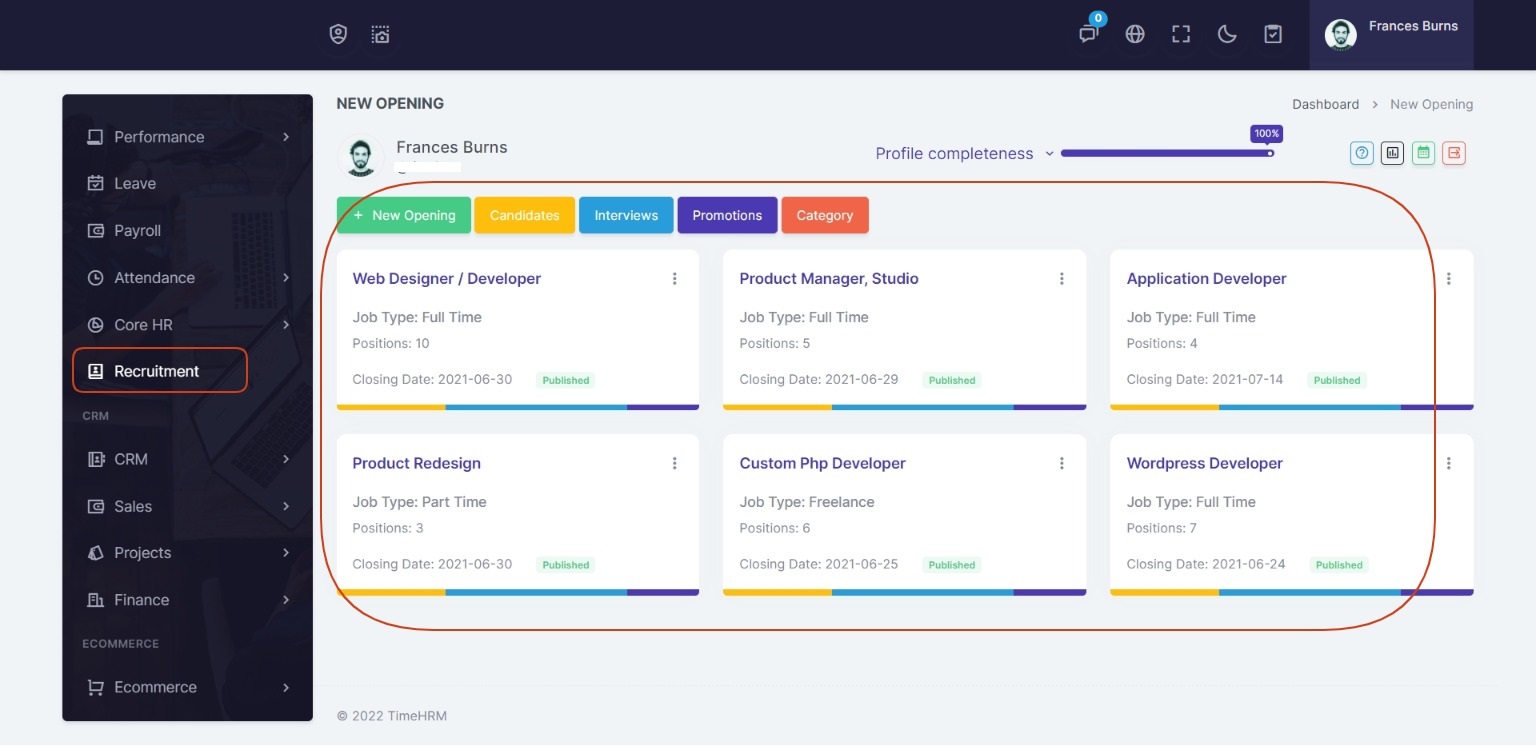
Recruitment is also the most vital part of MASSHRM. Job opening Information, job functions, requirements and skills information and staffing status.
New Job Open
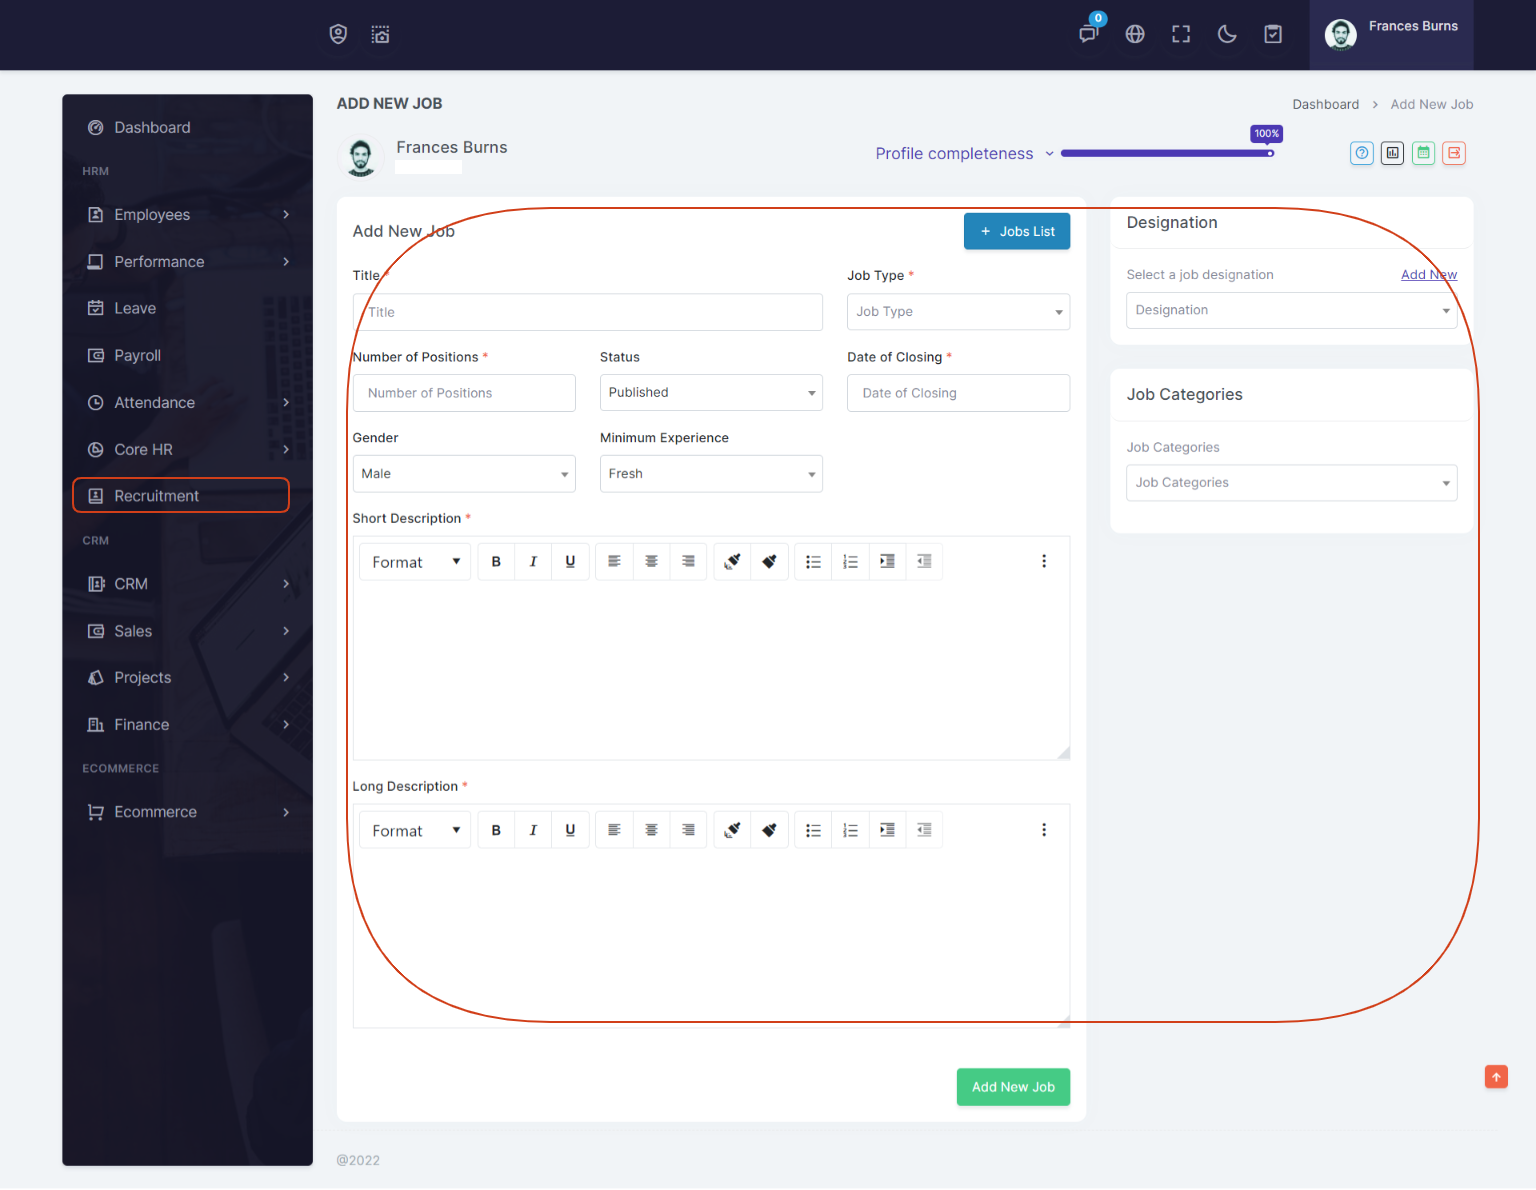
You can create new job according to your need and then the job will appear on frontend for job seekers, then job seekers can apply for any job which are posted. The Job seekers can also apply for a job after create a new account.
Candidates
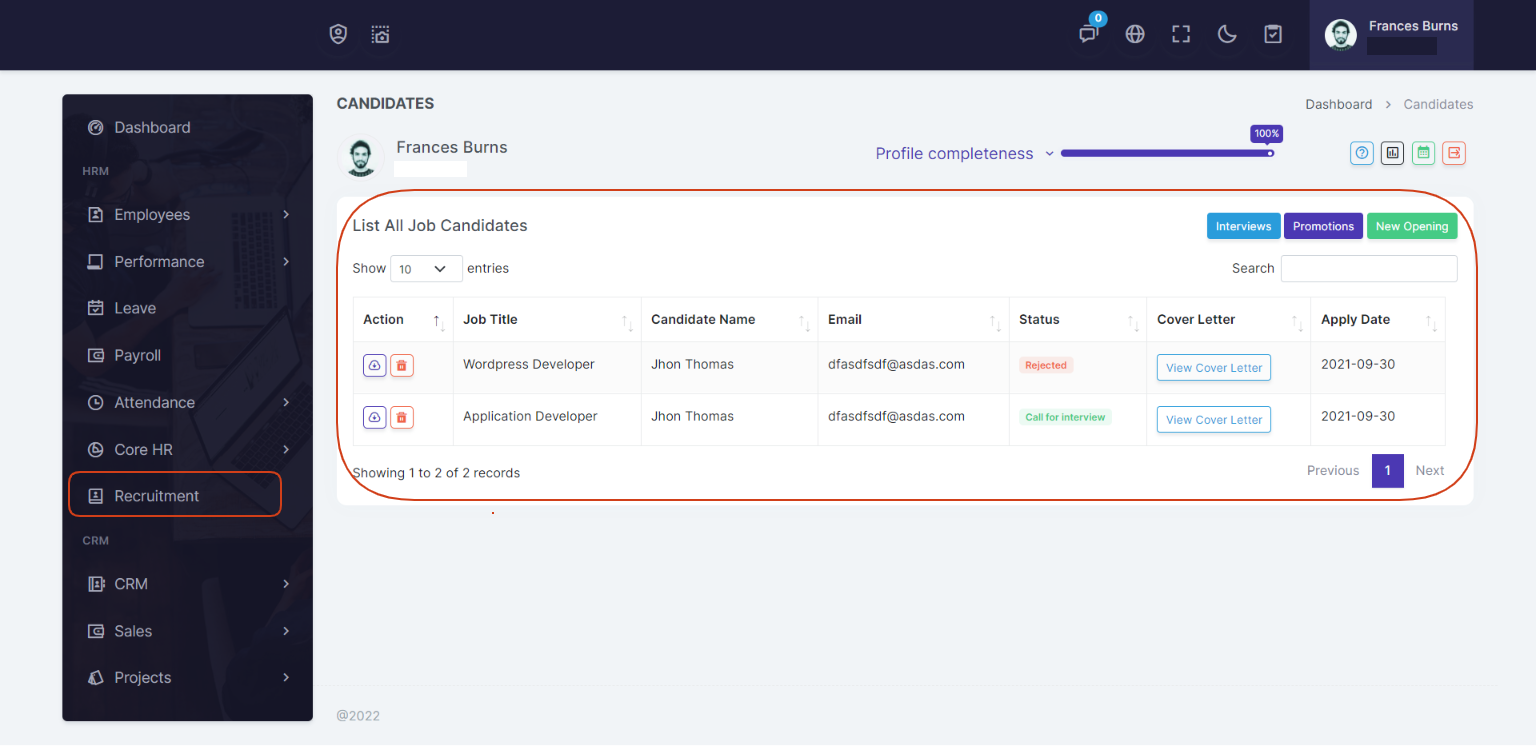
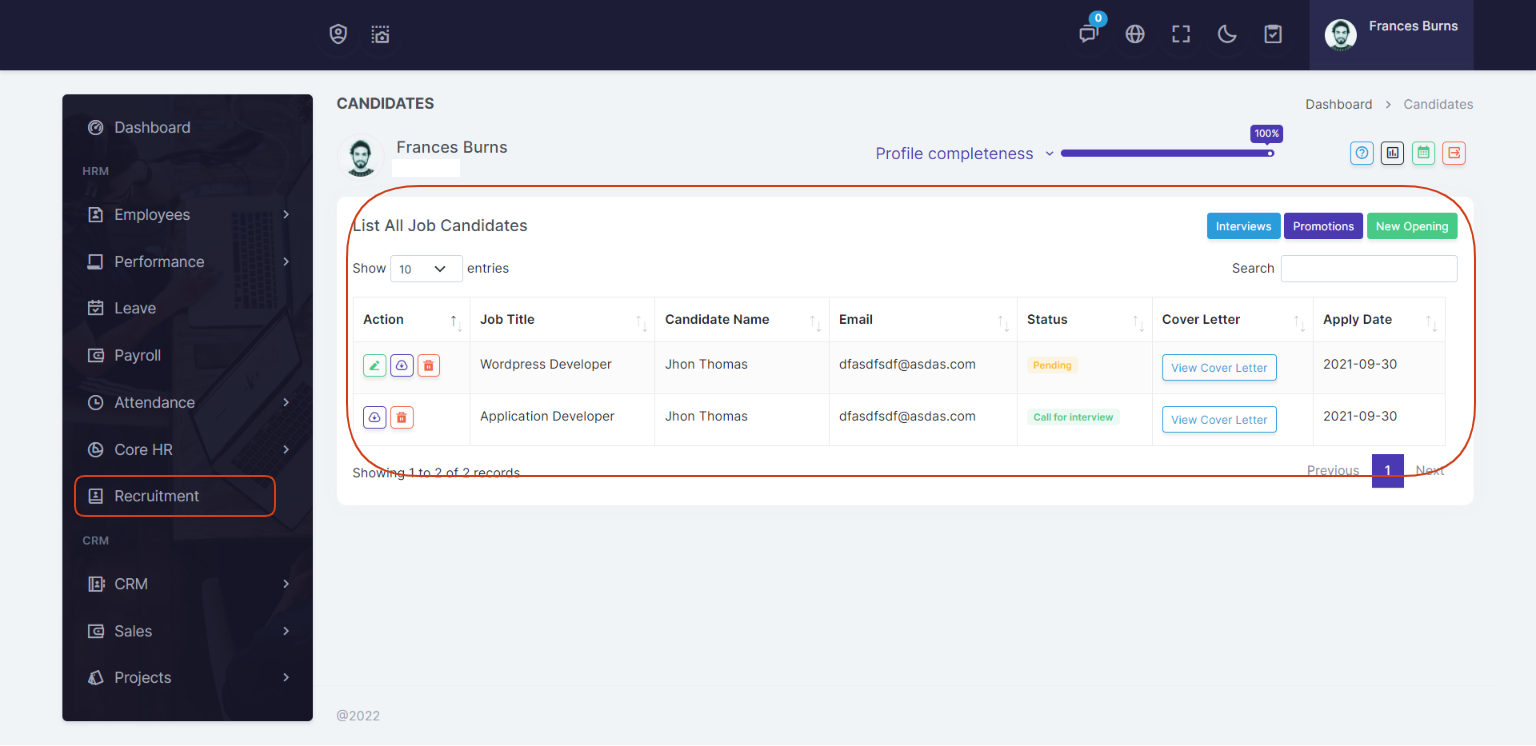
After successful creation of new job - all job seeker can easily apply for that job, and then admin can view the new job applications in Job Candidates page.
Interviews
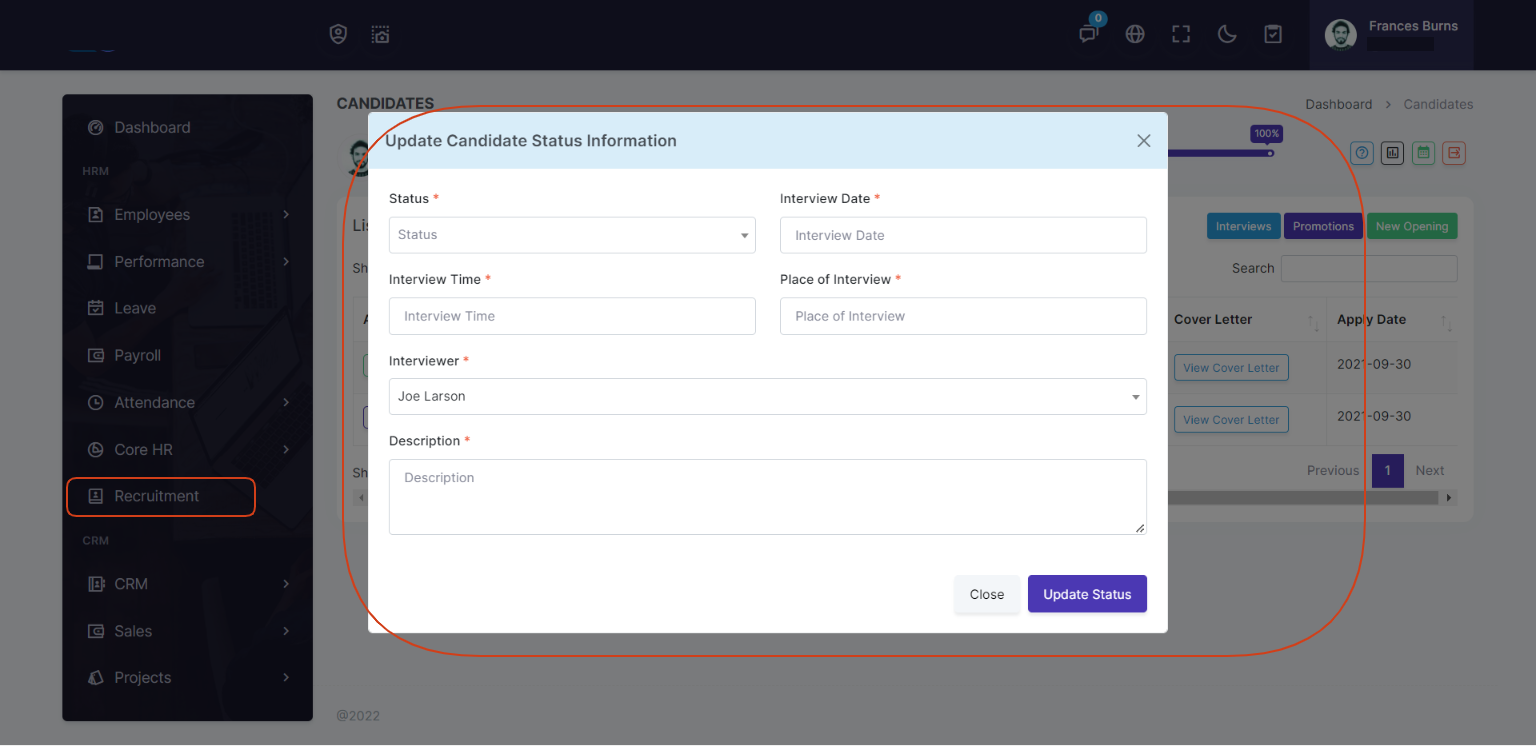
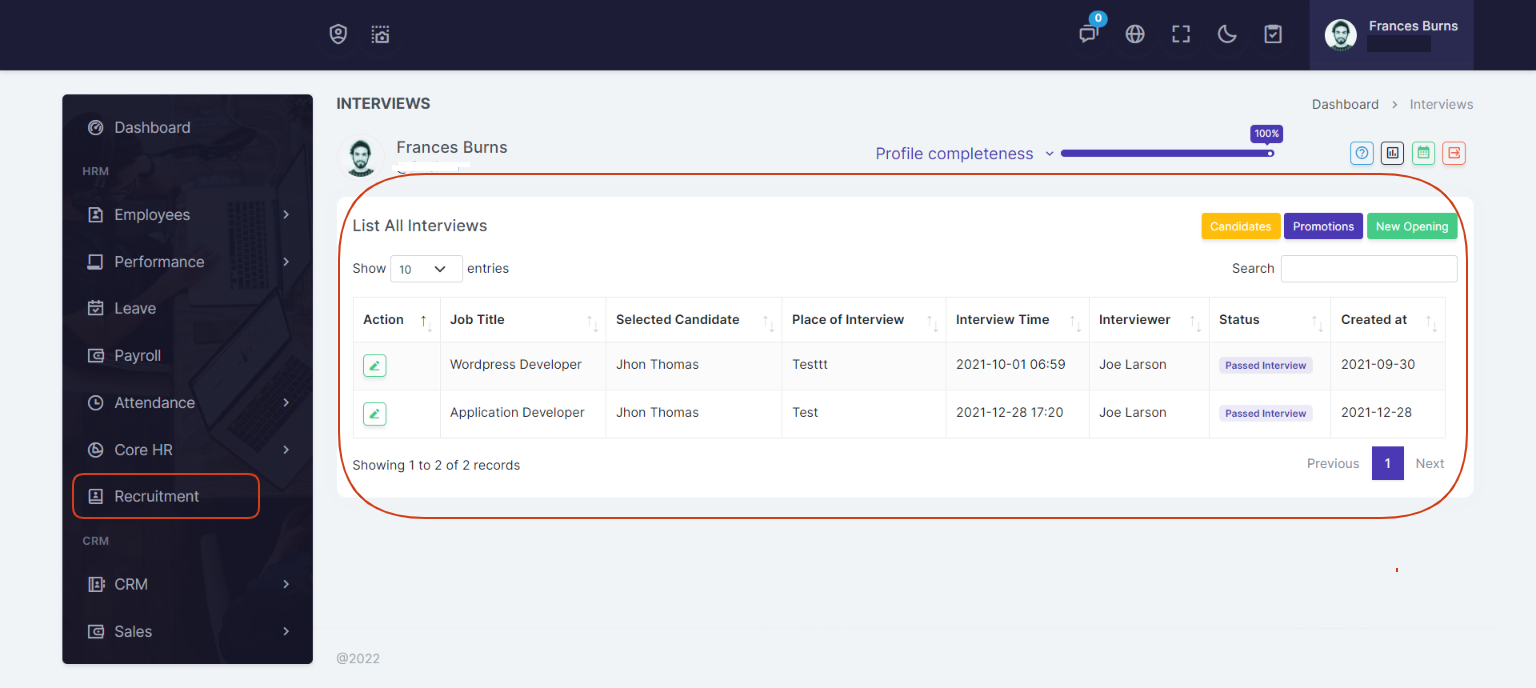
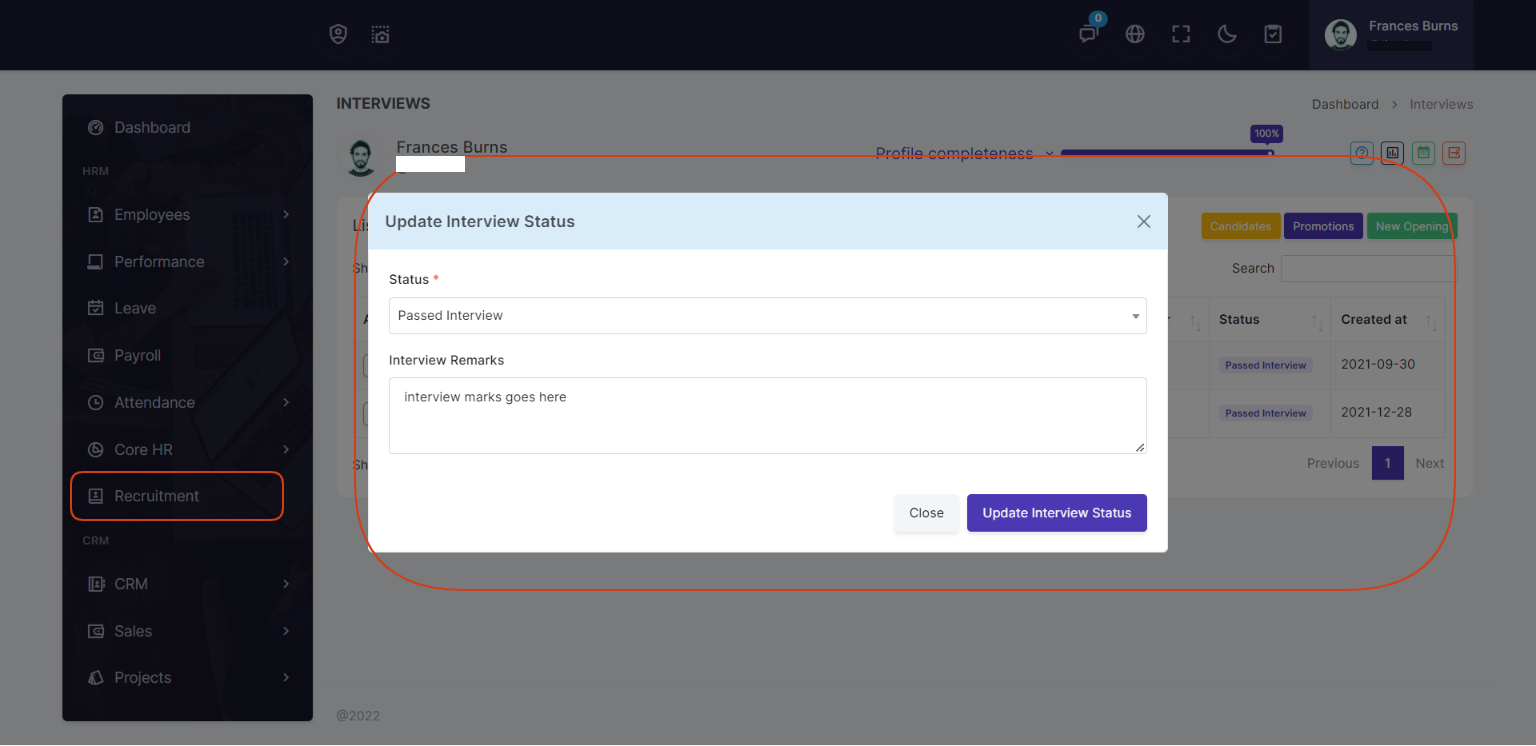
After receive job applications admin can now invite the candidates for interview. Admin can easily add the interview place, interview time and interview date.
The job seekers will see the interview data from their portal.
Promotions
When new candidate pass the interview, they have been assigned a related job title according to applied job.
Job Category
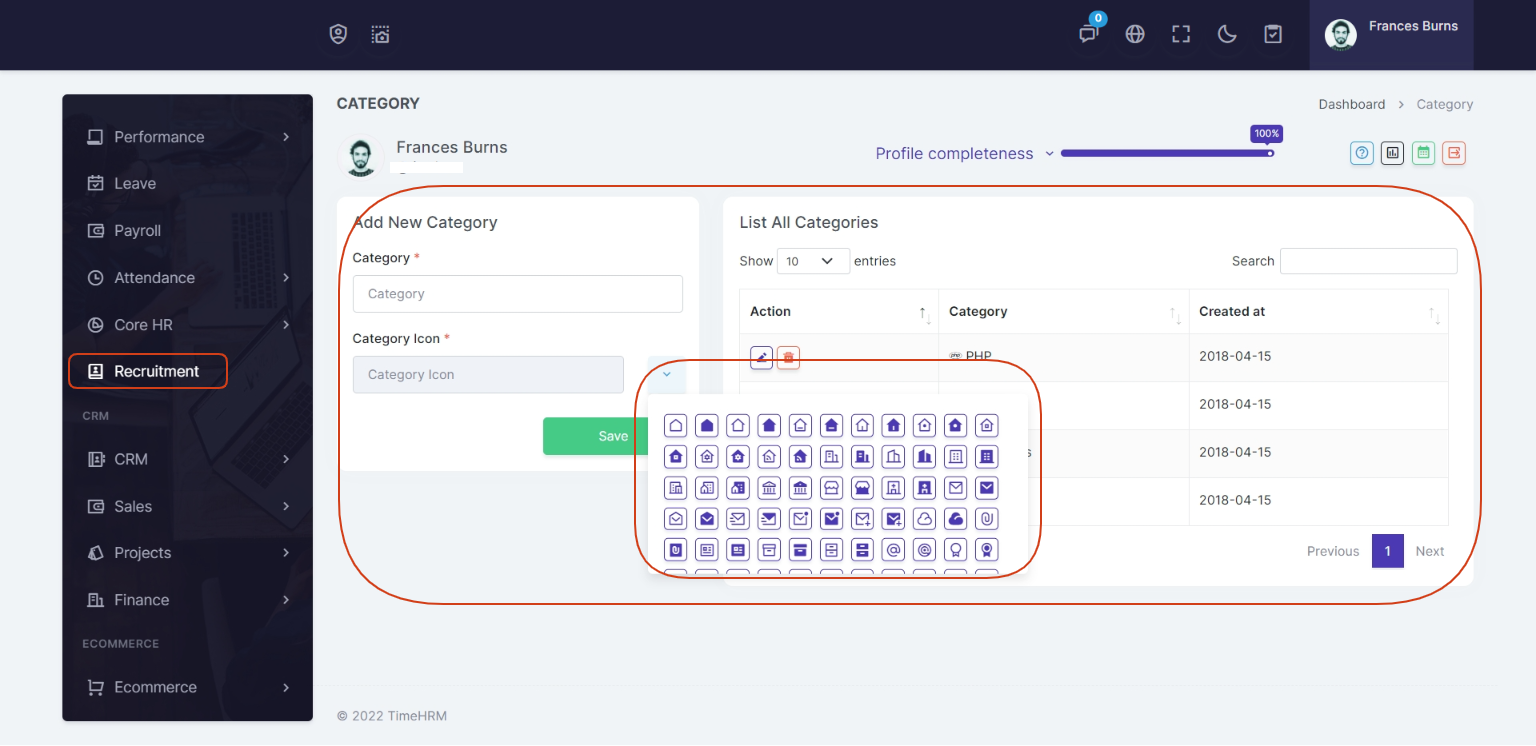
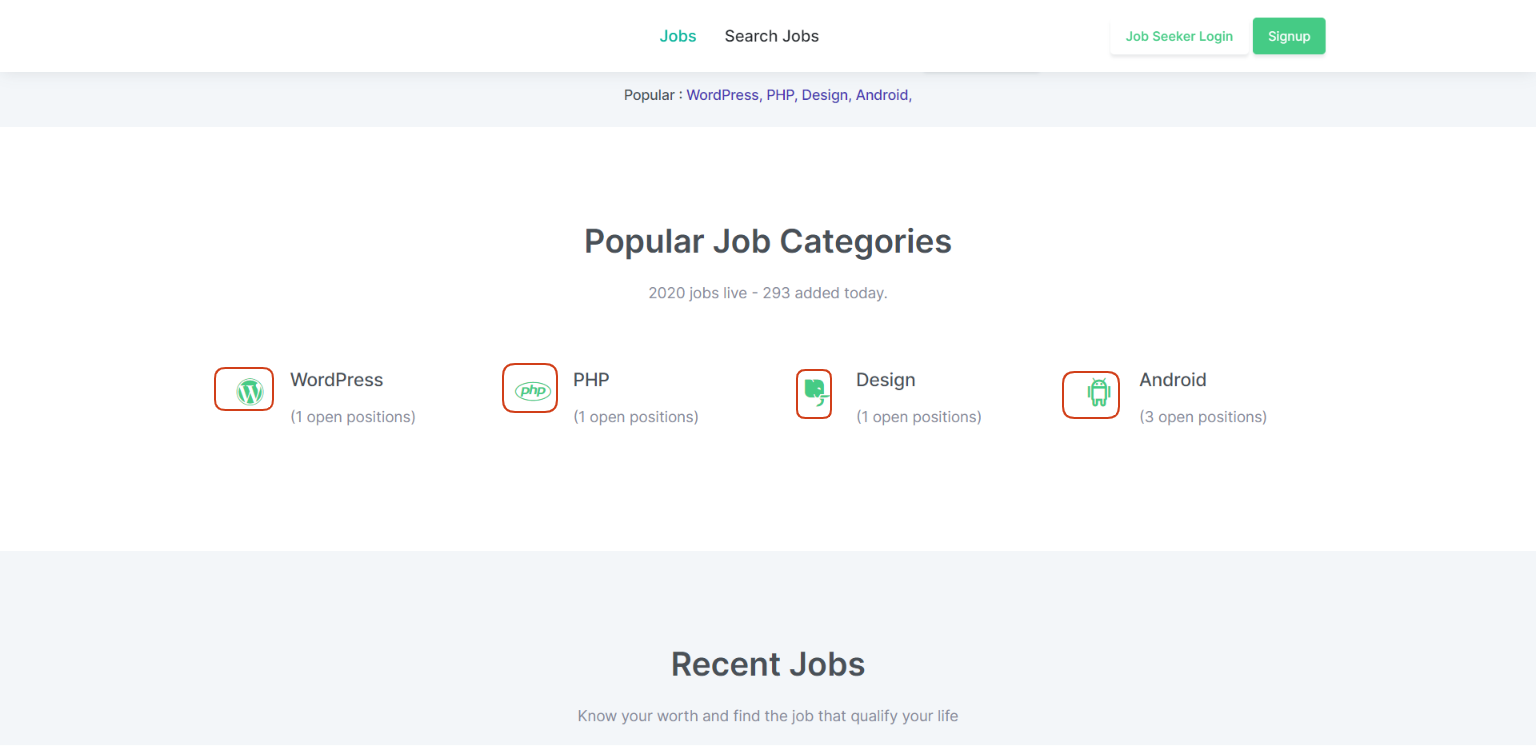
You can add job categories, and select icon for a category it will show on frontend website on jobs listing page.
Documents
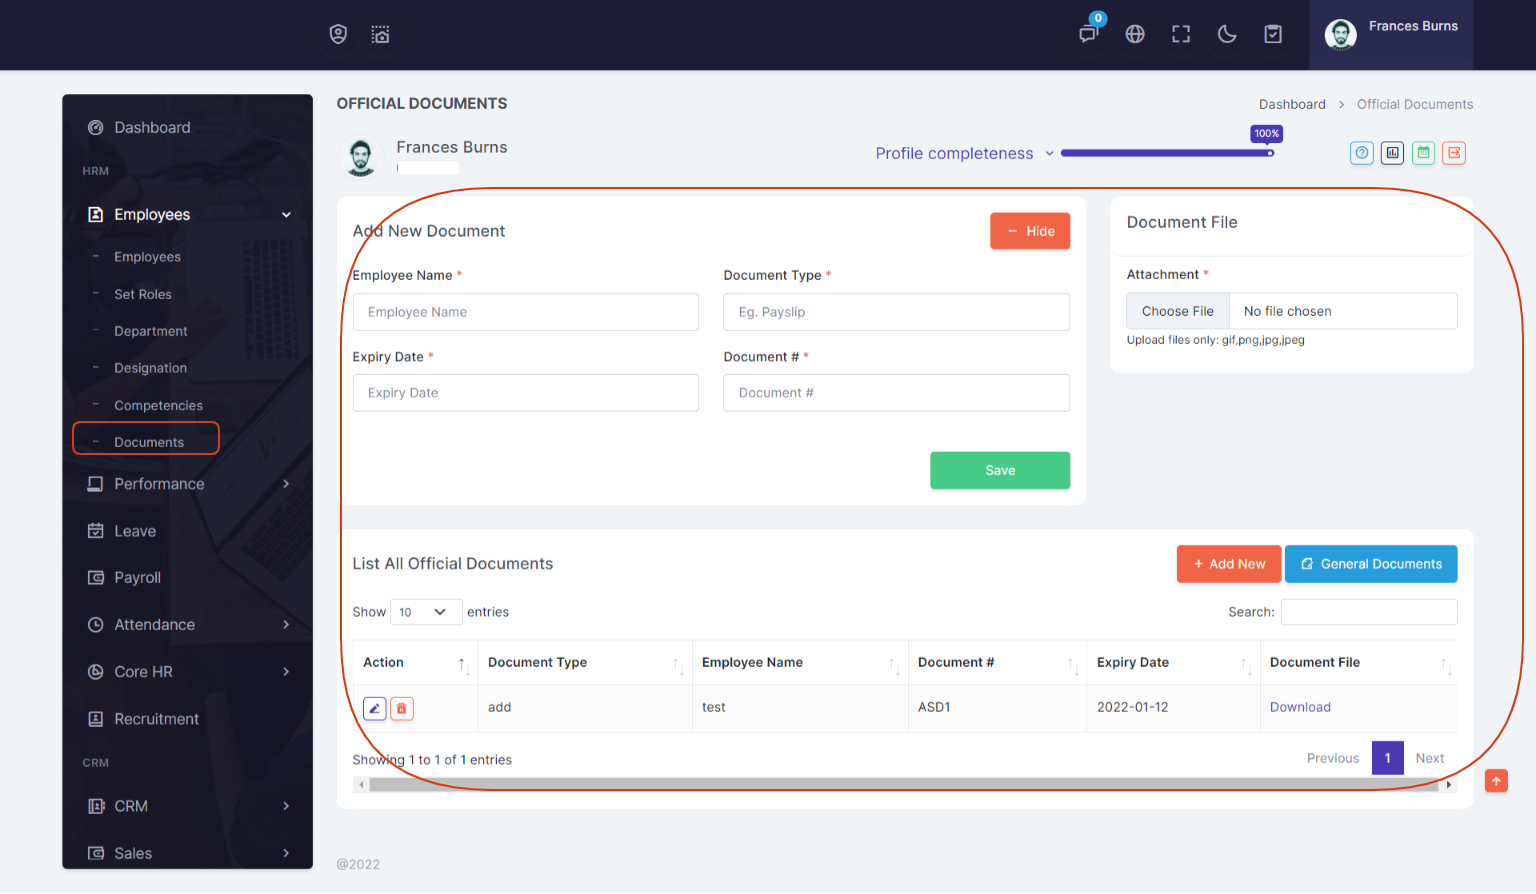
Official Documents
On General Documents page you can add documents for an employee
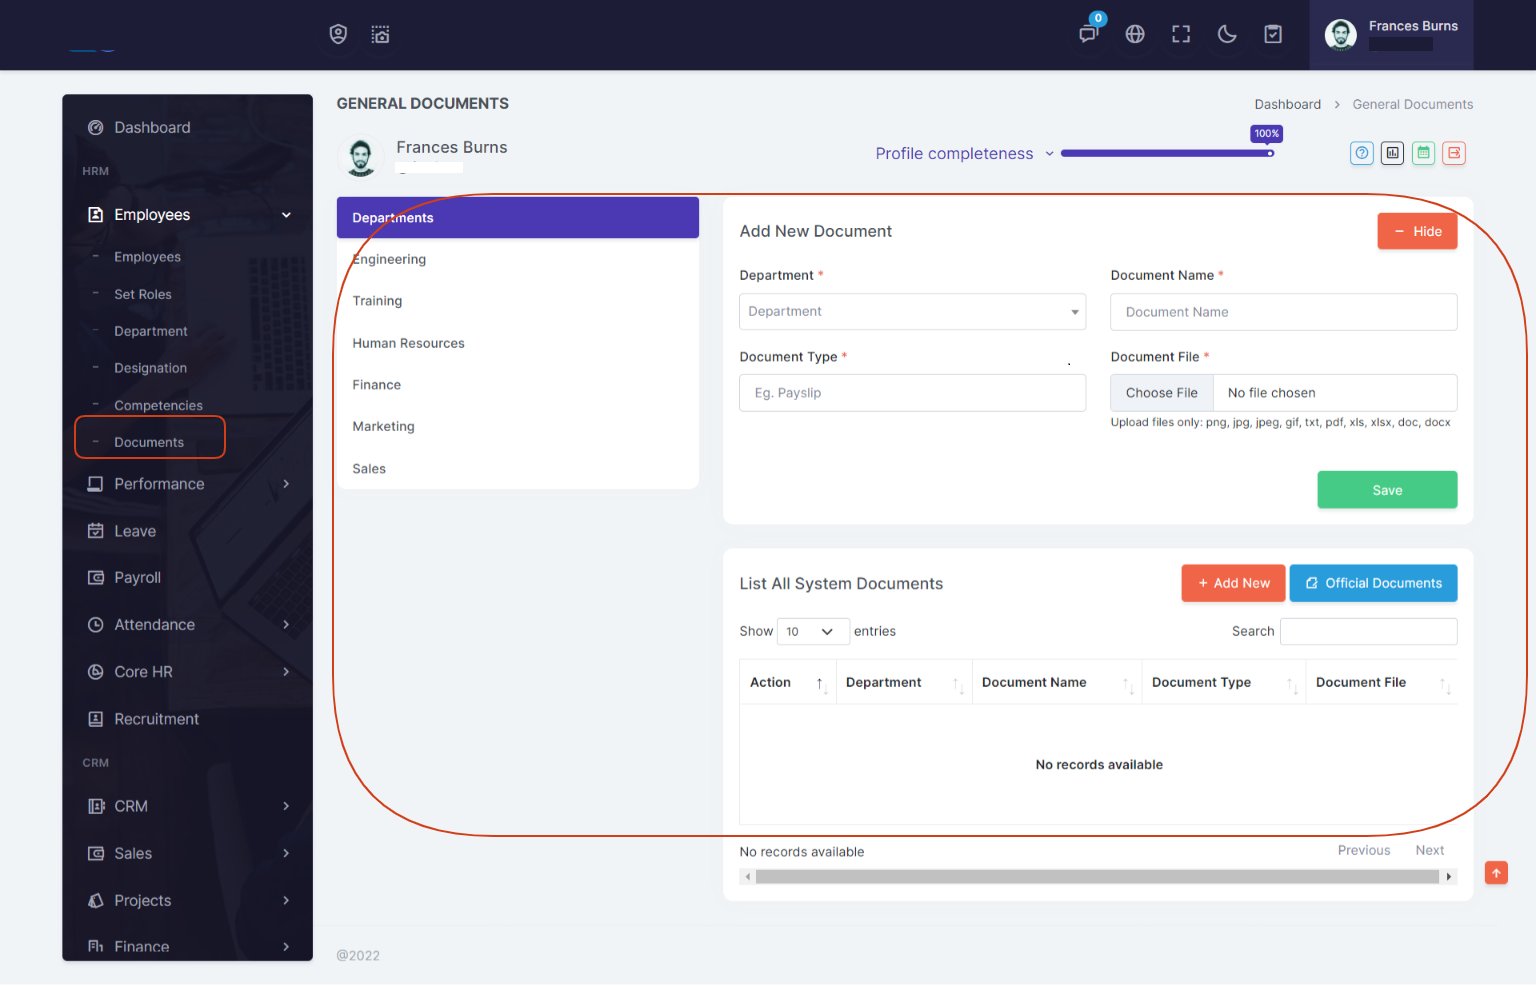
General Documents
You can upload any type of file in different departments, employees can view their own departments files or can upload files only own department.
Note: Employees will see their own department documents.
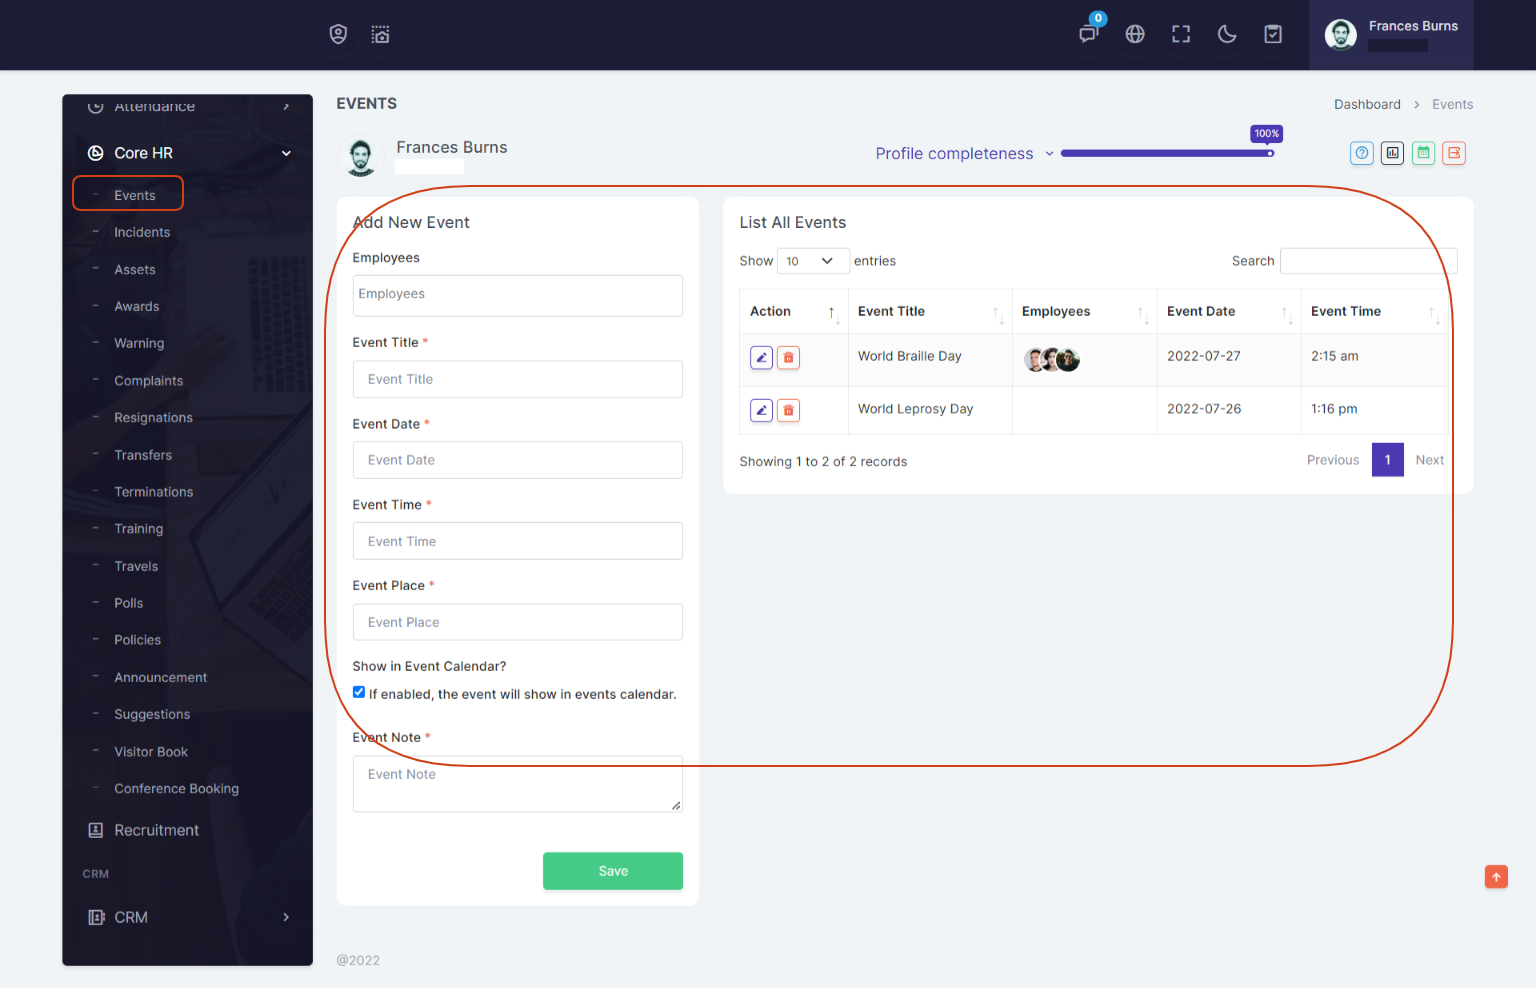
Events
Events is a simple and advanced module. It is suitable for any one who wants to create event based functionality to their system. You can easily manage your events so they can be added, updated and deleted in an easy way.
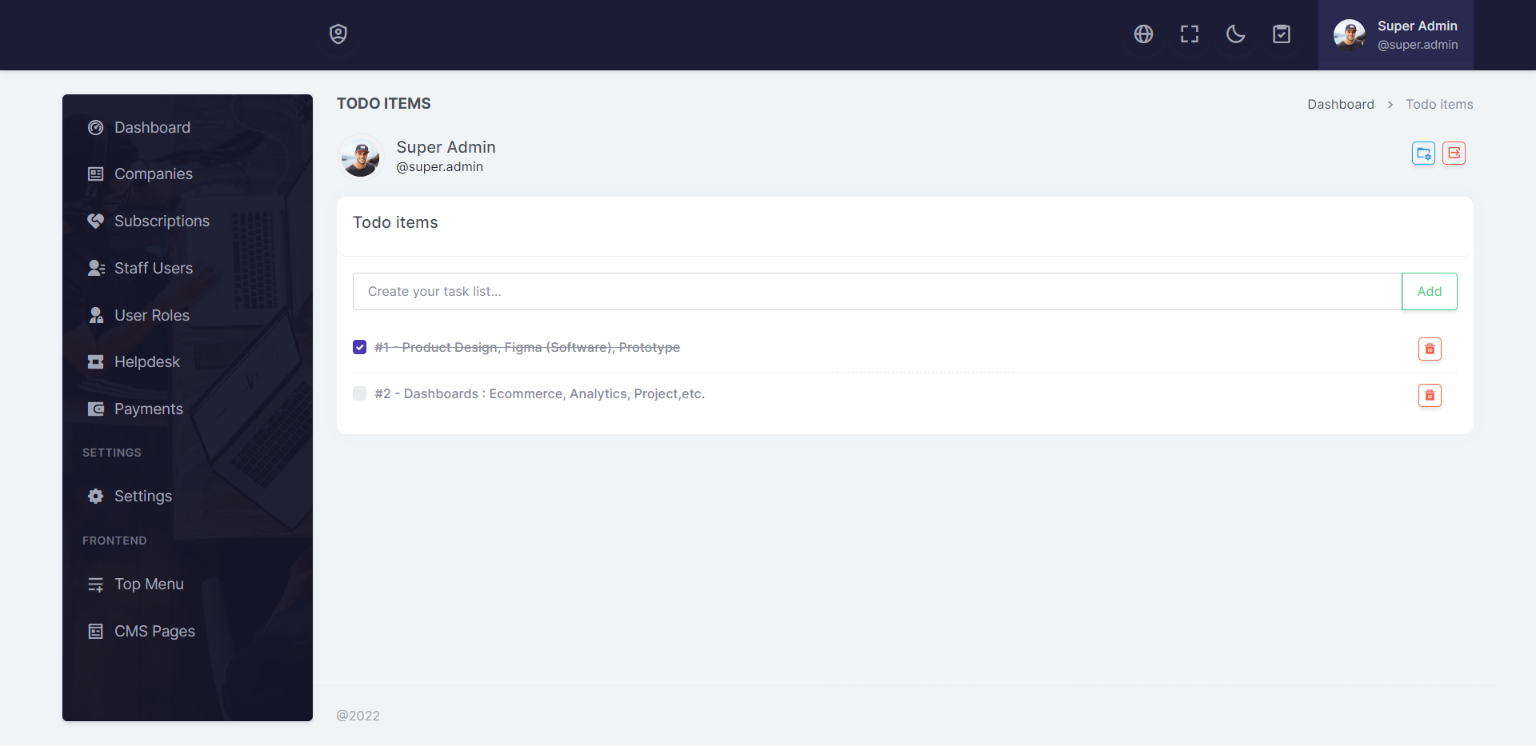
Todo Items
You can add items on todo list page.
